|
 Maker: Capital Model: clip-on Circa: 1964 Price (new): $5.25 Cell type: Selenium Measure type: Reflecting/Averaging |
|
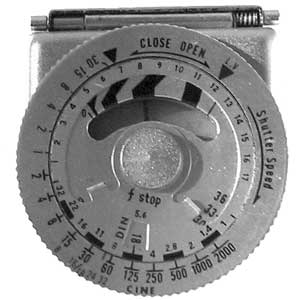
Capital is a Japanese company that makes a variety of meters. I've never heard of them, but I've seen similar looking meters sold under other names, so I suspect that Capital meters are commonly re-branded for the USA market (e.g. this Capital SP-1 looks like the Soligor, and I believe Spiratone had an SP-1 which was the same, and so forth). Probably the smallest meter I have. Like the Fris, its leather pouch was meant to ride a camera neck-strap. The meter itself has two screw-holes that suggest (to me, and confirmed by the ad) that it could be mounted onto a foot and placed in a camera's accessory shoe. How to use it Refer to the photograph of the meter face above. 1. Set the film speed. If you look at about the 6:30PM position (as if it were a clock face), on the inner ring you should see DIN and a little window that shows 18. This is the film speed setting. DIN is a common film speed system: it's popular in Europe and used for movie cameras in the USA. There's a little metal nub that's bent up on that inner dial, it's just above the 1/8th--22 mark at about the 8 o'clock position. Hold the outer ring still and with a fingernail, you should be able to turn that inner ring either way. Turn it until the DIN number that fits your film speed is shown. Here's a conversion table if you need it. ASA and ISO are the same thing, so using that table DIN 18 is equivalent to ISO speed 50. For ISO 100 (which seems to be the norm these days), the DIN equivalent is 21. I can't change the picture above so we're going to assume DIN 18. 2. Point your meter and note where the needle is. 3. Look at the top (11 o'clock and 1 o'clock) positions on the outer ring. There are two arrows: one is black and one is red. If the little door on the front of your meter is closed, use the black marker; if it's open, use the red one. Now rotate the ring so that the marker you're matches up with the needle. 4 If you're using the EV / LVS system, then the number is whatever the marker is pointed at; in the example here, I'm using the black marker so the EV is 7. I'd set my lens to 7. If you're setting your camera aperture and shutter speed yourself (very likely), then look at the bottom of the ring. Those are your speed/aperture combinations. In this case, I have 1/30th at ƒ/11, or 1/60th at ƒ/8, or 1/125 at ƒ/5.6, for 1/500th at ƒ/4, and so on. That's it. The very outer edge of the ring, in red, are the frames-per-second numbers if you're using a movie camera. |
|

.gif)
©opyright by James Ollinger. All Rights Reserved.
Company names and models are registered trademarks of their respective owners
and are not affiliated with this website in any way.