|
|
l.jpg)
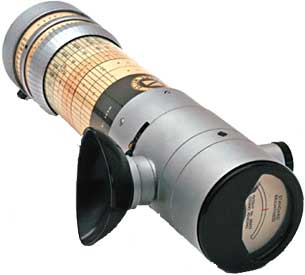
One of earliest spot-meters made. A spot-meter is a reflecting meter, but it has a very narrow field of view; whereas most meters (like a Weston Master) sees a 30° field, spot meters usually read under 5°. Modern spot meters read 1°. This meter reads ½°. If you do Zone System work, that's a helluva tool to have. The other thing that really sets this apart is that it's a comparison meter. There's a little light bulb in it that's powered by a battery; the light makes a spot in the middle of the viewing field, and you vary the brightness of the light spot until it blends with the surrounding image. The light level can then be read on the slide-rule calculator printed on the meter body. There is no selenium cell, no CdS photoresistor, or anything that's photosensitive except your eye. (Well, there is, but it's used to run the calibration meter at the top of the unit.) You may reasonably ask, "if I'm using my eye to judge the light level, then why is this any different than any of the other optical meters, like an Instoscope?" The difference is the light bulb, which is a standard reference you can use for comparison. The Instoscope (and other extinction meters like it) don't have that. The human eye is not good at judging light values objectively because the human eye has an automatic iris that's constantly adjusting. But the human eye is very good at comparing the difference between two adjacent light levels. These meters are highly regarded. Most light meters have very little information about them on the internet, but this one yeilds quite a bit. The now-defunct Huws Home Page was kind enough to host the operating manual, brochure and service docs. I was able to pick up this gem of advice: Do not use the meter with a lighted cigarette in the mouth, otherwise accidental contact may damage the scales. There's also Robert Suomala's excellent site, which turned out to be extremely helpful. As usual, the only meters of this class (i.e. expensive) that I can afford are the broken ones. Mine had a couple of problems. The original bulb was burned out, and replacing it turned out to be an ordeal. The original bulb had a little stem on one side, so when you dropped it in, you could fit a collar around it to keep it in place. Original bulbs aren't available anymore so you have to improvise, and they don't have that little stem. A previous owner "solved" this problem by tacking it in place with a glob of solder. That works, but getting it unsoldiered is harder than it sounds. My father, who was an electronics tech before he retired, was able to get it out with braid and a soldering gun. Then we had to find an appropriate bulb (the local hardware store had one with a screw mount) and we held it in place with a piece of spring that acted as a small nut. Next up was disassembling and cleaning the rheostat base, which was flakey, and then finally opening up the meter on the top to see why the needle was hanging up (we think a small piece of foreign matter was in there, but it's hard to say). So finally I have a working meter. This is one of those meters that can't be used without reading the instructions. At least I couldn't, and I think I'm pretty good at figuring them out. To use this, you have to hold the button in at the base and turn the base until the meter needle on top matches with the red line scribed on it. The red line appears to have been marked by the manufacturer, since every one I've seen is in a different location. That calibrates the meter. There are two thumb slides, one on the back by the eyepiece and one in front under the telescope. The rear one has two positions: one for artificial light and one for daylight, so you set that. The front one is the sensitivity range (it slides neutral-density filters in the light path), so you set it depending on how bright the conditions are (there's bright (e.g. outdoor sunny), medium (indoor bright) and low (indoor poor). Now you set the film speed index, which is the lowest ring on the handle. There are a number of variations of this machine: some are British Exposure Index; mine thankfully is calibrated in ASA. Now you look through the eyepiece. If you're shooting negative film, you find the darkest area of the scene where you want a little detail (Zone II), hold the button and turn the handle until the light just barely disappears. If you're shooting reversal film (or digital), then you measure the brightest area where you want a little bit of detail (Zone VIII). So now you look at the calculator rule on the handle. You pick your desired aperture and your fingernail across to the the proper shutter speed column. There are three columns, so you have to read the one that matches the range you chose (bright, medium or dim). And there you are. |
|


©opyright by James Ollinger. All Rights Reserved.
Company names and models are registered trademarks of their respective owners
and are not affiliated with this website in any way.