|
 Maker: Phaostron Model: C Price (new): $8.50 Circa: 1941 Measure type: Comparometer Battery type: two AA |
|
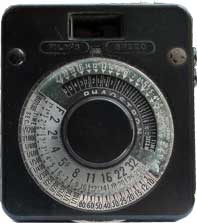
This Model C has two big differences: first is that has a much more complicated (and extended) calculator dial, which measures in both f/stop-shutter combos and in footcandles. The extended range means you can calculate very long exposures for very dimly lit subjects, though I don't think it factors in reciprocity failure. The other feature is a second button which also lights the lamp. This unit has two ranges, a normal light range and that extended dim-light range. So you choose which button to push depending on the light levels, adjust the dial, and there you are. This one also came with a fitted leather case and a neck strap. $8.50 in 1941 dollars. According to a US Inflation Calculator, that's about $125 today in 2010. How to use it: you need AA batteries for this one—make sure they're installed and working. set the film speed (use the Weston scale) using the edge of the ring that's exposed on the bottom of the case. The film speed shows in a little window just underneath the viewfinder. Once you've done that, you're ready to go. Look through the viewfinder and aim the meter at your subject. Press the white button on the upper right side of the case and hold it. This turns on a red light that should be visible in the viewfinder. Turn the dial on the front of the cabinet and the intensity of the light will vary. You want to dim the light until it just balances with the scene in the viewfinder (or until it's just barely disappears, if you prefer). This make take a little getting used to. If you're in dim light, press the red button on the bottom of the case instead of the white button on top. Once you think you've got the light at the right intensity, you can let go of the button and read your shutter/aperture combinations on the front dial. The black-lettering-on-bare-metal (lower half of the dial) is for bright light (white button); the white-on-black (upper half of the dial) is for dim light (red button). |
|

L.jpg)
©opyright by James Ollinger. All Rights Reserved.
Company names and models are registered trademarks of their respective owners
and are not affiliated with this website in any way.