 |
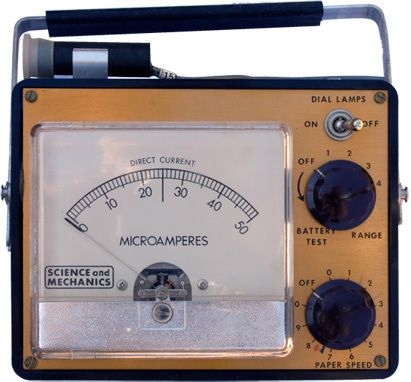
  Maker: Science & Mechanics Model: A-3 Circa: 1972 Price (new): $75 Cell type: CdS Batteries: two D cells and one Mallory RM-630 1.4V coin cell |
|
It appears that they sold darkroom meter kits (probably among other things). I know of three: the Model 250P, the Model 102 (which is the little brother to this unit), and this A-3. There may be others but I am unaware of them. For years I had the instruction manual for this machine but had never even seen it; then Mike Dimov was kind enough to give me one (thank you, Mike!), so here it is. Makes me want to set my darkroom up again. This was written up in the Ed Scully's column in the December 1972 issue of Modern Photography, so I actually know something about this meter (the advertisement comes from the same issue). The Model 102 is a micro-ammeter that runs off batteries and a CdS probe. They have four sensitivity ranges and a calculator dial to convert microamps into something useful for exposure. For $57.50 you got that unit and one probe (you chose which type: standard, mini or an easel). The Model A-3 was similar but it added a second sensitivity dial (called paper speed), a dial lamp that could be switched on and off (this was meant to be used in a darkroom) and you got all three probes. $75 new. There are three different probes, each of which are CdS cells with a wire that can plug into the unit. One is relatively large, one is slim and the third has a wide base to sit flat on a surface (like an enlarger easel). So you could use this as a studio meter, you could read the ground glass on a view camera, you could put it against the eyepiece of a meterless SLR, or under an enlarger. The meter face is calibrated in micro-amps, and you need a calculator dial to convert it into something useful (mine is glued to the back of the case). The A-3 takes two kinds of batteries, a pair of D batteries and a little RM-630 mercury battery. The D batteries power the dial lights, so if you leave them out the meter will still work. The meter itself runs off that little mercury battery, which of course is no longer available. Because the meter needs to be "calibrated" anyway, you should be able to get away with a modern 1.5V equivalent and calibrate accordingly. According to the Ed Scully article (see below), there's a second booklet available that I don't have (I have the assembly and operating manual). The second book showed how to use the A-3 as the basis of a stand-alone transmission densitometer. If I find the booklet, I'll scan it and make it available. But my guess is that if you're handy, you can figure out how to make one anyway. "Ed Scully on Color", from Modern Photograph magazine, December 1972 Sometimes the most obvious things are overlooked until someone wakes you up. My awakening came in college classrooms. Not sitting in a sidearm chair taking notes but sharing the fun of photography with today's college age young people. One fact of most of their lives is the difficulty in raising money for a hobby like photography. Each new piece of equipment is a budget crisis for many. Sensitized by this exposure, I became aware that more of my letters from you asked for help in putting together essential equipment. And, oddly enough, the most requested one was a densitometer. Every darkroom should have a densitometer and it should be an objective one which is independent of personal judgments. Unfortunately, even the newer, economy models of electronic densitome-ters cost several hundred dollars. That's a big improvement over the thousand-plus price tags of a few years ago but still out of reach for many hobbyists. The classic solution is to make your own.
Over the years there have been many homemade densitometers using conventional exposure meters. The basic method was to position the meter cell over a hole in a box containing a standard light source. When you placed your negative or transparency between the opening and the cell you read the meter dial and compared the reading with a table you had worked out by trial and error. Then you longed for a Macbeth or Lektra. Most hobbyists settled for the visually evaluated Kodak Color Densitometer. Today, even that is too expensive for most home darkrooms. So we come full circle back to making your own. In order to read small areas of a negative to be printed or a slide to be duplicated, you need a predictable light source shining through a very small hole. Then you need a very sensitive probe to "read" the density of that negative or transparency. Finally, you need some sort of table to translate the meter dial readings into standard density units. Fortunately, Science and Mechanics has put it all together, with improvements since the first showing of their meters. I'm just going to give you a guided tour through what they have done and let you take it from there. The heart of their homemade densitome-ter is a carefully thought out lightbox; the brain of this essential darkroom instrument is a Model 102 Photometer. And if you have a few more bucks you can substitute their Model A-3, which is bigger, with a magnificently legible dial even under darkroom safelight illumination. Nevertheless, the smaller meter, not much bigger than the standard hand-holdable exposure meters, works very well in the S&M densitometer. Both the Models 102 and A-3 can do double duty as conventional reflection type exposure meters, ground-glass readers for view camera exposure metering, SLR ground-glass or eyepiece light measuring and printing easel photometers using an accessory probe. With an accessory collar you can read through a microscope. And you still have a great densitometer. All you have to do is build the light source. Basically a box with lamp and hole As you can see in the illustrations, your do-it-yourself densitometer is a box that can be a conveniently small IOV2 x 5 x 5 in. with a bracket to hold the meter and a hinged arm to contain the measuring probe. When you buy one of the S&M photometers, you get a copy of Building the Light Source of Your Densitometer. There are some impovements, however, that you might like to add to yours. In its simplest form your lightbox holds a small lamp, a piece of opal glass or plastic to diffuse the light evenly, a 45° mirror and a 1/ 32 in. hole above the center of the mirror. A hinged arm, with a hole to hold the metering probe, and the photometer to provide light transmission values, completes your lightbox construction. In order to add a bit more luxury, you can follow the S&M diagram and use springs to return the measuring head to an opeu position. And you can save battery power by wiring an on-off switch into your meter probe circuit. This last operation will, unfortunately, reduce the usefulness of your photometer for other applications. The solution is simple and costs only $7.50—buy an additional probe for the densitometer head and leave it permanently installed. Then you need only reinsert the conventional probe into the photometer to use it for reflected light measurements and viewing screen, microscope, or other photo applications. A further refinement is an inexpensive voltage regulator for repeatable color printing. You can use the voltage regulator you have for your enlarger.
The heart of any system which gives you filtration values begins with a standard print which you make the hard way. You start with a good guess and then change filters in the printing filter pack until you get a print you like. Then your problem is to find the changes you must make in order to compensate for another subject, another film emulsion, another box of paper or another film development. Fortunately, you wrap it all up into one set of readings of some repeatable part of the negative. Some printers use a standard gray card, others use a flesh highlight and recently we described still another method using the film leader. None of the methods described takes account of changes in the subject's colors or your tastes. And neither will your homemade densitometer. What you do is analyze the gray card, flesh highlight or film leader in terms of its red, green and blue components. To do this you read your standard area three times, once through each of three separation filters, a red No. 25, green No. 99 and blue No. 98. The numbers are those used in the Kodak Wratten Filter system. By placing A lightbox, meter, two booklets and time Building your lightbox is just a matter of following the plans supplied by Science and Mechanics when you buy a photometer. S&M Instruments, 229 Park Avenue South, New York, N.Y. 10003, sells the Model 102 shown in our illustrations for $57.50 and the larger Model A-3 for $75. Easel probes for black-and-white printing, small diameter probes for view camera screen exposure measurements, microscope adapters and probe cells for densitometer heads are all available at moderate prices from the same company. Learning how to use your densitometer is simplified in Kodak's 35-cent booklet Kodak Notes On Practical Densitometry, E-59. And, of course, you need Kodak's Color Dataguide, R-19 which lists for $5.95. Both can be ordered from Dept. 454, Eastman Kodak Company, 343 State St., Rochester, N.Y. 14650. As a bonus, you'll be getting more consistent negatives to print when you use your photometer to read your ground-glass or SLR eyepiece image. That's why you need a photometer and lightbox.—the end |
|

.jpg)
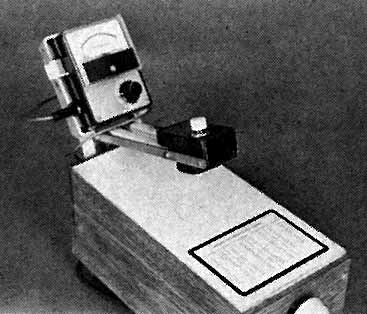 A meter with a probe is essential
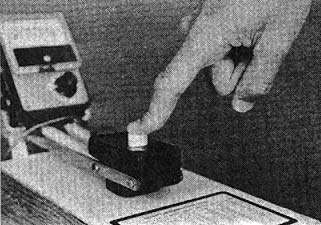 If you have never experienced the extra pleasure of densitometer precision, you will logically wonder, "Why bother?" There are several answers but two make the case best. First, you save money. Second, you get your color under control. The saving money part is easily seen. You measure the densest and thinnest parts of your black-and-white negative. This simple operation tells you what exposure and which contrast grade or variable contrast filter you want to use without making test strips. Using a densitometer as an electronic color analyzer is more difficult but straightforward. The procedure is described in Kodak's Color Dataguide under the section "Color-Printing Method No. 3" and is accompanied by a calculator to make the arithmetic easier. Moreover, a standard color negative is included in the Dataguide with a print to show you what you get on your print.
©opyright by James Ollinger. All Rights Reserved.
Company names and models are registered trademarks of their respective owners
and are not affiliated with this website in any way.