|
  Maker: Photo Utilities (also DREM) Model: Instoscope Circa: 1937 Price (new): $2.60 Measure type: Extinction |
|||||||||
|
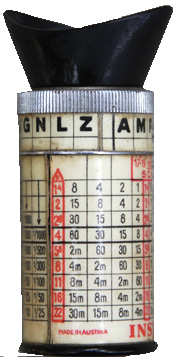
Extinction meters worked on the idea similar to a step wedge, where each section was progressively more dense and harder to read the number or letter in it.
So you peep through this thing and see which is the last letter than can be reasonably seen, because the more light, the more letters will light up; the less light, the fewer. The outside cylinder of this thing is the exposure computer. The top of the cylinder turns, so you match up the letter to an arrow, then find which column matches your film speed, and that gives you your speed/aperture pairs. A nice touch: the eyepiece can be adjusted to focus on the strip inside, so you can use it without glasses. I have two. One is the original DREM made in Austria. DREM is an acronym for "Dr. Emil Mayer," and they made a lot of variations of this meter with slightly different names. It's marked only in Scheiner. I also have one that was made in the USA that is the same thing, except that it's marked in both Scheiner and Weston numbers. How to use it: I'm holding mine upright, eyecup on top, so that the writing reads properly. Just like it is in the photo here. At the top there's the part that turns, and there are two rows. The top row has letters that correspond to the letters inside when you look through it. On mine, underneath the letter D, there's a red triangle pointing down. Just below the ring that turns there's the table with all the f/stops and speeds. And at the top of this, just underneath the ring, there's a row with the Scheiner speeds. Mine has 17-19, 20-22, 23-25, 26-28, 29-31. Rotate the ring until the red triangle points to the Scheiner speed for the film you're using. So for example, let's say our Scheiner speed is 26. You rotate the red triangle to line up with the 26-28 column. You look inside and figure out which letter applies. Let's say it's F. So you find F at the top of the ring and go down that column. Pick a shutter speed from that column. Let's choose the top one, 1/25th. We go sideways along this row until we get to the f/stop list. In this case it's ƒ/1.4. So there you go. If you wanted to add in a filter-factor, let's say you're shooting through a 4x ND filter. You look at the red triangle and two columns to the right there's a 4x mark. You put that on your Scheiner speed column. Then you take your reading, find your letter, go down the column, pick a shutter, and it tells you your aperture. Or you pick an aperture, and slide sideways along the row until you find the column with your letter, and there's your shutter speed. |
||||||||||

.jpg)
©opyright by James Ollinger. All Rights Reserved.
Company names and models are registered trademarks of their respective owners
and are not affiliated with this website in any way.