|
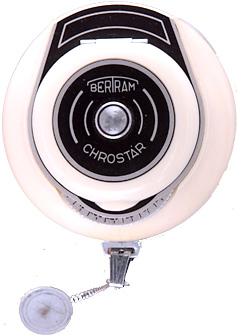
  Maker: Bertram Model: Chrostar Circa: 1952 Price (new): $24.95 Cell type: Selenium Measure type: Reflecting/Averaging |
|
Mine is a later model, as the calculator dial is calibrated for DIN, Scheiner, Weston and ASA. What you do is set the exposure index on the upper calculator dial and that tells you a letter code to use. You set the letter code into the little calculator dial on the bottom and then turn the big dial to match the Light Value on the meter scale. That gives you an aperture/speed pair. The scales look confusing at first but it's easy after you look at it a moment. The scales are calibrated in full half stops, which is nice because that's the way most camera shutters and lenses are stepped. Weston uses 1/3rd stop increments, which works great for film speeds but not so great on camera lenses and shutters. These sold in different colors; I've got two, one in black and this one, which is kind of an off-white. How to use it: flip open the lid (there's a little raised lip on the edge below the "Chrostar" name). On the inside of the lid there's a dial for setting the film speeds. Bertram dials vary and yours may be a little different, but they all work about the same anyway. Mine has two windows: one for DIN (top) and one for Scheiner, Weston and ASA on the bottom. Pick the film speed type you're using and rotate it until the speed you want shows in the window. Example: I set mine to ASA 100. Now look on the outer ring on the top and you'll see the alphabet. Read the letter that's above the top window. In my case, the letter is C. Now on the meter body itself you should see another calculator dial, and again it has two windows. The bottom window should show a letter and the top window should show a numeral. Using your fingertips, rotate the plate until your letter shows up in the lower window (in my case it would be C). Now you're ready for action. Point the meter at your subject and see where the needle falls on the scale. Let's say it points to 9. There's a rotating metal disc underneath the calculator dial. Just below the Letter window, you should see the exposed edge of the disc. There's a scalloped edge to make it easy to turn with the edge of a finger. Rotate this disc and look at the top window on the calculator dial: you should see numbers move across it. Rotate the disc until the number the meter needle points to shows up in this window. In the example above, you'd rotate it until 9 appears. Between the calculator dial and the meter needle face, you should see two bands of numbers. The upper row (black on bare metal) is shutter speeds in fractions of a second; the lower row (white on black) is the aperture. These are your available combinations. Continuing my example (Film speed 100, letter C, dial set to 9) I read 1/500th @ f/2, 1/400th @ f/2.8, 1/60th @ f/5.6, 1/4th @ f/22, and so forth. If it sounds complicated, it's harder to explain than to use. Once you do it a couple times you'll quickly get the hang of it. |
|

-l.jpg)
©opyright by James Ollinger. All Rights Reserved.
Company names and models are registered trademarks of their respective owners
and are not affiliated with this website in any way.