|

 Maker: Gossen Model: Labosix Circa: 1972 Cell type: CdS Measure type: Enlarging Modern Photography Test: June 1973 |
|
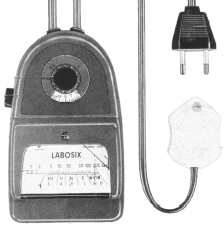
It works fine but it has problems. One is that it's temperamental and difficult to set. Another is that was never designed to be used as much as it was, so doing things like replacing the batteries is a chore. And the last is that I don't like changing the aperture; I'd rather set the aperture in the middle of the scale where it's sharpest and adjust the timer. (Besides, if the negative's Zone 3 area ends up requiring the lens to be turned beyond the range of its aperture scale (which does happen), then you're screwed. You either have to guess at exposure or reset the meter on a different area). The Labosix should solve that problem. It's simply a light meter that sits under the enlarger. You make test prints, calibrate the meter, and you're set. You spin a dial to show you the proper time. I have an Omega color analyzer that does the same thing but the photocell is large and meant to average out everything; I wanted a spot. So I bought this Labosix on eBay. It's not too bad. You put in their step wedge negative and make test prints until the two darkest steps (A and B) are just slightly different: Step A being pure black and Step B being just a tiny bit lighter (which would make Step A = Zone 0 (filmbase + fog) and Step B = Zone I, for you zonies). You leave the enlarger alone, put the Labosix sensor under the projection of Step B and turn the calibration dial until the needle reads the number of seconds you had exposed for. If you change the enlarger settings (the aperture or the height or both), the Labosix will tell you the new exposure time to use. I found it worked fine for that. It's supposed to also tell you the paper grade to use (or filter for those of us using VC). You put in your negative, read the darkest area (Zone 1) then read the lightest (Zone IX), and the needle points to a contrast grade number on another scale. I had more problems with that, though it's probably my lack of practice with it and the fact that I was printing a difficult negative anyway. But it got me in the ballpark, and I can't complain. My only real beef with it is that it has a CdS cell that needs to be protected from normal room lights, or the cell goes night blind in the dark. They should have made a hood or a place to put it when you want to flip the room lights on, because otherwise you have to figure something out (I put a lick of electrical tape over it) to protect it. Next time I'll likely use my Beseler PM2L and see how it goes. |
|

.jpg)
©opyright by James Ollinger. All Rights Reserved.
Company names and models are registered trademarks of their respective owners
and are not affiliated with this website in any way.