|
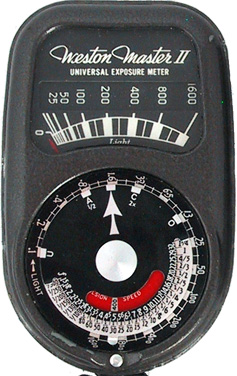
  Maker:Weston Electrical Instrument Model:Master II (Model 735) Circa: 1945 - 1953 Price (new): $30 Cell type: Selenium Designer: Alexander Williams US Patent: 2,528,716 Measure type: Reflecting/Averaging (3D incident available as accessory) |
|
After 1965, on-camera light meters had become so common that the average photographer didn't need a hand-held anymore. While many kept their old ones as insurance, it certainly didn't do anything to spark new sales. The Master II came out right after the war, after the depression, when people had money and wanted to spend it. The Master was an excellent meter, very nicely finished, highly regarded, and well-advertised by Weston. And it didn't hurt that field photographers like Ansel Adams wrote about them in their books or were photographed holding them in their hands. The Master II seems like the iconic one to me; I see it so often for sale, usually at inflated prices because most of them are dead now and the cells can't be replaced. It was also still from the era when it was calibrated for Weston numbers, not ASA, so the modern user needs to make allowances. If you want to see what this looks like inside, check out the autopsy. How to use it: the film speed is the innermost band on the calculator dial. There's a red panel with a little window and a number should show inside it: that's the film speed on the Weston scale. There's a small bare-metal button. It's at the 3 o'clock or 6 o'clock position depending on how you hold the meter (it's at 6 o'clock in the photo above) at the outer edge of the dial. There's also a very small tab on the outer dial, located right by the word "light." Using the fingernail of one hand, press and hold the lock button down and with the fingernail of your other hand, push the tab to rotate the dial. You should see the film speed numbers change. Set this to the Weston speed you want to use. (If you think you're doing everything properly and the dial still won't rotate, it's possible that everything is rusted together, in which case you'll have to take it apart and clean it and put it back together again. Good luck.) Once the film speed is set, you're ready to go. Look at the calculator dial's shutter speed band (it's got black numbers scribed on bare metal). At each end of this band there are little raised tabs that make it easy to rotate the calculator dial. As you do this, look at the outer edge of the dial where the big pointer is. You should see it point (as you turn) to a series of numbers on the outermost band. These are your "light values." So what you do is point the meter at your subject and see where the needle falls. This is your "light value." Turn the calculator dial until the pointer on the dial points to the same number on the outer band. Now you can read the aperture/shutter speed combinations on another part of the dial. Example: I have my speed set to 50. The needle points to 100. I rotate the pointer to 100. That gives me combinations of 1/800th @ f/2.8, 1/200th @ f/5.6, 1/50th @ f/11, and so on. A couple more important things to note: 1. Unlike most meters which have the cell on the narrow top edge of the box, Weston Masters all have the cell on the broad "back" of the meter. Instead of holding the meter at chest level and looking down to read it, you hold the Weston at eye-level. Hold the meter along the edges (as if it were a pair of binoculars) and take care that your fingers don't block the photocell. 2. There are two levels, one for bright light and one for low-light. On the back of the meter, covering the cell, there's a black panel with holes drilled into it. When this panel covers the cell, you're on the "bright" range. To change ranges, look for the little pin that's on the edge of the panel. Push it down (a fingernail works best) and pull gently--the panel will rock out and expose the cell. There's a hole near the bottom of the meter where that pin will catch, and that will lock the panel open. To put it back into High mode, gently pull the panel, rock it back into position over the cell, and press it until it locks into place. The meter automatically changes scales on the meter face depending on the position of the panel, so there are no special compensations to be made. |
|

.jpg)
©opyright by James Ollinger. All Rights Reserved.
Company names and models are registered trademarks of their respective owners
and are not affiliated with this website in any way.