 |
A Beginner's Guide to Enlargers
©opyright by James Ollinger.
All rights reserved.
Webmasters: Please link to this page; Do not copy the contents for use
at other URLs. This ensures that readers get the latest version of this file, and protects
my copyright.
|
|
I . Introduction
Darkroom beginners often ask about different kinds of enlargers and what to look for in one, so I wrote this up. Note that I'm not covering the fancy, high-end enlargers here (mainly because I'm not familiar with them)— but I think that beginners will find this a good starting point toward evaluating enlargers on their own.
An enlarger is really a very simple piece of equipment. It has a head, which
is a light source and some sort of method to try and make the light fall fairly
evenly across the negative area. It has a column, which allows the head to be
placed at various heights away from the easel, allowing various degrees of
enlargement. It has a negative carrier, which holds the film (negative or
transparency) under the light source. It has a focusing stage (usually bellows),
which (when used with an enlarging lens) allows the projected image to be focused.
And it has a baseboard or a wall mount that the column mounts to, which holds
the enlarger column steady and the head upright. (Note: I've been discussing
vertical enlargers, which are the most common. A horizontal enlarger is about
the same, except that the column runs horizontally and the image is usually
projected onto a wall-mounted easel.)
Just about every feature or variation on an enlarger deals with one of the
above parts of the enlarger (usually the light source).
Now let's discuss these things individually.
Return to the Table of Contents
II. The Negative Carrier
The negative carrier is the most basic part of the enlarger. It's a tool that holds the negative
(or transparency) in the proper place. All enlargers are limited by the largest negative that they can
accept, and generally speaking, the larger the negative, the larger (and usually more expensive) the
enlarger.
The most common enlarger sizes are 35mm, medium format, and 4x5. There are
larger and smaller enlargers but they're much less common.
Before you look at enlargers, you want to try and anticipate the largest
negative size that you're likely to use over the next several years. A quality
enlarger will last decades if you care for it. Even a cheap one should last for
quite awhile. If you make accurate forecasts of your photographic needs, you can
buy the proper enlarger to fulfill your needs for a long time to come.
If you know you're going to shoot 35mm exclusively, there will be little
point in buying an enlarger that will handle bigger formats. Likewise, if you
think you're going to try 2 1/4 x 2 1/4 or 4x5 sometime, then buying an enlarger
that will only handle 35mm may prove too limiting later on.
 If you are going to err, try and err toward a larger size. A given enlarger
can take smaller negatives than its maximum size. Thus if you buy an enlarger
that can handle 2 1/4 by 3 1/4 negatives, you can also print 2 1/4 square,
smaller medium format, 35mm, 35mm half-frame, and so on. But you can't stick a 2
1/4 square negative in a 35mm-only enlarger.
If you are going to err, try and err toward a larger size. A given enlarger
can take smaller negatives than its maximum size. Thus if you buy an enlarger
that can handle 2 1/4 by 3 1/4 negatives, you can also print 2 1/4 square,
smaller medium format, 35mm, 35mm half-frame, and so on. But you can't stick a 2
1/4 square negative in a 35mm-only enlarger.
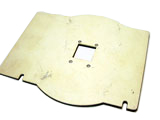
Now a word on the negative carriers themselves: carriers usually hold the
negative in place by sandwiching the negative between two pieces of metal or
plastic. The carrier holds the negative flat and in the proper position. The
carrier has a cut-out window the size of the negative image. Some negatives have
glass in the windows and some are glassless. Both have their good and bad
points.
Glass negative carriers are usually found in larger formats because the large
negative can rest on the glass to prevent sagging. However, roll film can also
benefit because sometimes the negatives curl a little. A negative
that isn't flat may not produce a sharp image across the negative area.
Glass negative carriers are also nice because they can handle the largest
negative they were meant to carry plus any smaller size. Thus you can have one
4x5 glass negative carrier that'll handle all negative sizes up to 4x5 format.
Glassless negatives generally can't do that.
There are some problems with glass carriers, though. One is that they can be
broken, chipped, and scratched; and they definitely collect dust and fingerprints—
all of which may degrade the image. This is particularly true of dust. If you get
glass negative carriers, get in the habit of handling them while wearing clean
cotton gloves, and get a bottle of Spotone (or equivalent) for the prints.
The worst problem with glass carriers is Newton's Rings. This is a swirl that
is caused by the interference pattern of light as it bounces between the glass
and the shiny film base. You can solve the problem by using Anti-Newtonian
glass, which is not completely smooth on the contact surface of the glass. This
irregularity on the glass surface breaks up the interference pattern.
Unfortunately, it may be detectable on ultra-sharp prints and large
magnifications.
Glassless negative carriers are popular because they're less expensive, they
don't have a surface to break or keep clean, and they don't cause Newton's
Rings. They don't squeeze the negatives flat, however, which may cause sharpness
problems if the negative buckles.
Return to the Table of Contents
III. Enlarger Heads
The enlarger head contains the light source (often
called a lamphouse), and there are a number of different kinds. The light source
can't just emit light—it has to put out a light bright enough to allow
reasonably short exposure times, but not too much to heat and damage the film in
the carrier. Just as important—it has to be able to light the negative evenly across
the negative area; otherwise the center of the negative (or worse, some other portion
of it) will be bright and the edges will be dimmer.
There's also the matter of the color of the light. B&W work uses white
light, but color work requires the light to be tinted through filtration. This
is usually accomplished in the enlarger head.
Color heads vs. B&W heads
If you want to make B&W photos, all you need is a head with a white-light source.
If you want to print color photos, however, the light is filtered to obtain a desired color.
There are three common ways to filter the light:

-
You can put the proper color filters under the lens, which can be done on
any enlarger. The down side is that you have to buy a pack of colored filters
and determine what combination of filters to use. There's also a limit on how
many can be used at one time.
-
You can put the proper color filters above the lens and negative carrier,
which requires a "filter drawer" in the enlarger head. Better B&W
enlargers have these filter drawers. Cheapies don't. You still have to buy a
pack of filters and determine the proper combination of filters to get the
required result, but there is no restriction on how many can be used at a
given time.
-
A dichroic head is a lamphouse with filters built-in, and the colors can be adjusted by dial.
This is the typical choice for people who do a lot of
 color printing: They're very convenient, since one doesn't have to sort
through various filters every time the color balance has to be changed; the
filters tend not to fade or change color over time; and since the filters are
in the head, they tend not to get marred or damaged by normal handling.
Dichroic filtration can also be used in B&W work on variable contrast
papers (provided you know the color combinations to set). The disadvantage of
dichroic color heads is that they can be expensive.
color printing: They're very convenient, since one doesn't have to sort
through various filters every time the color balance has to be changed; the
filters tend not to fade or change color over time; and since the filters are
in the head, they tend not to get marred or damaged by normal handling.
Dichroic filtration can also be used in B&W work on variable contrast
papers (provided you know the color combinations to set). The disadvantage of
dichroic color heads is that they can be expensive.
If you are reasonably sure that you are going to print color in
the future, then seriously consider an enlarger with a dichro head, as they can
be useful even in B&W work. Or consider getting an enlarger that can be
fitted with a dichroic head later on.
If you think you may dabble in color later on but the vast majority of your
work will be B&W, or if you're on a tight budget—get an enlarger with a
filter drawer. It's there when you need it and you can ignore it when you don't.
Avoid enlargers with no filter drawer unless the enlarger is otherwise perfect
for your needs and you're willing to deal with below-the-lens filters.
Even Illumination Methods
The lamphouse on the enlarger can't just
emit light—it has to put out light evenly across the negative area—otherwise
the center of the negative will get more light and the edges will get less,
which will cause uneven exposure and a lot of headaches during the printing
session.
There are two common methods to handle the problem of even light illumination.
Condenser heads
Condensers are great big (big enough to cover the negative) lenses—usually
they're two plano-convex lenses with the flat surfaces facing outward and
horizontally and the curved surfaces are facing each other and nearly touching.
Some (usually better) enlargers have a third lens that can be positioned for
different negative sizes, while other enlargers require different size condenser
sets for each film format. Different condensers or settings are used to ensure
that different sized negatives are illuminated evenly.
Condensers collimate the light—they bend the light rays parallel to each
other, which has two effects on the image. The first is that you tend to get a
little better acuity and sharpness of the image, since all the light rays are
coming down perpendicular to the negative film plane. Unfortunately this can
also emphasize defects in the negative and the negative carrier glass—like dust
and scratches. Careful handling of the film and the negative carrier and a
bottle of spotting solution may alleviate that problem.
The other effect of collimated light is called the Callier effect.
When these parallel light beams hit the negative, the light beams get scattered
as they hit the emulsion. On low density areas (which will print as dark tones),
the light passes through relatively unscattered. But in the high density areas
(which will print as highlights), the light rays will scatter more, and the rays
won't be quite as intense when they hit the paper below. This increases the
contrast of the print a little because the print will be a little lighter in
the high values than it was meant to, which may cause blocked highlights. If you
compensate the exposure to get the highlights printed properly, then the low
values may be overexposed. You can fix that by cutting the development down a
little, but may cause a lack of separation in the low values and muddy blacks.
(The fix for that is pre-flashing: giving the paper an over-all, brief
exposure to plain light, which will change the exposure thresholds in the
low values.)
Despite the Callier effect, condenser enlargers are very popular,
particularly among hobbyists and beginners, and many people use them (including
me, though nobody's going to get my photos confused with Adams's or Weston's)
and are perfectly happy with them. Fine art photographers tend to prefer diffusion
heads.
Diffusion heads
A diffusion enlarger has a piece of opaque glass that purposely scatters the
light rays, which does two things: it helps provide even illumination across the
face of the diffuser (and thus even illumination across the area of the
negative), and it provides already-scattered light rays to the negative, thus
minimizing the Callier effect.
Diffused light rays, since they're scattered, tend to lower the acuity and
grain sharpness a little, and dust spots and scratches are less noticeable.
Also, with the Callier effect minimized, the image contrast tends to be a little
lower and the highlights get a little more printing exposure.
Diffusion heads generally have one of two light-sources—a tungsten bulb or a
cold light unit. Tungsten bulbs work well and they're found on the less
expensive units, but they put out a lot of heat, and if the head isn't
ventilated well, the negative may get hot and buckle.
A cold light head uses a big tube or a grid to create even illumination, and
they run much cooler than tungsten bulbs. The disadvantage is that they're more
expensive and they may require special voltage stabilizers and print timers.
For beginners, a cold light machine is probably out of the price range, but a
tungsten diffusion enlarger may be affordable. They are an attractive alternative
to a condenser enlarger.
Return to the Table of Contents
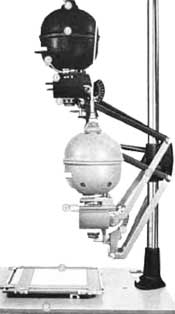
IV. The Column and Baseboard
The column of the enlarger holds the
weight of the enlarger head, and allows the head to be positioned at a given
height above the easel. This is where the "enlarging" comes in.
A good column should do two things—hold the head steady so that
vibrations don't blur the image, and it should move the head smoothly up and down
the column length. Less expensive enlargers usually have smooth columns and
you push the head to the desired height and lock it into position.
Better enlargers tend to have a rack and pinion so the head can be cranked
smoothly into position. Luxury enlargers offer motorized drives.
The baseboard holds the column steady and gives stability to the
whole enlarger. When the head is cranked all the way up, the center of gravity
is high and the whole unit will be more susceptible to vibration. A good baseboard
will keep the enlarger steady and dampen vibration at all enlarger head heights.
When you check out an enlarger, be sure to see how rigid the enlarger is.
An enlarger that rattles or vibrates easily is probably going to be unsatisfactory
in use. A good, steady, rigid enlarger will hold the projected image steady
during print exposure.
Always check the action of moving the head along the column as well, and
see how well it locks into position. If it's difficult to get the head into
a given position—especially when making small changes—then it's going to
be difficult to crop the image on the easel. If the head doesn't lock down well,
then it may get knocked out of position (and out of focus).
Be sure to check how well the column is attached to the baseboard, and
how well the baseboard is suited to the weight of the enlarger. There are
few things more unsettling than having an enlarger topple over in a heap.
Vertical vs. Oblique Columns
On simpler and less expensive enlargers, the column is plumb vertical. For smaller enlargements that's fine, but at some point as the head goes up, the back edge of the image is going to extend back past the column, which limits how the size of the enlargement. Manufacturers usually get around this by allowing the head to swing around for floor projection (you need to put a heavy weight on the baseboard, or clamp it down to keep the machine from tipping over).
Another common answer is to rake the column forward to that the head travels forward as it goes upward, so that the edge of the image never crosses the base of the column. Oblique columns are typically found in larger, more expensive machines.
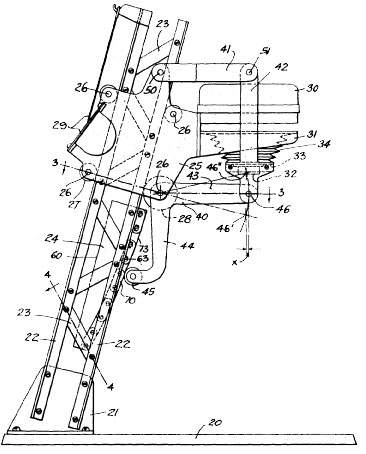
Parallelograms
 On most machines the head is attached directly to the column bracket and that's it. But some heads are attached with an arrangement of bars and springs that form a parallelogram. The whole thing still travels up and down the column, but in addition the head height can be adjusted using the parallelogram while leaving the main column bracket alone.
These enjoyed a vogue in the 1950s and 60s, but mostly disappeared by the 1970s. Leitz used it on their Focomats, and it can be found on many others. An advantage to using them as that the head could be positioned outward away from the column, which solved the cropping problem with vertical columns at high magnification. The chief complaint is that they aren't as sturdy and can't be locked down as well as a direct-attach (no doubt Leitz over-engineered theirs to work well).
I only had one enlarger that had this arrangement, but it was a rinky-dink and I don't want to fault them all for it, but I can completely understand the complaint that they don't hold the head as steady as you might desire.
Return to the Table of Contents
V. The Focusing Stage
Right under the negative carrier and the
lamphouse is the focusing stage. It's made up of a lens board and a bellows. The
distance between the lens board and the negative carrier can be adjusted to bring
the projected image into focus.
Just about any decent enlarger has a rack and pinion focusing mechanism
to make focusing easier. Some enlargers may have a motorized focusing unit. Be
very wary of any enlarger where you have to push and pull the lens board into
focus.
Again, always check the smoothness of the action and how it holds after
you take your hand off the knob. If it's too tight, it'll be difficult
to precisely focus the image. (I had an enlarger with this problem. It took
too much torque to turn the focus knob. I'd get the focus right, let go of
the knob, and the knob would turn backward a little and the image would go out of
focus. I would have to turn the knob a little bit more than I wanted and let it
snap back into position. This doesn't make critical focusing very easy.) If it's
too sloppy, the image may slip out focus the second you take your hand off the
knob. A good focusing mechanism should be firm but precise, and the lens board
should stay exactly in position when you take your hand off the knob.
Autofocus
 Auto-focus doesn't mean the same thing in enlargers as it does in cameras. Really it's more like "follow-focus." The idea is that compose and focus the image once, then the enlarger keeps the image in focus as the head is moved up and down the column.
It's a great feature when it works, because trying to carefully crop and focus an image can be a pain.
The problem is how it's accomplished. In most auto-focus systems, the lens stage is directly coupled with a cam that rolls along a track that's located on the chassis. As the wheel turns, it mechanically adjusts the lens stage.
For this to work properly, the curve of the track has to be mathematically calculated and machined to match the lens. Ideally, the track would be matched to an individual lens at serial number level. So it's not just an 50mm f/2.8 El-Nikkor, but 50mm f/2.8 El-Nikkor #2518010. Another 50mm f/2.8 El-Nikkor will be close, but it may not be quite right. And if you have to manually refocus every time you move the head, then the whole thing is wasted anyway.
Companies like Leitz pulled it off, but they demanded close tolerances in their lenses and their tracks. They also charged a mint for it. Most other companies came close but ultimately, auto-focus never worked as well it should have. Autofocus showed up in the 1950s but were pretty much gone by the 1980s. What does that tell you?
Rangefinders
Some machines come with rangefinder forcus, which is an aid for focusing the image on the easel. Usually there's a special target you set up and then focus on that. I've never owned one and have no first-hand experience, but a) I've read comments that they're better in theory than in practice, and b) like autofocus, they appeared in the 1960s and were mostly gone by the '80s. That suggests to me that they weren't very good.
Return to the Table of Contents
VI. Lenses
A lot of people buy a decent enlarger and then
skimp on an enlarging lens. If you can, skimp on other things and get a good
enlarging lens. A camera may take a bunch of lenses for varying situations, but
an enlarger will probably only need one (or one lens per negative format you
use). An enlarging lens is an investment—a good one will last many years if
it's cared for, and it can be used even when you change enlargers at a later date.
 A good enlarging lens is important because it's the part that does
the important work of forming the image. A mediocre or a poor lens may
have unacceptable light falloff at the edges, it may be unsharp at the edges
(or worse, unsharp everywhere), and may reduce the contrast. It's one thing
to choose to make your images unsharp—but it hurts to settle for unsharp prints
because of a poor lens.
A good enlarging lens is important because it's the part that does
the important work of forming the image. A mediocre or a poor lens may
have unacceptable light falloff at the edges, it may be unsharp at the edges
(or worse, unsharp everywhere), and may reduce the contrast. It's one thing
to choose to make your images unsharp—but it hurts to settle for unsharp prints
because of a poor lens.
Some people ask if a camera lens will work on an enlarger. Yes, it can: but
it won't work as well. Enlarging lenses are flat-field lenses—they're optimized
to project a flat image sharply. A camera lens is optimized for three
dimensional scenes. Camera lenses can be used if : a) you're in the field and
you need the camera lens to do double duty, or b) you're on a seriously tight
budget. Otherwise, I advise buying a regular enlarging lens and be done with it.
I also advise buying as good a lens as you can reasonably afford. You don't
have to take out a second mortgage to get a good one—and it'll be a better
investment than a lot of other things if you do much printing. A decent enlarger
with good optics is capable of making sharp prints. A great enlarger with a poor
lens is probably going to make poor prints.
Many people write and ask if Brand X Model Y lens is any good. Years ago, a
man named Ctein wrote an enlarger
lens buying guide in the now defunct Darkroom magazine. If your local
library or camera club has back issues, get a hold of the January 1989 issue and
read the article. It's also in his book Post Exposure.
There are three big companies that make quality enlarging lenses (there
are other companies, but these guys are the big names): Nikon, Rodenstock,
and Schneider. Unless the lens itself is defective, any lens by these
three companies is quality. Some of the lenses may be better than others, but
I don't think you can go wrong buying them.
Generally, the more elements a lens has, the better it is. Quality lenses
usually have six elements. Mediocre lenses have four. And cheap lenses have
three.
Nikon makes the El-Nikkor line of six-element lenses. Rodenstock makes
several—their budget (four element) line of Rogonars and their six-element
Rodagons. Schneider makes a cheap-o line of three-element Componars, budget
grade four-element Comparons, and their quality six-element Componons.
Beseler Photo sells a line of lenses under their own name. The Beselers are
three element. The Beseler-HD lenses are far more desirable six-element.
Occasionally you may see APO or apochromat used when describing
a lens. An apochromat lens is considered to be highly corrected (and thus
sharper).
 Enlarging lenses, like regular camera lenses, come in different focal
lengths. You want to select a lens that will work well with the negative format
you are using. If you select a lens that is too short, the projected image will
be very wide and you'll have the enlarger head down low to make
small-magnification prints, and the bellows may not collapse far enough to be
able to focus the image. If the lens is too long, the enlarger head will have to
be pushed high to make large magnification prints, and the bellows may not
extend far enough to focus the image. Also, a given lens can only cover a
certain size negative. You can put a long lens on a small negative, but a short
lens may not cover a large negative.
Enlarging lenses, like regular camera lenses, come in different focal
lengths. You want to select a lens that will work well with the negative format
you are using. If you select a lens that is too short, the projected image will
be very wide and you'll have the enlarger head down low to make
small-magnification prints, and the bellows may not collapse far enough to be
able to focus the image. If the lens is too long, the enlarger head will have to
be pushed high to make large magnification prints, and the bellows may not
extend far enough to focus the image. Also, a given lens can only cover a
certain size negative. You can put a long lens on a small negative, but a short
lens may not cover a large negative.
Here's a very general guideline for lens sizes and negatives:
| Negative format | Use Lens focal length |
| 35mm | 50mm - 75mm |
| 2¼ x 2¼ (6x6) | 75mm - 90mm |
| 2¼ x 3¼ (6x9) | 90mm - 105mm |
| 4x5 | 135mm - 150mm |
| 5x7 | 180mm - 240mm |
| 8x10 | 240mm - 360mm |
Whenever you look at a lens, be sure to check out:
- The lens surfaces. Are they scratched? Is the coating spotty or coming off? Are they clear or cloudy?
- Is the diaphragm action smooth and proper? Do the leaves look oily and dirty?
- Does the lens look like it may have been opened and worked on?
Don't pay a lot of money if the answers to the above questions
are unsatisfactory. There are a lot of lenses in the world. If you think a lens
is bad or suspect, find something else.
After you buy a lens, run print tests on it. Get a super-sharp negative (if
you have one) and make a test print. Is the print sharp? Are the corners sharp?
Check the light falloff on the edges.
If you have an enlarging exposure meter, check the marked aperture settings
to see if they're accurate. My first enlarging lenses were Cheapos with nifty
click-stop f-stops. I could open and close the lens in the dark by counting the
clicks. There was just one little problem—if I changed the aperture on the
lens, the exposure didn't always turn out the way I had predicted. This was
particularly true if I changed the enlarger head height and calculated the
proper exposure settings for the new head height. Later on, when I was checking
the enlarger out for some other reason and was going crazy because the meter readings
weren't consistent, I found out the lens aperture click-stops were off. One
click stop didn't necessarily open or close the diaphragm a full stop. And the
click-stops themselves were very sloppy—I couldn't open the lens a stop and
close it back down and get the original reading! Lessons learned: 1) buy quality
lenses. 2) Always check the lens aperture markings for accuracy.
Bad lenses = frustration = expensive paperweights.
Return to the Table of Contents
VII. Alignment
In order to make a sharp print, the enlarger
ought to be in alignment. This means that the baseboard (and thus the easel),
the lens board, and the negative carrier are all parallel to each other, and
that the light path goes right down the middle of the negative and right down
the middle the lens and hits perpendicular to the baseboard plane.
Most good enlargers are going to have adjustment screws so that the enlarger
can be aligned. Cheap enlargers won't.
When you buy an enlarger, the first thing to do is to align it or have someone
do it for you. If your enlarger came with instructions, it should tell how to
do it. If not, it shouldn't be difficult to figure it out. If you're not
mechanically inclined or you don't have decent tools (you'll need a good bubble
level—though there's a company that makes an alignment tool that works using a
beam of light and a mirror), get someone else to do it. An out-of-alignment
enlarger may not focus the image properly at any or all head positions, and the
light illumination may be uneven. I know I'm beating this message into the
ground, but there's no point in buying a good enlarger and a quality lens to
make bad prints simply because some adjustable plates are askew.
Return to the Table of Contents
VIII. Buying Advice
It's a buyer's market out there, since everyone's going digital. My opinion on things to consider if you're just starting out:
- Get a popular make. In the USA that means Beseler and Omega, and to a lesser extent Durst. In Europe it would probably Durst, maybe LPL. Elsewhere--look around. There are several good reasons why I suggest this:
- It's easier to get parts and accessories. Even if you don't want something now, you might want it later. It could be something major like a different lamphouse, it might just be a different size negative carrier. Regardless, it's infinitely easier to get spare parts or accessories for a popular enlarger than a rarer one. Example: I own a Vivitar 356 which I'm particularly fond of. It's a great enlarger but it's somewhat rare. If something breaks on it I will be hard-pressed to fix it without buying another enlarger as a part-donor. Even standard accessories like the negative carriers are difficult to find and not easy to make from scratch.
- There's a big knowledge base. The major manufacturers sold many enlargers and there are legions of people who used them. If you ask a question on an advice forum like Photo.net or APUG, you're far more likely to get answers about a Beseler, Omega or Durst enlarger than a Vivitar, a Sun-Ray, a Hansa, etc.
- Make Sure It Works.
- Make sure the chassis is rigid because one of the primary requirements of an enlarger is to hold everything still while the image is being projected. If it can't do that, it's no use to you at all.
- Run the head up and down the column and make sure it's smooth and locks in place. Run the head all the way up to the top and see how stable it is.
- If the head rotates 90° for wall-projection, try it. Listen for rattling or anything that might be loose in the lamphouse.
- Turn it on and make sure the lamp works.
- Look inside the lamphouse. If it's a diffuser, is it intact? If it's a condenser, do they look secure and in good condition? Does everything look aligned?
- Does it have condensers? If it's supposed to, make sure it does. Condensers have a habit of walking off, especially if they're easily removed (some units have different sized condenser sets, so you match the set you need with the film format you're using).
- Try the bellows focus. Is it smooth? Does it hold nicely?
- Look at the bellows. Pinholes are annoying but can be patched. Tears are harder to fix. Bellows are tougher to replace (i.e. hard to find or expensive). I don't suggest trying to make them yourself unless you're experienced.
- If there's a lens, check it out. Look for scratches, fungus, etc. Check the action of the diaphram. It should work easily and smoothly.
- If there's no lens, is there a lens board? You have to mount the lens on the enlarger somehow. This is typically the easiest part to fabricate yourself, but I've done it and it can still be a pain. Also--modern enlargers typically are bored for a 39mm hole, and that's a standard size for enlarger lenses. Older enlargers often came with their own lenses and the sizes are anything-but. In other words, it may not be so easy to remove an old Foctar lens and replace it with a Componon. Very likely you'll need another lens board.
- How's the baseboard? It's easy to overlook, but check out the condition, especially where the column mounts, because you don't want that heavy enlarger head coming down by accident.
- Make Sure It's Complete. That's fairly easy on simple machines, but tougher on more elaborate models. I bought a Super Chomega II D-5 at a thrift shop, got it home and found out that it didn't have a power supply. I had a tough time finding one, and the one I got was dead and had to be repaired (no small effort). Absolutely, positively make sure that if the enlarger has special equipment, like negative stages, lens boards, accessory condensor lenses, that you get them. It might be more difficult to replace missing pieces than you imagine.
- Don't Pay Extra for Autofocus. See my coments above about autofocus. In short--it probably doesn't work. If you like the enlarger and it's an autofocus model, go ahead and get it. Just assume that you'll be manually focusing it anyway.
- Be Skeptical of Computers and Electronics. I love computers and electronics, but they're hell on earth to fix if you don't have the schematics and repair manuals, and those are hard to get. It's also difficult-or-impossible to get parts. If a metal part on the chassis breaks, a lot of people can fabricate a new part. You can't do that with electronics. I'm not saying to avoid buying an electronic marvel, but absolutely, positively make 100% sure it works properly before you buy it.
- Get the Owner's Manual. Unless it's a super-simple machine like an old Federal, the owner's manual is an annoying but worthwhile expense. It's annoying because some places will charge you $15 or $20 to get a photocopy of it. You can also ask around because if you ask nicely, someone may email you a PDF copy or point you to a link. Regardless it's worthwhile because the better ones
- tell you how to align the machine
- explain all the features and how to use them
- will have a parts list in case something breaks
- Get a Repair Manual if it's available. It's unlikely, but if it's available at a decent price, it may be a good thing to have.
- Get a Good Lens. Read my section on lenses above. You don't have to sell your car and buy an APO, but try to get a good 6-element lens that's the proper size for your needs. Used lenses aren't as cheap as enlargers, but it's a buyer's market there too and you can get a very good lens at a decent price. Plus you can use a good lens on different enlargers--you're not stuck with a proprietary lens mount system like you are with cameras. A good enlarging lens is a long-term investment.
- Consider a Bigger Format than You Need. I've always wondered this and then was pleased to see Arthur Kramer discuss it in one of his old columns in Modern Photography magazine (Feb 1968). Two important things about projected image quality: 1) the lens is sharper in the center than at the edges, and 2) illumination typically degrades at the edges. If you're enlarging 35mm negative on a 35mm format enlarger with a 50mm lens, the enlarger is designed to illuminate a 35mm negative, and the lens just covers it--that means center and edges. But if you put a 35mm negative in a 6x6cm enlarger and use a lens that covers a wider area (like a 75mm or a 90mm), there's excess area on the sides. You're working more toward the center of the lens where image quality is best, and the illumination is probably more even across it. Even more so with larger format enlargers.
So does that mean you should buy a 4x5" (or larger) enlarger even if you're only going to print 35mm? Not necessarily, but there is a possible increase in quality. Considering the very large increase in bulk and weight every time you go up a format, I wouldn't exactly advise buying a 4x5" if you're only going to use 35mm. But definitely consider a 6x6 or 6x9cm machine. If you plan on doing work with medium format, definitely consider a 4x5" enlarger, and so on. And conversely--if you find a 6x9cm or a 4x5" enlarger you think is wonderful but hesistate because you know you'll never need to go that big--you can still justify it from a quality perspective.
XI. Further Reading
If you want more information on enlargers, I
suggest:
Ansel Adams: The Print.
This is where I got and confirmed the bulk of
my information. It is the standard photography text against which all others are
compared. The book isn't as densely illustrated as others and it can be
intimidating for beginners, but Adams's writing style is very lucid and
readable, and I highly recommend looking at it at some point.
J. Ghislain Lootens: Lootens on Photographic Enlarging and Print Quality.
This slim volume is long out of print but shows up at the used bookstores
from time to time. It's out of date (my 7th edition is from 1967), but much of
the information is still useful. It is a very readable, useful book. If you find
a copy at a used bookstore or photo shop or library, get it.
Ctein: Post Exposure.
It's really an advanced text, but very much worth a look when you are ready to expand your expertise.
Ctein wrote the aforementioned article on enlarging lenses, and he also discusses enlargers in this book.
Also see his website: http://www.plaidworks.com/ctein/.
Return to the Table of Contents
Return to the Guide to Enlargers menu
Return to the master menu

