
Introduction
 The three Simmon brothers began producing enlargers in the mid-30s and are still in business today (as
OmegaSatter). The original company was
Simmon Brothers, and the greek Ω symbol was the logo; but over the
years the symbol became the name of the product. Enlargers by Simmon Brothers
are almost always referred to as "Omega" enlargers.
The three Simmon brothers began producing enlargers in the mid-30s and are still in business today (as
OmegaSatter). The original company was
Simmon Brothers, and the greek Ω symbol was the logo; but over the
years the symbol became the name of the product. Enlargers by Simmon Brothers
are almost always referred to as "Omega" enlargers.
Omega enlargers typically follow a reliable name scheme: the letter designates the format size of the enlarger (i.e. the largest negative the enlarger can accept); the following number indiciates the model generation. A "B" size enlarger is larger than an "A", a "D" is larger than both, etc. Typically the higher the number, the more recent the model. E.g. a B-22 is more recent than a B-3.
The letter formats are: "A" (35mm), "B" (2-¼-square), "C" (3-¼-square), "D" (4x5), "E" (5x7) and "F" (8x10).
There are some exceptions, as noted. Marketing departments love to depart from a standard naming scheme, and in some cases a very popular model enlarger (such as the D2) remained in production after more recent machines were discontinued.
To the best of my knowledge, the XL designation refers to an extended-length column.
I have a few of Instruction Manuals and brochures available for download. 
Quick Comparison
| Model | Mfg | Col. Type | Col. Height | Lens Focus | Focus Method | Baseboard | Price | Notes |
|---|---|---|---|---|---|---|---|---|
| D | 1938-1941 | Single Tube | 60" | Bellows | Manual | Unknown | C and D models had interchangable condensor sets | |
| DII | 1941-1954 | Dual-Rail | Unknown | Cone | Manual | Unknown | $186 (1947) | Very similar to the D2. Used "lift and lock" to set head height. |
| D2 | 1954-1979 | Dual-Rail | Unknown | Cone | Manual | Unknown | An updated version of the DII. Used a rack-and-pinion to set head height. | |
| D3 | 1954-1979 | Dual-Rail | Unknown | Cone | Autofocus | Unknown | Autofocus version of the D2. | |
| D4 | 1959-1973 | Dual-Rail | Unknown | Cone | Autofocus | Unknown | Color head version of the D3. Modern Photography Test June 1970 | |
| D5 and D5XL | 1975-onward | I-Beam | 69" (XL version) | Bellows | Manual | 22"x24" | $1,155 | XL version is the current production model. |
| Prolab D6 | 1966-1979 | Dual-Rail | Unknown | Bellows | Manual | Unknown | Premium version of the D2. | |
| Super D6 Prolab | 1975-1982 | I-Beam | Unknown | Bellows | Manual | Unknown | Premium version of the D5XL. | |
| D5500 | 1982-1997 | Solid column | Unknown | Bellows | Manual | Unknown | $1,249 | Modernized, high-end, computerized colorhead successor to the D5. -- Reviewed Darkroom Photography, May 1983 (Vol 5 #4) |
| Prolab II | 1985-1997 | Solid column | Unknown | Bellows | Manual | Unknown | A D5500 with a B&W head. |
Series Comments
A very long and successful line of enlargers for Omega; they crossed the line between professionals and advanced amateurs by being rugged, solid, and very capable. While they're larger and heavier than the medium-format sisters, they could easily print smaller format negatives by simply shifting condenser lenses (when using a color head, not even that was required). Because they were rugged, they were very popular in schools and rental labs; many students learned darkroom work on an Omega D-series enlarger.
Because the later models, beginning with the D2, enjoyed a long production run, parts and accessories are relatively easy to find, and repair of the mechanicals are not difficult. One of the neat things about the D chassis is that many Omega components and accessories fit it directly or can be made to fit with adapter kits.
Model Comments
Model D
The first of the series, it was a sister to the original C model, but scaled up to to handle 4x5-inch film.
Model DII
A complete revision of the original D, this would largely set the standard for the series for the next thirty years. Most significantly the tube column was replaced by the dual-rail, and the lens cone replaces the bellows for the focusing stage (see notes for the D3 below for more about the lens cones). The head still uses a "lift and lock" method to set the height. I have a scanned copy of Omega's DII catalog and Guide available.
Model D2
This is the updated version of the DII. It shares the same basic design, but has a number of important updates. The most important include the change to a rack-and-pinion system to crank the head into position, as opposed to the old "lift and lock" system.
This was Omega's bread and butter system for decades, and they sold so many that it is still easily found, parts and accessories are still available.
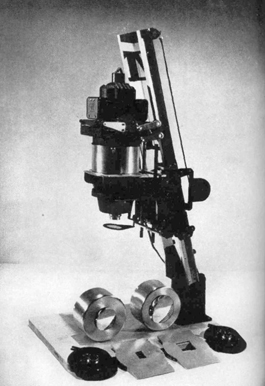
Model D3
.jpg) I owned this particular machine so I'm going to discuss this more fully than I have others.
I owned this particular machine so I'm going to discuss this more fully than I have others.
By the catalog, this is a D2 with "autofocus," the first of the D series enlargers to get this feature. Autofocus meant that if you set the head height and focused the image, the image would remain in focus as you changed the head height. This was a very nice feature for cropping, since changing the magnifcation means changing the focus, and trying to precisely crop a photo this way can be an exercise in frustration. The autofocus was done mechanically by means of a wheel that rode along a metal fin, and as the wheel turned, it adjusted the lens board. This required the metal fin to be mathematically sloped and matched to a specific lens; so if you have the lens and fin combination, you were gold; if you didn't, no autofocus. My D3 accepts three autofocus fins, and each one is marked for a specific lens (which I don't have), so theoretically I could interchange three different lenses and use the autofocus feature.
The D2 and D3 use what I refer to as the "dreaded" lens cone. This is (to me) an awful feature. Different lenses have to sit at different distances from the negative carrier in order to focus properly. Most enlargers put the lens on a board, tied the board and the negative stage together with bellows, and the distance could be adjusted accordingly. Not Omega. They used a bellows for part of it, and a metal cone for the rest. You had to buy a matching sized cone for each focal length lens you wanted to use; so if you had a lens cone for a 135mm lens, and you suddenly acquired a 75mm lens, you needed another cone. I never understood the point of using that cone system, though I suppose if you always used the same lens, there were no problems.
Another unusual feature of this Omega was the method of lifting the lamphouse. Every manufacture has some way of dealing with the negative carrier. Beseler used a little rack-and-pinion to lift the head up to release the negative carrier. Omega used a cantilever system to lift the head up. Maybe mine is out of adjustment, because it never drops down nicely onto the carrier, it drops down at a slight angle and then adjusts itself into place. Not a problem, but it looks sloppy.
On the plus size, the D3 (and D2) had a beefy, metal Omega chassis that was built to last. It is solid and meant to be a workhorse. Changing the head height is easy via the rack-and-pinion crank, the focus knob is easy and free of play, and the whole thing is solid (except for the autofocus fins, which tend to rattle) and sure.
Mine came with a condensor lamphouse with a door so the condenser lens could be adjusted for the negative size. I bought a Chromega head for it, but it will not fit on the chassis without modifications, and I never got around to that project.
Model D4
When Omega decided to introduce the Chromega color lamphouse for their enlargers, they decided they needed a bigger, redesigned chassis to handle it. The D4 was a D3 that went to the gym. However, Omega later introduced a smaller "Super Chromega" lamphouse that could fit on the D2/D3 chassis, and the D4 quickly became obsolete.
The following unsigned review appeared in Modern Photography magazine, June 1970. I have edited it a little for brevity.
Specifications: Super Chromega D-4 color enlarger. Accepts all negatives to 4 x 5, interchangeable integration spheres, lenses and autofocus tracks, quartz-iodine illumination. Other Features: Blower cooled lamphouses; sandwich type negative carriers; cyan, magenta and yellow filtration may be dialed in, in values from 0-180, two-position power supply. Price: $985.
This enlarger is designed for making color prints with maximum convenience and precision. It is a more sophisticated version of the time-tested Chromega color enlarger.
Let's begin by examining the optical system. There have been basically three illumination systems to choose from in an enlarger; condenser, diffusion and cold light, which is a form of diffusion. They all aimed at the same thing; even illumination across the field, low heat and sufficient brilliance to make short exposure times practical. Some systems work better than others, depending on the enlarger design.
For color printing, other problems present themselves. Cold light can't be used because it has a discontinuous spectrum with certain colors missing. Straight diffusion is slow and often uneven. Condensers are even and fast, but every dust spot shows. And spotting color prints is a time-consuming and difficult chore.
The integrating light sphere of Chromega and now Super Chromega add a fourth light source, one that is even across the field, bright and diffuse enough to illuminate much spotting. It was designed to provide the best of all possible enlarging conditions. Here's how it is designed. Visualize a sphere. Cut a 1:" hole in each side. Mount a quartz-iodine lamp in front of each hole to brilliantly light up the inside of the sphere. Cut an opening at the bottom of the sphere the size of the negative and you have the basis for the Chromega system. The quartz-iodine lamps provide intense brilliance. The sphere concentrates the light but keeps it diffuse enough to minimize dust.
Now let's make an addition or two. Add blowers to keep the lamps cool and place filters between the sphere and the lamp. Make the filters stepless and graduated from 0-180 in cyan, magenta and yellow. That's the basic Chromega system design.
The Super Chromega is characteristically engineered Omega design. Inclined double girders, 40 in. high, give rigid support to the lamphouse, and it's an autofocus enlarger, supplied with three lenses, three carriers and three spheres. The lenses on our test machine were supplied in 50mm, 105mm and 135mm focal lengths and each came with a specially ground cam to insure accurate autofocus performance. The cams were installed in seconds and each was held in place by a single pin.
The carriers, 35mm, 2¼ square and 4x5, are also typical Omega designs. They're glassless, stainless steel units with positioning slots at the rear, and they fit together perfectly. The integrating spheres supplied were "DA" for 35mm, "DB" for 2¼x2¾ and "DD" for 4x5. They cost $95 each.
To set up for any negative size is simple. The lens mount slides in until a slot in the board is stopped by a pin on the enlarger. This takes about 3 sec. Carriers are changed faster than it takes to write about it. Pull a lever at the left side of the head, lifting the lamphouse. Then change the carrier and lower the lamphouse. Changing spheres, however, is a bit more work. First, pull a small lever at the right of the lamphouse. This lifts the filter wheels clear of the sphere. Now remove a light baffle at the top of the housing by just lifting it away. Swing two sphere-catching levers on each side of the lamphouse and pull the sphere upward. Replace with any other sphere and reverse the procedure. Place the focusing roller on the proper track to match the focal length of the lens. It takes about 2 min. to change from one negative size to another and that's pretty fast. Let's assume we have just set up for 35mm. The lamphouses are being fed by a special power supply which goes through a 400-watt voltage regulator. Insert a negative in the carrier and the carrier into the enlarger. Now turn on the voltage regulator. Turn a switch on the power supply to "on"and a pair of blowers go to work keeping the quartz-iodine lamps at a safe temperature. The blowers plus the regulator give off more than just a faint hum. In fact, it's downright noisy.
Now turn another switch on the power supply to "low focus" ... hit the focus switch on the timer and the enlarger is on. You need focus just once; after that the unit is completely autofocus throughout its entire range. The enlarger moves up and down on the column effortlessly due to good counterbalancing. A crank moves the head. A small locking knob locks the head at any position.
To make an exposure, switch from "low focus" to "high print" and the brightness suddenly increases. You are ready to make a print. This two-position switch saves the lamps from an early demise. Good idea.
Just how the Chromega head is set depends on the type of prints you are making. The filters are operated by three knobs. One on the right controls cyan filtration. Two on the left control magenta and yellow, respectively. To make black-and-white prints we set the filters to 0-0-0 to dial out the colors. Working in color you can simply dial in any filtration instantly.
But few serious color printers these days work by guess and by gosh. They use reliable color analyzers. The analyzers have been standardized by making one perfect print and feeding the data into the analyzer (with an ordinary enlarger you experiment with individual filters until the analyzer is zeroed). This might take quite a long time, with much fumbling and trial and error. And here's where the Chromega system really shines. You place the probe of your analyzer under the lens (or on the baseboard, depending on type) and by simply turning the Chromega dials until all needles zero (or null) the problem is solved.
During the tests we got good prints every time after initial standardization. And that was without exception. There is little doubt that the Chromega's design provides a fine color head which lets you work easily, quickly and accurately. Most prints were spotless even hough no special care was used in leaning the negatives. As an extra feature, the CP filters may be used for variable contrast papers.
One point bothered us. How could machine having two blowers in operation not suffer from vibrations? So we tested. First we made the best print we would on our standard enlarger. Then we made another print on the Chromega. It was about ½ paper grade softer in contrast but no less sharp.
The entire machine is easy to clean. Everything comes apart nicely. The quartz-iodine lamps twist out easily. Maintenance is limited to occasional use of petroleum jelly on the moving parts and replacement of the filters every few years.
We found the Super Chromega to be an outstanding autofocus enlarger for both black-and-white and color prints.
Model D5 and D5XL
This was the successor to the venerable D2, the big redesign to bring the Omega D series into modern (1975) times. It was so successful that it is still in production. The dual-rail was replaced with an enclosed column. The damned lens cones were tossed in favor of longer bellows, the lamphouse lifting mechanism was re-engineered, among other things. The D5XL is the extra-long column version of the D5 chassis.
I replaced my D3 with a Super Chromega D5XL, so I can speak a little about this first hand. I haven't used it yet so I'll discuss that at another time, but I did mention repairing the Chromegatrol, and it is in my darkroom.
It's a monster! I went from a Federal medium-format to the D3 and I thought the D3 was huge. The D5 didn't look any larger until I actually tried to put it on the darkroom counter where the D3 was--holy smoke. The baseboard sticks way over my countertop, and it looms over everything like a gargoyle.
[Prolab] [Super] D6 [Prolab]
This is where someone in marketing should be shot. The original Prolab D6 was a D2 with additional features, such as a 3-lens turret and full focusing bellows instead of that infernal lens cone. When the D2 was retired, the Prolab D6 went with it. When Omega introduced the D5 chassis, rather than name the deluxe model something else, they named it the Super D6 Prolab. Got that? Except whereas the original D6 had been a significant upgrade to the D2, this D6 was only a few extra tweaks away from the D5 (and D5XL).
Model D5500 and Prolab II
This was to be Omega's high-tech successor of the D5. There were a number of enhancements and simplifications to the chassis. The big difference was the computerized colorhead. But the D5500, while sweet, was expensive and did not supplant the older, workhorse D5. The D5500 was succeeded by the Prolab II.
The Prolab II is essentially a D5500 chassis with a B&W condensor head instead of color.
The D5 and D5500 were made interchangable so that you can mix and match the D5 and D5500 chassis, condenser head, Super Chromega D lamphouse, and the D5500 colorhead, to make six different enlarger combinations. Or start with a D5 and upgrade to a D5500 in increments.