Introduction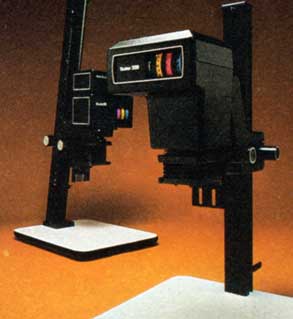
Vivitar is a manufacturer/distributor based in Oxnard, California. Not too much else known about them; they don't appear very interested in sharing their heritage or history (I believe they were formed from a merger between Ponder & Best and SCOPUS, but I'm not certain of it). I don't know how much they directly manufacture; I believe they primarily imported foreign-made enlargers and branded them with the Vivitar name as they do with their lenses and cameras.
Vivitar sells mid-tier equipment, and their enlargers follow that pattern. They break easily into two series: the B&W E series from the 1970s and the color VI series from the early 1980s. Unfortunately I know next to nothing about the E's, so I'm limited to what I've been able to gleen from forum questions and eBay descriptions. The VI and 356, however, came out when I was just getting serious about darkroom work, and I remember the splash they made. I still own a 356, so I can discuss that first-hand.
Quick Comparison
| E-32 |
1971 |
2-¼ x 2-¼" |
n/a |
n/a |
n/a |
Single post |
No |
Yes |
Uses squeeze-handle column-height adjustment |
| E-33 |
1971 |
2-¼ x 2-¼" |
16 x 12" |
Double condenser |
Rack & pinion |
Single post |
No |
No |
|
| E-34 |
1972 |
2-¼ x 2-¼" |
14 x 18" |
Double condenser |
Friction |
Single post |
No |
Yes |
Uses squeeze-handle column-height adjustment. Modern Photography Test Aug 1972 |
| E-36 |
1970s |
n/a |
n/a |
n/a |
n/a |
Single post |
No |
No |
|
| E-54 "Son of Grabber" |
1971 |
2-¼ x 2-3/4" |
n/a |
n/a |
n/a |
Single post |
No |
Yes |
Uses squeeze-handle column-height adjustment |
| E-74 "Grabber" |
1971 |
2-¼ x 3-¼" |
n/a |
n/a |
n/a |
Single post |
No |
Yes |
Uses squeeze-handle column-height adjustment |
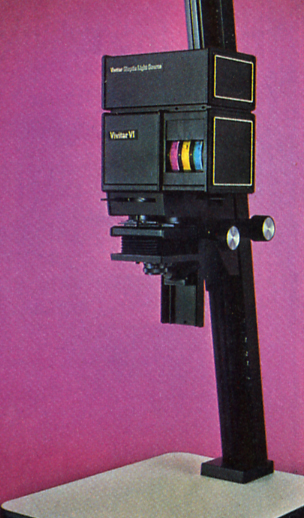
| VI |
1978 |
2-¼ x 3-¼" |
18 x 24" |
Dichroic condenser |
Rack & pinion |
Single post |
Yes |
Yes |
Bigger sister to the 356. P/S is located on the head. Modern Photography Test Aug 1978 $325 -- Darkroom Photo test July 1979 (Vol 1 #3) |
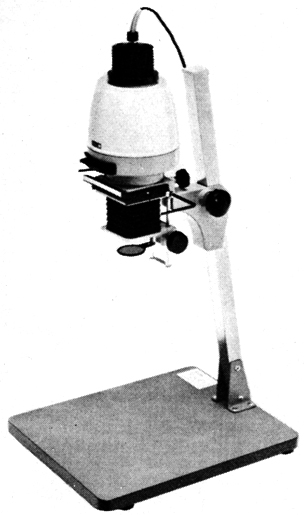
| 356 |
1980 |
2-¼ x 3-¼" |
18 x 24" |
Dichroic condenser |
Rack & pinion |
Single post |
Yes |
Yes |
Slightly smaller sister to the VI. P/S is located on the baseboard. Designed to easily break down for storage. Modern Photography Test May 1980 $334 |
Quick Comparison Key
Era: It's nearly impossible to get actual production year spans; I've provided this simply to give an idea of when an enlarger was in production.
Focusing:
- Bellows means that the lens stage is connected to bellows that expand and collapse, and the bellows are typically moved via a wheel using friction (as opposed to using rack & pinion gears).
- Helical focusing means a collar around the lens is turned, and the lens housing is threaded so that the lens moves up and down.
- Rack & Pinion means that the lens stage moves up and down via a knob that turns gears.
- Tube means that the lens is set into a tube that moves up and down (as opposed to bellows).
Autofocus: not to be confused with what we think of as autofocus today; these enlargers don't focus themselves. What they do is offer a sort of tracking control so that once the image is focused, it stays in focus as you change the elevation of the head for cropping.
Column: all columns are assumed to be vertical unless oblique is noted. Oblique columns (i.e. angled forward) are nice at higher head elevations because the image won't expand back across the column post when the head is at the top of the post. On smaller enlargers this wouldn't be a problem, but at larger magnifications (and with lenses with shorter focal lengths), this can become a concern.
Manual: Yes means there's a link to an owner's manual you can download.
Ad: Yes means click on the link to see an original display advertisement for the unit.
Model Notes
The following is the test report from the late Modern Photography magazine, August 1972 issue.
The Vivitar E-34 falls into the category of a beginner's enlarger that will continue to serve well after one is no longer a beginner. It is small and light, can be easily stored and carried, yet our tests show it to be extremely capable in many critical areas that result in better print quality. More about that later.
It is a nicely furnished machine with a 14 x 18-in. gray baseboard and a square inclined column 28 in. high. The lamp-house rides on the column by means of a friction drive. The drive knob, located on the right side of the column, measures a generous 2 in. in diameter. Result: smooth, easy movement up and down the column.
The hardware that connects the lamp-house to the column is rigid and extremely well braced. No play was evident. The column is fixed to the baseboard with four generous bolts. A wrench is supplied to tighten these bolts securely and keep them that way. If we consider rigidity the first requirement of an enlarger, then the Vivitar E-34 gets high marks on this score.
The lamphouse is well ventilated by a louvered turret at the top. Lift off the lamp-house and double condensers are revealed a large lower condenser and a smaller upper one. They are computed to provide good coverage with both 35mm and 2-¼ square negatives.
Tests using the Lektra PTM-7a electronic photometer gave some interesting data. Exposure on our test negative showed that using Kodak Polycontrast paper (or equivalent) with no filter, exposure for enlarging a 35mm negative to 8 x 10 ran 10 sec. at f/8. Illumination across the field varied less than 5 percent from center to edges with a zero variation in the four corners. With 2% square negatives using the 75mm lens and making an 8x10 print the exposure was exactly twice as fast, or 5 sec. at f/8. Illumination was still more even, with our Lektra meter showing a 3-½ percent variation from center to edges and no variation from corner to corner. Conclusion: a well-designed illumination system.
Just above the carrier is a filter drawer. It can be used for either color printing or variable contrast filters. It comes equipped with a thick heat-absorbing glass. It's so thick, in fact, that there isn't much room left in the drawer for anything other than unmounted gelatin or acetate filters. So if you want filters for this machine don't buy the type that are mounted in protective glass (especially for color printing where many filters are needed).
The carrier is a simple metal stamping with levered handle attached. The top plate can be removed and replaced with either a 2-¼ or 35mm unit, depending on the format you are using.
In spite of its simplicity the earner did a good job of holding the negative flat and was quite easy and convenient to use.
One point that is especially worthy of discussion is the focusing arrangement. It is a familiar bellows type where the lens-board rides up and down on two tracks driven by a friction drive. But there was absolutely no play in this unit, and its smoothness and good alignment contributed a great deal to this machine's good performance. Everything considered, this is one of the best low-cost enlargers we have seen in a long while. Modern's editors recommend it for beginners and intermediate workers who are cost-conscious. The Vivitar lenses supplied with the enlarger performed capably center and edge at f/8 or smaller.
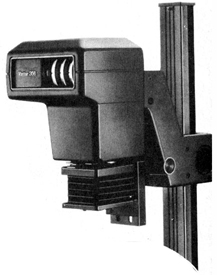
E-54 and E-74
.jpg) These were called "Grabbers" because they had a unique squeeze-handle lock. To adjust the head height, one would "grab" the handle and left or lower the head and then release. They were very similar models: the E-74 "Grabber" came with three negative carriers and handled up to 2-¼ x 3-¼". The slightly smaller E-54 "Son of Grabber" came with two carriers and maxxed out at 2-¼ x 2-¼".
These were called "Grabbers" because they had a unique squeeze-handle lock. To adjust the head height, one would "grab" the handle and left or lower the head and then release. They were very similar models: the E-74 "Grabber" came with three negative carriers and handled up to 2-¼ x 3-¼". The slightly smaller E-54 "Son of Grabber" came with two carriers and maxxed out at 2-¼ x 2-¼".
VI
 I have the original owner's manual for it. You can download it for free.
 The following is the test report from the late Modern Photography magazine, August 1978 issue. Slightly edited for brevity.
The Vivitar VI enlarger . . . was completely designed and manufactured in the U.S. . . .
The upright consists of two aluminum extrusions fitted together with slots to hold the head in alignment. It's a 47.5-in.-tall upright (or box beam column as Vivitar prefers to call it), allowing a 16 x 20 in. print to be made on the baseboard. At the rear of the upright is an extremely effective counterbalancing system consisting of four springs. You use two with the condenser head and hook up the other two when the heavier color head (called a Dioptic Light Source by Vivitar) is attached. The counterbalancing action was nearly perfect in both cases. The entire head rides on the upright with a silky smooth action that is controlled by a twist-to-lock-and-unlock knob that is clearly superior to and more convenient than the older set-screw type of lock found on many other enlargers.
An unusual feature on the Vivitar VI is the dual (left and right hand) enlarger head locking knobs as well as two focusing knobs.
We made a print with the standard condenser head in place, using the 75 watt light source for black and white printing. It will immediately be evident that this is a fast machine. Exposure time for an 8 x 10 print from a standard test negative ran 11 sec. at f/16.
Illumination followed standard patterns expected of condenser enlargers: In this case there was about a 1/4-stop difference between the edges and a 1/2-stop difference from center to edge. The edge-to-edge difference is about normal, but the center-to-edge difference is beyond our strict tolerance limits.
Alignment of carrier to lens could be adjusted to a zero error due to the machine's distortion correction control. Alignment between negative and baseboard ran about 1/4 bubble length on our standard alignment tool, which is quite good. Temperature tests at the negative are carried out until temperature stabilization is achieved, even though that may take far more time than will ever really be needed for making a print. It went as follows:
| Time (sec) |
Temp.(°C) |
| 0 |
18.0 |
| 30 |
28.0 |
| 45 |
33.5 |
| 60 |
37.0 |
| 90 |
40.5 |
| 120 |
45.7 |
| 180 |
47.0 |
| 240 |
49.8 |
| 300 |
51.5 |
| 360 |
51.8 |
.jpg) The temperature climb is rather fast, and continues longer than one might expect. In fact it continues for a full 6 min. and levels out atjust a bit above 50°C after 5 min. That's a level that might cause some negative buckling on prolonged exposures but, as pointed out earlier, this is a fast machine, with exposures for black-and-white running short seconds rather than minutes, unless you are making murals at small apertures.
The temperature climb is rather fast, and continues longer than one might expect. In fact it continues for a full 6 min. and levels out atjust a bit above 50°C after 5 min. That's a level that might cause some negative buckling on prolonged exposures but, as pointed out earlier, this is a fast machine, with exposures for black-and-white running short seconds rather than minutes, unless you are making murals at small apertures.
To prepare the machine for color work, you start by getting a medium Phillips-head screwdriver. Remove the screw
at the top of the lamphouse while holding onto the lower convection cooling plate to keep it from falling on the top condenser. You may have to remove the top condenser if it is in the high 35mm position or it will interfere with the removal of this plate. Now loosen the two knurled knobs at the rear of the lamphouse and remove the lamp, recovering the hole with the plastic disc that is provided for that purpose. You then remove the threaded, tapered lock collar from the light pipe, drop the color head in place, and secure it there by firmly screwing back in the tapered lock collar. The color head is now installed. Simply plug the head into the stablized power supply and you are ready to go.
Previous tests on a preproduc-tion sample enlarger indicated that exposures ran about 17 sec. at f/11 for an 8 x 10 during the tests made at [Vivitar]. Our recent tests on our production unit ran about the same from our standard test negative using a filtration of 40M x 75Y. The illumination tests revealed 1/4 stop between corners but 1/2 stop from center to edges. Not bad for black-and-white, but more variation than we prefer in a color machine and more than diffusion head would have produced. This light falloff can be compounded further still by the darker edges on negatives caused by vignetting of the taking lens on the camera. This problem can however teach you to become an expert at dodging.
Temperature at the negative tests were amazing:
| Time (sec) |
Temp.(°C) |
| 0 |
18 |
| 30 |
18 |
| 60 |
18 |
Absolutely no heat was transmitted from light source to negative! None! Zero! The light pipe proved to be an extremely effective heat insulator--the best we have ever seen.
Finally we made some color prints. When placing a negative in the hinged plastic carrier be sure to place it under the quides so it lies flat. Now snap (that loud cracking sound doesn't mean the carrier has shattered in your hand) the carrier shut, place it on the en-larger stage and lower the condenser. Turn on the focusing light ... but be sure that all filters are set at zero. Note that the markings on the filter wheels glow softly and are easily readable in the dark. Dial in the filters you need. What to check focus with white light? Just pull down on the white light focus lever on the bottom right-hand side.
What's that you say, you are using a negative at the left end of the strip and the rest of the negative strip protruding on the right gets in the way? It sure does. You just have to be careful and reach around the end of the strip.
We are now ready to make a print, once the filters are back in the light path and the lens is stopped down to the proper aperture. In spite of it all (mainly the light falloff from the condenser system), the Vivitar Dioptic Light Source performed beautifully. Exposures were fast, even with heavy filtration, and images were crisp and well saturated, indicat-ng effective infrared and ultraviolet filtration.
Overall action of the machine was first class. And, with the exception of the white light focus lever, everything was in the right place. Construction is solid and rigid. Vibration (there's some in every enlarger) was minimal. . . .
The Vivitar VI enlarger is a very competent machine.
356
 I bought this enlarger when it was new in the early 1980s, and I still have it today. It's not a professional-caliber machine (it's mostly plastic), but if you treat it well, it holds up well. I have never regretted it. There were times I wished I'd had the 6x6 negative holder, or that it could take 6x9's, but that's not a great loss.
I have the original owner's manual for it. You can download it for free.
Most of this enlarger is made of plastic; the head shell definitely is, though it appears nicely rugged. The upright column is aluminum (or something like it). It's a dichro head using subtractive color, so there are three illuminated dials with a raised ridge so you simply turn them with a fingertip. The head goes up and down via friction, but I always found it went smoothly and the handle is large, comfortable to use, and easy to lock into place.
.jpg) It's a condenser enlarger: a pair of condensers sit in a tube and there's a supplimental lens whose position can be adjusted for the desired format. The lens mount is quasi-bayonet: the lens board is a disc with a hole bored in the center. Near the edge, on opposing sides, are two holes and slots that run about an inch behind the holes. On the lens stage there are two thumb screws; you loosen the thumb screws, rotate the lens board a bit and then it drops down over the screws. The board is a simple flat disc so you can (relatively) easily fabricate more. Focusing is rack & pinion and the knob is big and easy to turn.
It's a condenser enlarger: a pair of condensers sit in a tube and there's a supplimental lens whose position can be adjusted for the desired format. The lens mount is quasi-bayonet: the lens board is a disc with a hole bored in the center. Near the edge, on opposing sides, are two holes and slots that run about an inch behind the holes. On the lens stage there are two thumb screws; you loosen the thumb screws, rotate the lens board a bit and then it drops down over the screws. The board is a simple flat disc so you can (relatively) easily fabricate more. Focusing is rack & pinion and the knob is big and easy to turn.
Not so the negative holder. It's a hinged plastic unit that's got a circular ridge on the top. When you push it into place, the condenser housing rides on top and then settles down into this grove, giving you a nice seal and a secure fit; and because the ridge is circular, the carrier can be rotated across 180° of motion. But that also means the negative carrier is complicated and hard to make; you can't just cut one out of scrap sheet metal or wood. My enlarger came with a 35mm carrier and it never occurred to me to buy others until the enlarger was long out of production and the carriers nearly impossible to find. I still see requests posted on the net for these things.
One of the big differences between this and the VI model is the power supply. The VI has the p/s incorporated into the head, the 356 has it separate; it sits on the baseboard and connects to the head via a cord.
Personally I think it's a great enlarger. I do most of my work in 35mm and it's always been there for me. It's easy to use, reliable, and well-thought-out.
©opyright by James Ollinger. All rights reserved.
