A Beginner’s Guide to Exposure Meters
by James Ollinger
This is not meant to be authoritative or exhaustive. It’s simply a short guide to familiarize the reader with the subject.
A Little History
In the early 19th century when photography began, exposure times were typically measured in minutes. Photographers usually  made their own emulsions or sensitized their plates. The processes were hazily understood, unscientific, and subject to a lot of variation. So photographers learned how to make exposures largely by trial and error, and often by making multiples with different times.
But as the 19th century drew to a close, companies began manufacturing plates and film. Between larger quantities and the need for standardization, variations from batch-to-batch began to diminish. Chemistry advanced. Emulsions became more sensitive—they reacted faster to light, thus cutting down exposure time from minutes to seconds, and eventually to fractions of a second. As exposure times dropped, the margin of error dropped as well, so photographers needed a way to determine exposure requirements.
Research scientists (beginning with Hurter & Driffield) began to accurately measure and document the relationship between film emulsions, development, and exposure; so for the first time photographers were able to scientfically predict the effects of exposure on film.
Calculators
These were the first exposure systems. They began as simple tables and required the photographer to make judgments about the conditions of the scene and how much light was available. For simple camera adjustments, say just an ƒ/stop and shutter combination, they were sufficient. But when various film speed emulsions became available, calculator dials took over. Usually the photographer would set the dial for a film speed (commonly called the "exposure index" (E.I. for short), and then adjust for the prevailing conditions ("sunny day with strong shadows," "sunny day with weak shadows," "sunny bright with no shadows," etc.), and the calculator would match up the "proper" shutter speed/aperture combinations.
Optical (Extinction) Meters
Optical or Extinction meters use some sort of visual aid to help determine exposure. One type used printing-out-paper, which visibly turns dark when exposed to light; the user would pull out a little piece of POP and determine how much time it took to get to a certain shade of gray. The number of seconds could then be fed into the calculator dial and exposure determined.
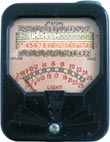
Many others used something like a step wedge, where the user would look at a series of numbers or letters and see which was the last in the series that was visible; the idea being that the brighter the light, the more letters would visible.
Not a bad idea, except that the human eye has a constantly-changing, independent aperture, and it would adjust for low light, so more letters would become visible. Some people’s eyes adjust faster, some people’s eyesight is naturally more acute than others. So it wasn’t as useful as it should have been.
Photoelectrics
This was the revolution that really brought control and predictability into photography. People had made electric light meters for years, but they were limited to labs and indoor use. But in the early 30s, Rhamstine, Bell & Howell, Weston Electrical Instrument, and others offered meters that could be used in the field. It was quite a feat: the meter had to be small enough to be hand-held, and hardy enough to take the reasonable amount of knocking-about that would be expected from outdoor use. The idea was to use a sensor that would react to light, and the reaction could be measured. The result would be objective and repeatable. Modern cameras, even the digitals, still use photoelectric light meters to determine exposure (they’re just a lot more sophisticated).
Photocell Types
There are probably more, but for the purposes of this article we shall consider three major kinds of sensor (the part that actually sees and reacts to light). They’re listed here in order of introduction:
Selenium
This was the first: the sensor introduced by Rhamstine and Weston in the early 1930s. It’s an iron plate with one side covered with selenium, and then an ultra-fine layer of gold over that. When a wire connected the gold side to the iron side, and the gold surface was exposed to light, an electric current flowed. The current was tiny but it could be measured by an ammeter; and the more light that struck the sensor (called a photocell), the more current was generated. The meter could be calibrated and marked in a real-world measure, like candles/ft2 or lux; and that could be translated into exposure values.
Selenium cells had several nice things going for them. One was that they generated their own current, so no batteries to deal with. Another was that was sensitive to wavelengths of light similarly to popular films, as opposed to the human eye; that meant it would see light the way film saw light, and hopefully yeild more accurate results.
Of course there’s no such thing as a free lunch. Selenium cells worked just like a battery and eventually they would run out of juice. And unlike a battery, the cell was much harder to replace.
CdS
Cadmium Sulfide cells arrived with the 1960s. Unlike a selenium cell which created current, CdS cells were resistors that varied with the amount of light that hit them (resistance drops as light increases). So a battery provided an electrical current, a meter read it, and a CdS cell varied it depending on the amount of light it saw.
CdS had a couple of nice things over selenium cells: they required a battery (or batteries) to run, but batteries could be easily replaced and theoretically, the CdS cell wouldn’t wear out. CdS cells were more sensitive and better in very low light conditions. And they were a lot smaller: whereas a typical selenium cell might require a square inch of area, a CdS cell was usually about 1/8" or so in diameter. CdS cells made it possible to put the cell behind the lens in cameras, and took camera automation to a whole new level.
CdS had one minor and one major drawback. The minor was that it saw light similarly to the human eye, which was not the same way most films saw it. The major drawback was, like humans, it had temporary night-blindness—a slowness to change from a bright light level to a dimmer one. Didn’t seem to matter, though. CdS was controversial, but by the end of the decade the selenium meters were considered dinosaurs.
Silicon Blue
Si cells showed up in the early 1970s, generally on the high end cameras and meters, but worked their way down as the decade ended. Silicons had the best of both selenium and CdS cells; like CdS they were small, they were good with low light, and they used batteries. Like selenium they reacted fast to changes in intensity, so no night-blindness. They had a blue filter to cut down the spectral sensitivity, so they’re often called "silicon blue" cells.
Measurement Types
Before I go any further, I’m going to make an important point because I don’t want people emailing me and picking this apart. A light meter does one major thing: it tells you how much light it sees. That’s all. How it’s interpreted is up to human beings, and that’s where the devil is. In the old days when meters read out directly in candles/ft2 or lux or some other real-world value, the numbers meant something. But how do you translate that into exposure? That’s tough. Most people would say that if you take an 18% "middle" gray card and meter it and photograph it, the exposure would reproduce that shade of gray.
Maybe it does, maybe it doesn’t. The people who make and (more importantly) calibrate meters determine what shade of gray it will really give you. Some makers bias it one way or another. Some people argue that 18% is not really middle gray; that 12% is middle gray. And even then, the makers bias the meters; though they can be biased differently (especially if you have with a K adjustment, or even a Zero adjustment).
Because there is a variation, and because I don’t want to make this unnecessarily complicated, I’m going to assume here, for this article, that 18% gray is a standard, target gray that all light meters are calibrated to reproduce. Argument about how that isn’t really the case can be taken up another time, another place.
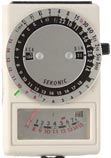
Reflected/Averaging
Personally, I think this kind of meter should be called "wide-field" averaging, but they’re typically called "reflected" or "averaging" meters. All meters "see" the light that strikes the photo cell. Most meters see light that’s reflected back from whatever they’re pointed at. A "wide-field" meter takes in a large area, typically what a "normal" lens on a camera would take in, which is around 46°. Since a 46° field might reasonably include bright areas and shadows and a lot of things in-between, all this gets homogenized into a single light value—an average. So they’re often called reflectance meters, or averaging meters.
In a lot of cases, an average will provide a good exposure. But there are also many cases where it falls down, like when the scene is mostly brighter-than-average or dimmer-than-average. The meter is calibrated against middle gray, so if the overall scene is brighter than average, it will "underexpose" everything. If the overall scene is dimmer-than-average, it will overexpose everything. So for instance a snow scene would have dull, muddy-looking snow; an evening scene will have murky, dull grays instead of deep, rich shadows.
Examples: Weston Master series, Gossen Luna-Pro, Sekonic L-98.
Spot
A spot meter is the same as a wide-field, except that it measures a very narrow angle. Whereas a wide-field averaging meter will typically take in a 46° field, a spot meter typically take in 1°—perhaps 3° or 5°. The idea is to measure a very small "spot" precisely.
Spot meters are typically used by advanced photographers who want to know how much light a particular spot (e.g. a shadow) reflects versus something else. People who use the Zone System of exposure need this so they can "place" values and see where others "fall."
Examples: S.E.I. Photometer, Soligor Digital Spot Sensor
Some meters fall in-between these two ranges, and they’re usually called View Meters because they measure much narrower than a normal meter, but not as precisely as a Spot. Say somewhere between 9° and 20°. Examples would be the Weston Ranger 9 and the Sekonic Zoom Meter
Incidence
This is very different from a reflected meter, because this kind of meter measures the light falling on the subject, instead of light being reflected by the subject. An incidence meter has a diffusing disc or dome located over the photocell. The meter is placed as close to the subject as possible, and the photocell is aimed back at the camera. Not so common in the field, but studio photographers (and movie cinematographers) prize them because they can set light levels based on how much light is falling, regardless of what the subject may reflect. Many meters have accessory attachments that convert them from reflection to incidence.
Examples: Norwood Directors, Spectra Combi-500
Others
There are a number of specialized types of meters, of which these are a few:
Cine
Movie cameras typically have a shutter that’s hard-connected to the film transport, so the shutter-speed is always in sync with the film speed. Standard "silent" film speed is 16 frames-per-second (fps), "sound" is 24fps. Higher or lower is used for special effects.
The base shutter speed varies with the camera make and model, but on a typical silent camera, the shutter is 1/30th at 16fps. So at 8fps the shutter speed is 1/15th, at 32fps it’s 1/60th, at 64fps it’s 1/120th. If the base shutter speed were 1/40th, it would be 1/20th, 1/80th, and 160th respectively.
A normal meter can calculate exposure for a movie camera, but cine meters had calculator dials that were optimized for them. Typically the user would set the base shutter speed, and the meter would show the proper ƒ/stop for the various frame speeds.
Some companies like Weston routinely sold cine versions of their popular meters.
Example: Weston Master II Cine
Flash
Most meters can’t react fast enough to brief flashes of light. Flash meters can—they record the "peak" amount of light that they see. The better ones have memories so they can record multiple flashes and "build" the exposure the same way film can.
Example: Calcu-Flash II, Wein WP-1000
Color Temperature
Usually these are incidence meters, and instead of looking at amounts of light, they react to the color—the balance between red and blue. Usually they express the result in color temperature (°Kelvin), and a table is consulted to see which filters to use to correct the color the film used.
Example: Gossen Sixticolor
Darkroom
In the darkroom, printing papers behave just like film, so exposure meters can be used to determine the best exposure for the paper. Darkroom meters are optimized for the low light levels of enlargers, however, and the calculator dials are meant to be set by the photographer, since paper speeds and behaviors aren’t as standardized as film.
Examples: Beseler PM2L, Gossen Labosix, Omega Simtron II
Evaluation and Aging
This is simply to give you an idea of how old a meter could be when you find one you don’t recognize. These are just guidelines—there’s a lot of overlap and plenty of exceptions. But it should give you some ideas of what’s what.
 Pre-1950s
- Metal or bakelite housing (bakelite is a very hard, shiny plastic)
- Art deco design
- Black finish
- Meter scale is in candles/ft2
- Complicated or "busy" meter scale
- Exposure index is in Weston numbers (American), Scheiner (European), or unknown
- Big and heavy for its size
- Selenium cell
 50s
50s
- Plastic (maybe bakelite) housing
- Black or chrome finish
- Late moderne design
- Light Value scale — a numbering scheme made by the manufacturer
- Simple meter scale
- ASA/DIN exposure index
- Selenium cell
 60s
60s
- Plastic housing
- Chrome or color finish
- Post-modern design
- Light Value or no meter scale at all
- Match-needle (pointer connected to calculator dial)
- Needle-lock
- CdS cell requires mercury battery
- EVS and/or Polaroid exposure number scales
 70s and later