
The following article appeared in the February 1938 issue of Minicam Photography magazine. It was written by H. P. Rockwell, Jr. This is why I love old magazines, especially the ones from the depression-era. They were more interested in showing people how to make things and do things with the equipment they had, rather than the "go buy this new widget" articles that fill modern magazines.
Three special notes:
- Bakelite is an opaque, early type of plastic. If you try to build this thing, any black, opaque sheet plastic should suffice.
- The "printer" the writer refers to here is a light-box with a contact printer on top, which was a common arrangement at the time. To use this with an enlarger, I suggest making a box with the mask and meter mounted on a side, with a mirror inside set at a 45° angle to catch the light. The box would sit on the easel and you could easily move it around to read the area of the negative that you're interested in.
- If you're serious about using an exposure meter as a darkroom densitometer, I suggest Phil Davis's book Beyond the Zone System, which explains how to use a modern 1° spot meter this way.
| Conversion | |
|---|---|
| Opacity | Density |
| 1000 | 3.0 |
| 900 | 2.95 |
| 800 | 2.9 |
| 700 | 2.85 |
| 600 | 2.8 |
| 500 | 2.7 |
| 400 | 2.6 |
| 300 | 2.5 |
| 250 | 2.4 |
| 200 | 2.3 |
| 150 | 2.18 |
| 100 | 2.0 |
| 90 | 1.95 |
| 80 | 1.9 |
| 70 | 1.85 |
| 60 | 1.8 |
| 50 | 1.7 |
| 40 | 1.6 |
| 30 | 1.5 |
| 25 | 1.4 |
| 20 | 1.3 |
| 15 | 1.18 |
| 10 | 1.0 |
| 9 | .95 |
| 8 | .9 |
| 7 | .85 |
| 6 | .8 |
| 5 | .7 |
| 4 | .6 |
| 3 | .5 |
| 2.5 | .4 |
| 2.0 | .3 |
| 1.8 | .25 |
| 1.6 | .2 |
| 1.5 | .18 |
| 1.48 | .17 |
| 1.45 | .16 |
| 1.4 | .15 |
| 1.35 | .13 |
| 1.3 | .11 |
| 1.26 | .10 |
| 1.2 | .09 |
| 1.1 | .05 |
Print quality, as well as speed and economy in printing, is always desired. The use of an exposure meter for determining exposure time in enlarging goes far toward putting printing on an accurate mechanical basis.
I use a Weston meter for measurement of negative densities before making prints. The simplest method is with a contact printer for a light source. This, with the aid of a mask is the only other equipment needed.
The mask is used to limit the area of the negative being scanned. To take a reading, the mask is placed over the negative so that only the area to be measured is in view. Then the reading is taken through the negative. When recorded, the negative is withdrawn and a reading taken on the light source without moving the mask. From these readings, the density value may be obtained.
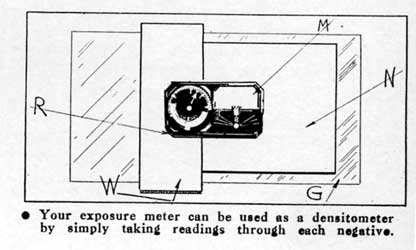
The procedure is very simple, but before it can be followed, it is necessary that the printer be arranged to take the readings. Referring to the sketch, it can be seen that the mask "W" is designed to locate the instrument "M" on the glass surface "G" of the printer. The negative "N" is under the mask "W."
Your exposure meter can be used as a densitometer by simply taking readings through each negative.
To construct the mask "W," it is only necessary to take a piece of bakelite or wood the width of the glass top "G" on the printer. It should be about 2½" wide and 3/32" thick. To this is fastened a second piece of bakelite or wood the size of the aperture of the photoelectric cell on your exposure meter. Then, a clean cut hole approximately ¼ " is drilled near the edge of raised section of "R" through which the light may shine. The actual size of this hole will depend on the brilliance of the light source in the printer. A position near the edge is chosen because the light falling on a small area so placed will give a higher meter figure than when a similar area in the center of the disc is used.
The most accurate reading will be obtained with a hole sufficiently large to swing the meter needle well into the upper part of the scale, and should be over 100. It may, however, be necessary to make it smaller than ¼ " inch in diameter when smaller areas are to be read.
If meter reading without any negative is 240, and when a given small uniform area of the negative is interposed between light source and meter a reading of 24 is found, then 240 divided by 24 is 10, which represents the opacity of this part of the negative.
Density as understood by the "sensito-metrist" is the logarithm of the opacity. For the benefit of the large number of photographers who do not want to be bothered with mathematics a simple approximate conversion table is given.
Intermediate figures are sufficiently accurate by interpolation, and our mathematically minded friends can easily obtain greater accuracy, if they desire it.
For a good Chromatone print it is not important which of the standard negative-processes is used in the preparation of the three separation negatives. It is important, however, for correct color rendition that the three black and white prints be made correctly, and that your negatives are of equal contrast. Density measurements of neutral scales in such negatives are easily read by this method. A very desirable feature of the Chromatone process is that the color reactions go to completion. In other words, the amount of color depends primarily on the amount of silver deposited ' on the strip film. Since this is so, we can do a great deal toward insuring final satisfaction by the use or this densitometer.
For most negatives, the system is entirely satisfactory, but, should it be desirable to read densities with greater accuracy, it will be necessary to obtain a special meter for this purpose.
When a densitometer has been used for a short time, it will establish its usefulness as a darkroom tool, just as the exposure meter aids the camera.