The following article appeared in the July, 1979 issue of Modern Photography magazine. — JO
Is a meter in the Hand Worth Its Weight?
by Peter Moore and David L. Miller
Automatic exposure systems are damn seductive, we must admit. We've all come to rely on them increasingly because of their convenience and speed in use. And, we must grudgingly concede, they hardly ever produce extreme exposure errors. Most common errors fall within the plus or minus one f/stop range that falls within the latitude of most black-and-white and color negative films on the market today.
 On the other hand, critical users working with color transparency films may have noticed a certain dull sufficiency in their slides resulting from adequate but not "spot-on" exposure. The world is not composed of middle-toned snow and beach scenes, back-lit landscapes with dark blue skies and murky foregrounds, and underexposed portraits with muddy gray backgrounds. Half a stop of underexposure can turn light green spring foliage to a muddy green mass. In short your camera's metering system may provide exposures that are, perhaps, acceptable, but don't quite capture what you or the subject had going when you pushed your basic button. On page 1, you'll find 14 situations when normal camera meters won't hack it—and that's just the tip of the iceberg. But if your faithful 'flex falls down on you, what can you do?
If you want to achieve controlled picture quality you can fiddle with your basic readings more or less knowl-edgeably, or even spend a bit of extra film bracketing exposures—if you and the subject have the time. With fast-moving situations, though, the chances are at least three to one that the best moment won't be on the best exposed frame of film.
There's yet another way. Buy a good hand-held exposure meter and use it with some discrimination to supplement your in-camera alternative. They're accurate, versatile and sensitive—and they'll work with virtually any camera you've got around. Some of them don't even need batteries so they'll keep working when all else fails including, perch-ance, your camera.
Hand-held meters come in many types and sizes but, basically, they all meter reflected or incident light, or both. Common to both types are exposure scales that show you, at a glance, all the different exposure-time/aperture combinations suitable for your lighting situation. You won't have to change your camera aperture to tell whether you can handhold an f/16, depth-of-field-enhancing
exposure. The choice is yours, and everything's laid out for you. Since they do not have to meter through lens systems, they can be, and frequently are, much more sensitive than in-camera meters. And, because of the large size of their movements and scales, they can read and be read to small fractions of an f/stop. Since reflected light meters do the same thing your camera meter does, let's consider incident light reading first—it's a whole new ball of wax. There are very few exclusively reflected light meters anyway, the one behind your lens and the true spot meter being just about it.
 Metering incident light
Incident light meters take a totally new tack. They don't measure your subject at all—they measure the light about to fall on it and take off from there. So, to make a reading with an incident light meter, you point it toward the camera lens. This method has a unique combination of virtues. It is both easy and accurate as all get out.
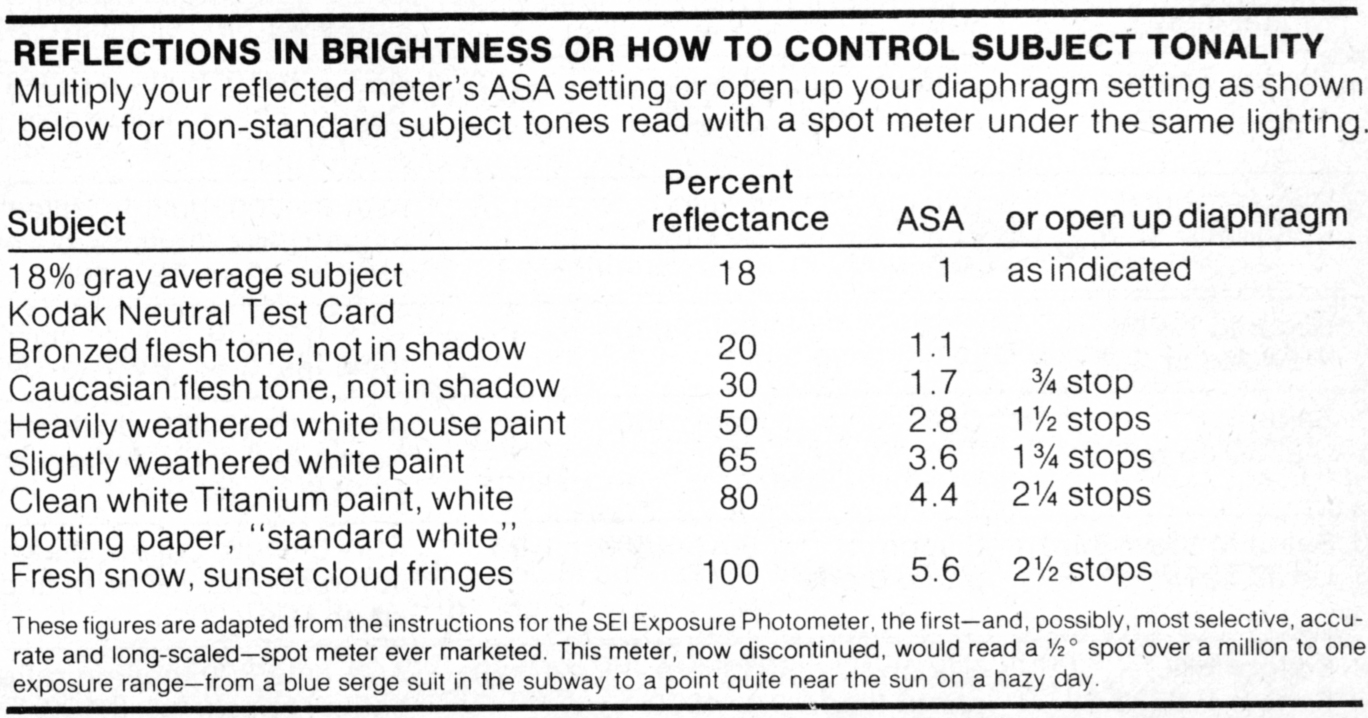
You may justifiably wonder if an accurate exposure could be obtained without reference to your subject. Doesn't it matter if my subject is dark or light? Much less than you might think. After all. you want the dark stuff to be dark—and the light stuff to stay light. Years back, researchers discovered that the world averaged out to 18 percent gray, and all reflected light meters and film speed ratings are calibrated based on this unchallenged assumption. Averages notwithstanding, we have light and dark subjects to contend with. Meter them directly and you'll get gray snow and gray black backgrounds as the reflected light systems bend nature to their will.
Lacking an 18 percent gray world, one has to produce one for metering. Kodak, in all their wisdom, produced the 18 Percent Neutral Test Card to stand in for nature as an exposure aid and color constant. Whip out the old gray card and your reflected light meter, read the card, and go to town. Fine—if you can meter it without throwing a shadow on it, if you have the time, and if you've managed to cram an 8x10 gray card into your bag.
Irritation with these makeshift techniques led Lieutenant Don Norwood, back in 1936, to steal his baby's rattle. Why not, he theorized, make the meter into the subject as well, let it act as if it were 18 percent gray, and let it face lights and camera. Half the baby rattle was grafted onto an early reflected light meter to collect light coming from all directions like a miniature face.
 This simple revolution is responsible for more correct exposures than you can imagine. Those professional cinema-tographers standing there with dome-equipped meters are not trying to upstage the acting talent. They expose more film in a few minutes than you will in a lifetime. Scenes shot with different cameras at different times all over the world must splice into an accurate and harmonious whole or else the cast may have to go back to Nepal to do a retake. While individual color and exposure corrections can be made, they're expensive and take away quality. And when 3/4 sq. in. of film gets blown up to fill the side of a house, it's gotta be sharp.
Since we will be metering light, not subject tone, our incident readings will tell us a lot about light and nothing about the brightness range of our subject. But this matters little. If the scene is much too contrasty for the film, we'll lose some shadow detail and perhaps a few highlights, but the flesh and middle tones are going to be properly exposed no matter what happens to the background. One quick reading should produce an exposure accurate to within half a stop.
Since we're measuring light, we can easily measure the relative intensity of front, side or back lighting and modify exposures if things get too contrasty. Facing the meter hemisphere to each light source in turn will allow easy comparisons. Merely favoring the hemisphere so that it points midway between the camera and the main light usuallysolves the exposure problem directly.
Faced with heavy backlighting, one lone reading toward the camera with the meter shaded from the backlight will give you full shadow detail. Want to balance the lighting to favor the highlights a bit? Take a second reading with the sphere pointed at the sun or mainlight and split the difference between the two. For very dark subjects, add half a stop— for very light subjects subtract half a stop. That's all there is to it.
 Incident metering hardware
Meters designed specifically for incident metering have diffusers reminiscent of ping-pong balls to collect light. The most convenient ones have swivelling heads so that the dial can be observed no matter where the head is pointing. The meter calculators are generally straightforward and do not make provision for reading subject tones, even when the meter is used with reflected light accessories. Until recently, few incident meters made more than grudging attempts to read reflected light as well. Lacking was selectivity, sensitivity and the comprehensive calculator systems needed for controlled reflected light use. Now, however, CdS and Silicon Blue Cells have provided the extra sensitivity needed to make system meters capable of incident/ reflected and spot readings with a wide range of accessories. The classic incident meters have been the Spectras and Se-konics. The early units with selenium cells are relatively insensitive, particularly when used with reflected light accessories, but work dependably without batteries for years. Newer units—Minolta's Auto Meter I and II, Spectra's Combi II and Professional II, Sekonic's Auto Meter L-418 and L-428-couple silicon blue cells and amplifiers, wide accessory ranges and convenience features like powered and motorized calculator dials. Accessories provide fibre-optic probes, 10° and 1° spot attachments and other possibilities too numerous to mention. Lacking in almost all, however, is a calculator dial capable of convenient use in the reflected mode. Unfortunate, but perhaps they figure if you're discerning enough to want to own an incident meter, you're apt to be smart enough to be able to work with reflected light as well. Maybe they're right. ...
Unfortunately you can't always use an incident light meter. Remember, it must always be at the subject position or under the same lighting with its inscrutable sphere facing the camera—hard to do if you're shooting scenics out of a shadowy hotel room window on your hard-won vacation; harder still if you're shooting the circus from your seat in the peanut gallery. Since no one's come out with the transmitter-equipped incident meter I used to dream of hiding on stage to broadcast readings back to the wings, we must make do with reflected light units when metering from a distance.
 Selective reflective metering
When we have a subject with both long tonal ranges and contrasty lighting, we have to call for Supermeter. Here, we must know as much as possible about our long-ranged subject because we are going to have to give up something to get it onto our comparatively short-scaled transparency or paper print. With selective light metering, we can tell just how much shadow or highlight detail we'll have to sacrifice. Knowing this, we can make the best compromise possible to deal with the situation.
How selective must your reflected light meter be? The Weston Master was the photometric touchstone in zonal days of yore—in spite of its limited sensitivity and 45-plus degree reading angle. Its justly famous calculator dial is still unsurpassed for controlling exposure. Nowadays we have reflected light meters of undreamt of sensitivity and selectivity to work with. But, not only has no one improved on the Weston dial, too few meter manufacturers have had the grace to provide anything comparable. In too many cases, the user is left to estimate where the over and underexposure limits of his films will fall.
As the reading angle of a reflected light meter narrows, two things happen simultaneously. You are able to take more samples and extract more information about the reflectivity of particular parts of the scene. As the meter becomes more discriminating you, too, must become more discriminating in what you read and how you weigh your results. With reading angles approaching the 45° coverage of a normal lens, the meter will automatically average and weigh the light reflected from all areas of the subject within its field. If the subject is, overall, unusually light or dark, errors will occur if the reading is used without a grain of salt. The meter—any meter reading reflected light either in your hand or behind your lens—is assuming an 18 percent gray subject, remember? So you must be prepared to give or take a little from its reading accordingly. For example, you wouldn't want an 18 percent gray snow scene, so you'll have to increase the exposure a stop or two to keep it light. If your subject is a tiny spotlit performer on a black background, your meter will want to make that black background 18 percent gray and will kick the density of your subject into overexposure beyond redemption. So you'll want to throttle back a bit, giving a stop or two less exposure than indicated. How much? It'll depend on your metering system and the subject/background relationship. Feel that things could be easier and more exact to boot? Right on.
If you can't read an area, you can't expose it with confidence. Metering then must ultimately become more precise. One-degree spot meters are the most useful, yield the most information—and require the most of the user. Wider-angle spot meters may not meter critical areas at long distances. Remember that all limited area meters are scene samplers—the smaller the area you can read the better off you are. A face on a dark background at 50 or 100 ft. in theatrical work will demand a 1° meter for accuracy. A wider-angle reading will be too much influenced by that background. Because of light losses within their opti-: cal systems, spot meters tend to become less sensitive as their measuring angles narrow. With a highly selective meter. we can meter the brighter parts of the scene selectively to keep our readings as accurate as possible.
|
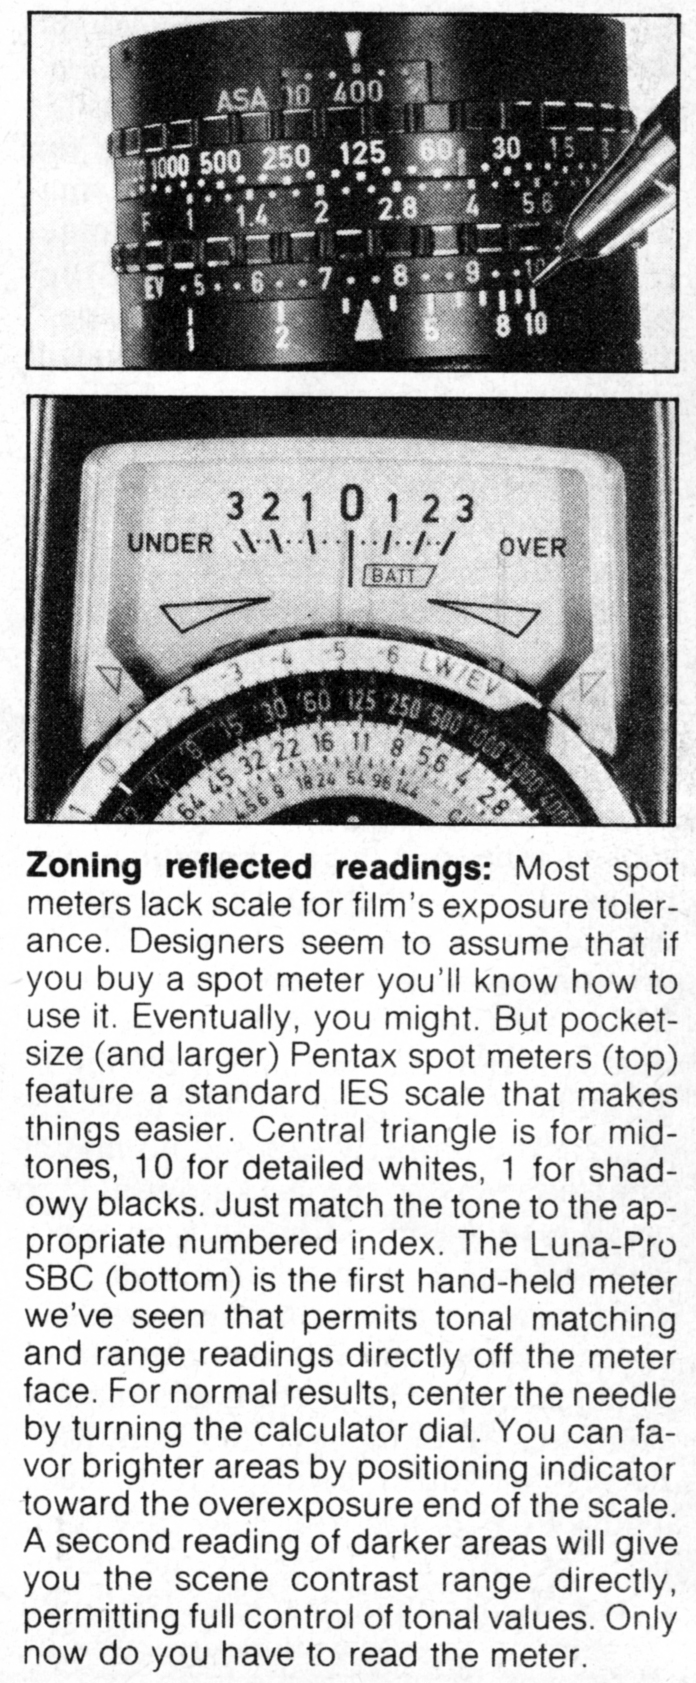
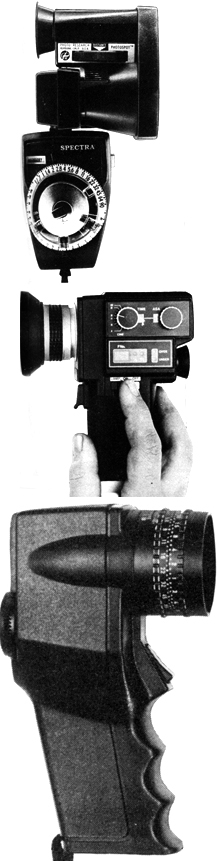
Spot meters: The 1° face-off. You can use a 1° attachment, like the pocketable viewfinder-equipped Spectra Combi II (upper left), or you can go the whole distance for a specialized meter. On the Spectra, you must dial in distance settings to compensate for parallax but save in weight and cost. This meter features a super-long measuring range divided into three levels. Novel calculator allows speed to be preset, reads relevant aperture directly. No zoning facilities on the dial—you're on your own. The Combi-II offers an altogether unique option—it reads incident light and reflected light simultaneously, if desired. Your basic incident reading is, thereby, automatically compensated for subject tone. Two digital 1° meters compared: Pentax's pocketable Digital Spotmeter (middle left) vs. Minolta's deluxe, slightly larger, Auto-Spot II Digital (lower left). Both offer the ruggedness and unequivocal precision of digital readout. Pentax's EV readings in the finder are transferred to a standard IES-scale-equipped lens-barrel calculator. The Minolta meter reads EV readouts in the finder and apertures with LEDs in the side of the unit. Film speeds and ASAs are entered on illuminated dials at right—sort of a shutter-preferred system. Zoning is your responsibility here. |
Using a spot meter
If you can find a middle tone in your subject, meter it—chances are you can use the reading directly with a minimum of thought. If you can't, read the scene twice—once in an area which you want to reproduce as a dark tone with detail and again in an area where you want high light detail. Expose midway between the two, remembering that the area of minimum color fidelity extends about three stops, and try to keep your important subject areas within that narrow range. For reversal films, flesh and mid-tones are of major importance anyway. Let the shadows go dark if you have to; if flesh tones burn up you've had it.
This is a working and useful guide practical spot metering. It might be cused of being oversimplified ... but it should suffice. If you want to go further Ansel Adams and a horde of disciples stand ready at your nearest bookseller to assist you with the Zone System. But be wary of getting lost in the thickets of ex-posure. We are after pictures here. zones. In the hands of the skilled. zone system is fast and useful. It can slow the beginner down so much he'll never get the picture.
In conclusion, camera meters will suffice for most relatively average subject matter without exposure compensation. Used knowledgeably, there are few problems that they can't solve. For maximum accuracy with minimum worry, buy and use an incident light meter (or a combination unit in incident mode) and use it in good health. Spot meters will handle the subject that can't be reached with an incident meter, and will handle virtually any exposure problem you'd care to think about.
Perhaps the only way to be automatically right is to have our electro-optical and photometric camera wizards design a motor-driven, auto-bracketing, auto-exposure camera that would fire off ex-posure-spaced bursts quickly enough to capture the fleeting moment. The film and battery manufacturers would approve, I'm sure. — the end.