
The following is an article that originally appeared in Modern Photography magazine, August 1953, pp 72-77 and p.109.
On the Button
How to Get the Best From Your Exposure Meter
by Charles Hellman
Exposure meters cannot think, whatever else may be the virtues claimed for them by their manufacturers. Due to this unfortunate circumstance, a vast number of photographers, well equipped with accurate meters, manage to do an astonishingly bad job of getting consistently correct exposures. Whether you are a member of this unhappy group, or one of those who understand the basic use of the meter, this article will show you simple, precise ways to get exposures that are right on the button.
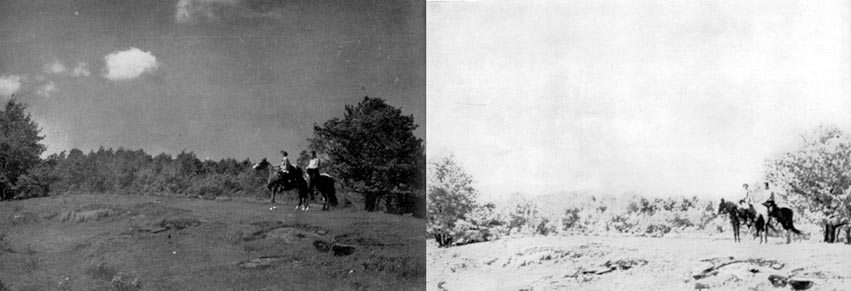
Underexposure or overexposure can lead only to poor pictures. Underexposure has ruined Photo 1 (left); shadow detail is lost. This might have been improved by chemical manipulation of the negative, or by local control during the printing, but the result can never be a good print. In Photo 2 (right) great overexposure has resulted in such a dense negative that the highlights have been lost, the tone qualities of the scene are distorted.
What is Correct Exposure?
Exposure for black-and-white still camera work is correct when it leads to good print quality. This is a more useful definition than the concept of a "perfect negative" as an objective in itself. If good prints are obtained on "normal" contrast paper, we may then say that the negatives have been well exposed. A good print must have adequate shadow detail. To insure sufficient exposure for the shadows, exposure indexes, guides and calculators all carry a wide safety factor. Film speeds are rated conservatively; recommended exposures are on the full side.

This works fine where there is much light and the subject has a moderate contrast range—highlights aren't too overexposed, shadows get enough exposure. But, this may be a great waste of effective emulsion speed where extra speed is needed—for instance, in order to use a smaller lens opening for more depth of field, or a faster shutter speed to stop action. With this in mind, let's enlarge on our definition of correct exposure and make it the minimum exposure that will result in good print quality. Your meter can give you this correct exposure. In many cases it will result in higher effective film speeds (as though you were using a much more sensitive film), and sharper negatives that print better with a minimum of dodging or burning in.
All photoelectric exposure meters consist basically of a photoelectric cell and a sensitive galvanometer (a device for measuring small amounts of electric current). The cell converts light into electrical energy in proportion to the light intensity. The current is sent through the galvanometer causing a deflection of the pointer across a calibrated dial. This is the reading that the photographer uses to determine exposure. How this is done is shown on the following pages.
The range of light intensities (difference between the brightest and darkest objects) in the scene is very important in the exposure problem. A typical black-and-white film can record adequately a subject with a range of light intensities of 130:1. That is, the brightest highlight can be 130 times as bright as the darkest shadow, yet both will register on the film—if exposure is correct. Most meters are designed to calculate exposure for subjects with an average distribution of light intensities over this range—this is called a "normal" subject. Unfortunately, many subjects are anything but "normal" (in light distribution, that is). This may be only inconvenient in black-and-white. With color films, consequences are more serious. These are usually reversal type films. They have less latitude than black-and-white negatives (can only handle a brightness range of 16:1 as compared to 130:1) and the margin for permissible error is small— about one half a stop either way.

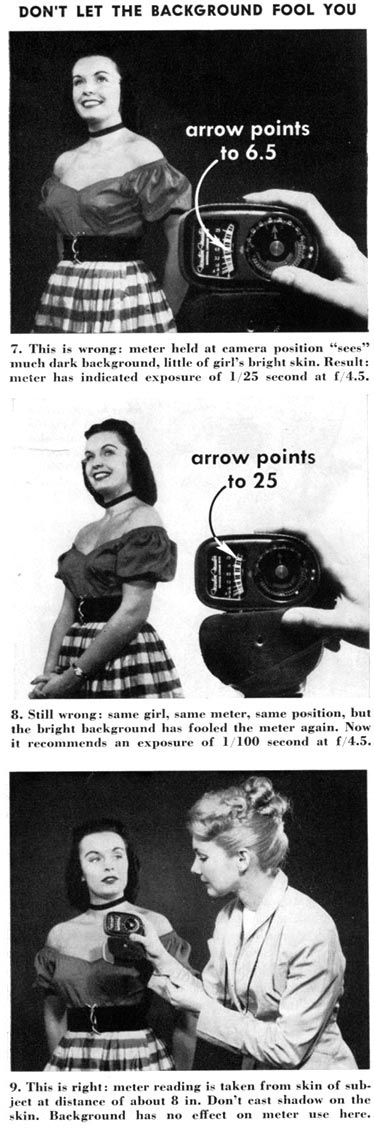
The majority of exposure meters measure light reflected from the subject and use that reading to calculate exposure. We're using the Weston Master as an example because it is the best known of this type. Offhand, the reflected light method would seem to be foolproof. Dark subjects reflect little light, thus produce low meter readings and should get more exposure than light subjects. But. there are several aspects of the reflected light meter that often trap the unwary and lead to unhappy results. Even the best meter is not very selective about the light which it measures. Light reaches the photo cell from an area almost as wide as the usual camera angle. However, the main subject is often only a small part of the area which the camera would cover. If the subject differs markedly in brightness from the background, and if the meter is used at the camera position, the reading will be wrong for the subject (photos 7, 8, 9).
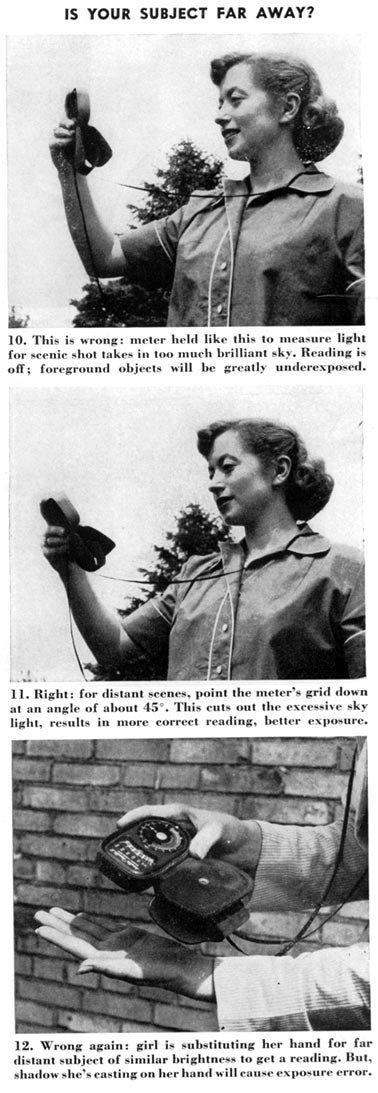
Reflected light meters are particularly valuable when the subject can be measured close-up. Scenics are another problem—photos 10, 11 show the wrong and right techniques. Sometimes you may want exact exposure for a particular subject in a distant scene, yet the meter must be used at camera position. In this case, try the substitution method shown in photo 12. The theory is that if the photographer can locate near the camera a subject which is just about as bright as the far distant subject, then brightness readings may be taken on the nearby one. Suppose you wanted a reading on the riders in photo 1; a meter reading from the palm of your hand (photo 12), or the face or clothes of someone standing nearby, would do. But, don't cast a shadow!
Substitution is also helpful where there are bright reflections in a scene, such as seascapes with the sun glancing off the water. Reflected light readings from a seascape show unbelievably high readings. Many a roll of color film has been hopelessly underexposed by photographers trusting meter readings taken under these circumstances. The simple method of reading the reflected light from the palm of the hand, somebody's face, a nearby wall or some other object, will produce a trustworthy reading. Don't forget—the substituted subject must be of approximately the same brightness as the true subject.
Occasionally, photographers find that despite careful use of a meter pictures are consistently over or underexposed. This may have nothing to do with the meter. A slow or fast shutter may be the offender. Some fine grain developers cut film speeds drastically. If your color pictures are consistently well exposed but the black-and-whites are off, it's probably something in the developing and printing method. However, if both black-and-white and color are bad, then it has to be the camera, the meter or the photographer which is out of order. For consistent underexposure, reduce the film speed to 50 percent of its official rating for black-and-white, and to 75 percent for color and movies. For consistent overexposure increase film speed 100 percent for black-and-white negatives, 25 percent for color and movies.
Proper Use of the Reflected Light Meter Will Give You More Film Speed
There are definite and important advantages to be had from using minimum correct exposure. So long as we don't get into the realm of underexposure, thinner negatives are the equivalent of higher film speeds. They require less printing time, are less grainy, produce higher resolution and sharper pictures. For successful minimum exposure measurements you must understand the significance of the "U" and "0" scale on the computer dial of the Weston meter. The same principle is applicable to other meters.
The U to 0 scale on the Weston meter covers the maximum range of latitude (130:1) of a typical negative. If you turn the computer to place the U on the light division marked "0.1" the 0 mark will then be opposite the light division marked "13." The range of brightness spanned is therefore 13 to 0.1, or 130:1. The normal arrow is halfway between the U and 0. Since most scenes don't have a brightness range of 130:1, use of the normal arrow may result in unnecessarily dense negatives. Much of the film's immense latitude is being wasted.
In general, our objective is to expose the negative so that the darkest important part of the subject will receive just enough light to produce adequate negative density. So, take a reading on the darkest part, line up the U on the computer dial with that meter reading. Pick out the shutter-speed diaphragm-opening combination which bests suits you. Now you've guaranteed correct minimum exposure for the darkest area. Any brighter part of the subject (up to 130 times as bright) will also receive a correct exposure, within the latitude of the film (photo 13). If your meter has no U and O scale, here's a substitute method. Take a normal reading for the darkest part of the subject. Divide this reading by ten. Set the normal arrow to this reduced setting. Minimum correct exposures will result. Intelligent use of this method will probably give more actual film speed than any "magic" developer now being marketed.
Using the O calibration
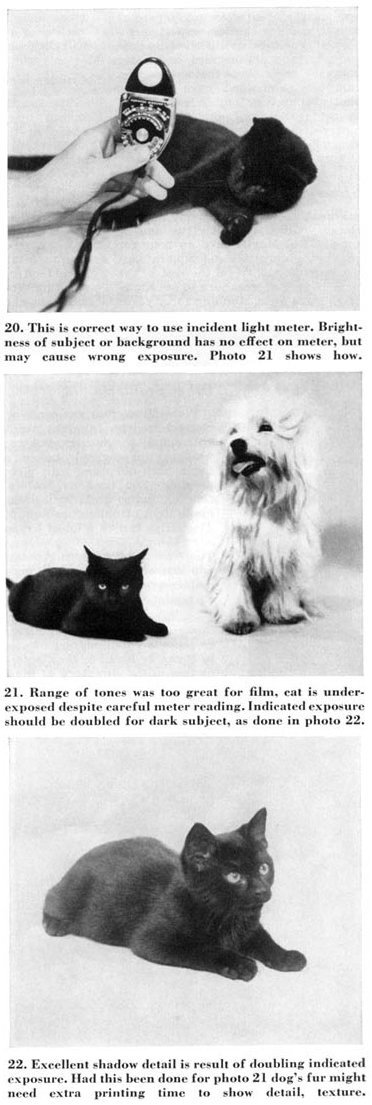
Sometimes the most important part of a bright scene is the highlight areas, but there are also shadows which shouldn't be lost altogether. Exposure may be adjusted so the greatest film density corresponds to the brightest important highlight. Take a close-up reading of the highlight area. Set the O on the computer opposite that reading. Parts of the subject less bright (down to 1/130 as bright) will be adequately exposed (photo 14). For meters without 0 scale, take a highlight reading. Multiply it by ten, turn the arrow to this setting.
Scenes with a brightness range much greater than the film's latitude can be given a compromise exposure. Take readings of darkest and brightest areas of the subject. Set the normal arrow midway between these points (photo 15). This is particularly good for color and movie work, where the film latitude is very small compared to black-and-white negatives. Here readings are taken of the brightest and darkest colors—disregard the brightness of black or white areas.
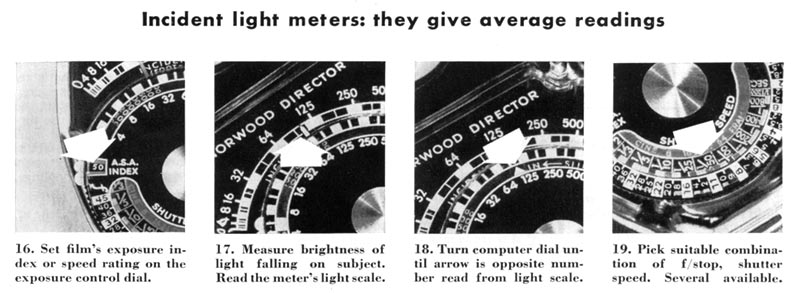
Incident light meters measure the light falling on or incident to the subject. The sensitive cell is pointed toward the camera from the subject position, exactly the opposite of reflected light meter technique. Exposure is calculated on the basis of this single reading, which assumes that the subject has a normal range of brightness that can be handled by film latitude. Usually, black-and-white film does have sufficient latitude, provided that the subject is not too far off "normal." However, where a subject has an extremely wide range of brightnesses, perhaps even greater than film latitude can handle, the incident light meter may lead you astray with its single reading (photos 20, 21, 22). There you must decide whether you want to save the shadows or the highlights. In general, for very dark subjects, give double the indicated exposure. For very light, bright subjects, halve the indicated exposure. If you are shooting color don't compensate more than x/2 stop for extra dark or over bright subjects. As with reflected light meters the principle of light substitution is helpful when the subject is distant or inaccessible. If outdoors, point the meter towards the camera from the direction in which the inaccessible subject is located. The assumption is that the light near the camera is of the same intensity as that on the subject. The meter illustrated is the Norwood Director, perhaps the best known incident light meter.
Incident vs. reflected light meters
Strong battles have been fought by partisans of the two types of meters. Actually, both types are capable of producing good results in the hands of an intelligent user. Each type has particular advantages. Incident light meters are particularly useful for color work and movies, where the films have narrow latitude and exposures need to be based on the average illumination on the subject. As a matter of fact, some makers of reflected light meters offer accessories to convert their products to incident light use. A new development is the dual purpose meter, designed for either reflected or incident light without the need for accessories. The Dejur Dual Professional is an example of this type.
As with any kind of equipment, exposure meters come in a wide range of prices and abilities. But, there is no magic connected with any particular brand name—they all need to be used with some thought. Follow the suggestions in this article and your exposures should be on the button.—the end