
The following column appeared in the September, 1979 issue of Modern Photography Magazine, beginning P. 6 — JO
Phototronics by Jim Bailey
Do you really need separate exposure meters for flash and continuous light sources? Maybe we've finally reached the point where one will do the trick!
 There was once a time when you could buy a flash meter that would check your flash exposures and/or you could get a conventional exposure meter which would tell you the proper cam-era settings to use with your floods or old Sol. Those were your only choices, though. While you still have these options it's our pleasant duty to inform you that you now have a third alternative.
How about a meter that will make both flash and continuous light measurements? You can get such an instrument for a couple hundred bucks or less. There are several available, each with its own features and drawbacks. To give you an idea of what they will do and what they won't, we tried out three different units of this intriguing type currently on the market. And while this column doesn't purport to be an "official test" of the models in question, we'll certainly let you in on our observations on and reactions to each unit.
First. I think we should review how most exposure and flash meters work so that the differences in the dual-mode meters will be clearer. A regular everyday exposure meter produces an electric current which is proportional to the tensity of the light falling on its cell. The current is read on a meter or digital readout panel in some convenient series of numbers so that (generally) all you have to do is enter the readings on a built-in calculator and read a range of proper-exposure shutter speed apertures once you've set the film speed.
With a meter of this kind, as long as you hold the on-off switch 'on' it will continue to measure the light intensity. If the light dims, the meter reads lower.
A flash meter is an entirely different animal. Because the output of a flash has not only intensity by duration as well, measuring its intensity alone will not give you enough information to determine the proper flash exposure. So what a flash meter has to do is come up with a number which is proportional to the intensity of the flash and the length of time the flash illuminates the subject.
The first flash meters did this by using a circuit that turned on the meter when the sensor saw the first inklings of light from the flash. A high quality capacitor then started charging up at a rate proportional to the intensity of the light. It continued charging as long as the flash was lit and then stopped charging when the light became too dim to keep the sensor turned on. A metering circuit then gave you a reading of the total charge contained in the capacitor.
Last versions of the flash meter added a second sensor which did the job of turning on the meter, and also a switch you could push to manually fire the flash from a distance.
Actually, these early flash meters worked much like a rain gauge except that a rain gauge stores the water that it catches and then it is read at precise intervals to get the rainfall rate in inches per hour, while the flash meter measured both the time and the light and, in effect, did the calculation internally. But, as you might suspect, you could run into some difficulty if the ambient light level was a bit high and you were forced to use ; rather slow shutter speed with your flash to sync with a focal-plane shutter.
This type of meter will register whatever light is present when the flash turns on the circuitry. However, the meter will call it quits maybe no more than one thousandth of a second later, while your film is going to be seeing the ambient light for ten to twenty times longer than that. So what do we do? We go back to the drawing board as the old cliche says.
Now all the more recently designed flash meters stay turned on for a precisely controlled time in the range of 1/50 to 1/125 sec, regardless of the duration of the flash it is measuring, so we can now get a more realistic assessment of the quantity of light our film is actually going to receive. Which brings us to the dual mode meters which can measure both flash and ambient light.
Electronics to the rescue
Wouldn't it seem likely that if you! were to push the flash firing button on a meter that measured whatever light saw for a precisely controlled length of time, that it couldn't care less whether it saw light from a flash or from the surf Exactly! It was just a matter of developing the sensors and circuitry that would be sensitive enough to read reasonably low levels of light, yet would be able to work with daylight intensities as well. Well, the three meters we're going to look at now won't measure moonlight (as some of their cousins that are intended exclusively for ambient light can) but they will handle a variety of situations quite admirably and not give a hoot whether they are seeing flash or continuous light.
However, (as usual) you have to pay a small price for the convenience of being able to measure both flash and ambient! light with the samerfneter. You don't get an actual reading until after the initial l/60th second elapses. That's fine; I can wait. The sticky bit is that to get anothei reading, you have to push the button again. In other words, you won't know if the light dims or gets better unless you deliberately take a second reading. There is no suddenly dipping needle to warn you of a change in the light. Indeed, you could hold down the button until your face matches the color of a silicon blue cell, but you won't get a continuous reading like you could with your old Weston Master.
O.K., let's get down to the specifics of our three meters.
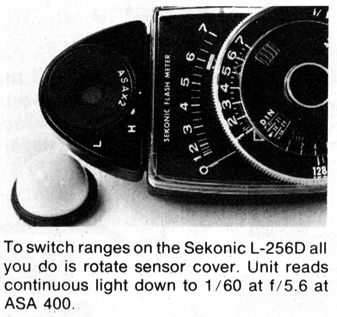 The first unit we'll look at is the Sekonic L-256D. It has a convenient moving pointer meter and operates over a seven stop range on its low scale and an additional six stops on its high scale by simly rotating its sensor cover about one-eighth turn. The meter comes with three different sensor covers so you can make reflected or incident readings.
A pushbutton and sync cord connector are also provided so you can trigger your flash directly from the meter to avoid being disturbed by othr photographers' flashes. Sekonic also includes two different sync cords so you can trip both negative ground and positive ground flash units. By using the pushbutton but not connecting a flash to the sync connector, th emeter will take regular continuous light readings.
You'd better move in close!
The instructions state specifically that you should make reflected light readings from as close as possible to your subject. That caution should be underlined. The sensor cover for reflected light measurements has a wide acceptance angle and can easily give you misleading readings if it is not kept close enough to your subject so that it only sees the area you really want it to read.
Like most light meters, the meter reading is transferred to a built-in slide-rule calculator and the proper-exposure aperture is read off a scale. the Sekonic meter has an 'on' time of 1/125 sec. and all the other shutter speeds can be read off the sliderule when you're measuring ambient light, just as you would with a conventional light meter.
An added feature of the Sekonic is that it can be used as a slave trigger for your flash simply by plugging your sync cord into the sync jack on the meter. When the main flash triggers the meter, it will also set off the slaved flash at the same time.
And finally, you also have your choice of making either single flash readings or you can fire your flash several times in succession while the meter totals the accumulated effect of the repeated flashes. In order to read single flashes you merely release the manual trigger button or switch the battery switch off momentarily to clear the reading. If you don't clear the first reading the meter automatically adds the illumination of each successive flash into its exposure calculation.
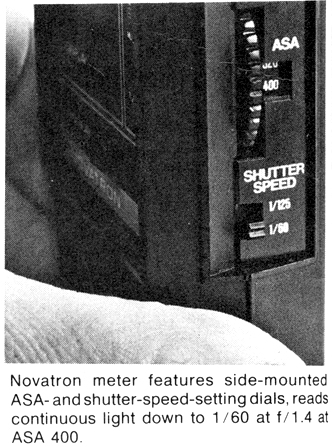 Our second meter is the Novatron N-3000 digital flashmeter. Instead of using a sliderule calculator this meter does all the calculations on a built-in microprocessor and reads out directly in f/stops stops in half-inch LED numerals. What's really nifty about this particular meter is that it has a selector switch that sets up the meter for either single or multiple flash readings.
In the single flash setting mode, once the capacitor has stopped charging, the microprocessor figures the aperture, stores it in its digital memory and discharges the capacitor automatically so it's immediately ready for the next reading. The aperture is displayed for about 1 sec. but the value is stored for as long as the power switch is turned on and can be redisplayed by pressing the 'display' button. A second flash will erase the first reading and replace it with the new one.
In the multi-flash setting mode, the N-3000 starts getting really cute. The aperture reading will get larger with each flash of course, but the first number you will see before the f/stop value will be the number of flashes the meter has seen! So after say. five flashes, the meter will display the number 5 and then the proper f/number for the exposure.
Changing from incident to reflected readings is simply a matter of flipping a small lever one way or another which moves a mirror in or out of the light path to select the proper window for each.
The microprocessor and display are designed to measure and display a ten stop range and you have the choice of two shutter speeds. 1/60 and 1/125 sec. selected by means of a slide switch. As with the Sekonic meter, you make continuous light readings by using the flash trip button without a flash being connected to the meter.
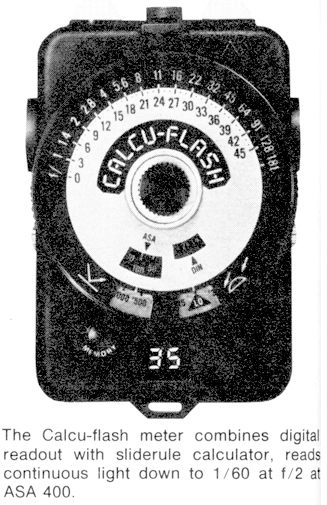 Our third and last meter in this comparison is the Quantum instruments Calcu-flash. This petite (4 by Vh by 1V4 in.) instrument has a bit of the other two meters in its design. This is not to say that it's a copy, it's just that it incorporates both a digital readout and a built-in sliderule-type calculator.
To take a reading you push a button and the power is turned on for about 1 min., after which it automatically shuts off. This same button also discharges the capacitor between readings. A second button trips any flash connected to the meter or makes ambient readings.
Any time during the 1 min. the meter is on you can take a light reading. Each time a reading is taken, the auto shutoff timer is automatically reset to 1 min. again. The amount of light is read on a j digital panel that has a scale that reads from '00' to '44'—in other words a 16-stop range. Next you transfer the reading to the meter's calculator and read the exposure settings as usual. A memory circuit holds the last reading until a new measurement is taken or until the timer shuts the power off. To recall the reading you simply press the memory button and the value flashes on the readout panel.
 The Calcu-flash comes with three sensor covers to make it possible to make both incident and reflected readings. A measuring interval of 1/60 sec. is used, and you determine the aperture for any other shutter speed by means of the aforementioned sliderule calculator.
An interesting additional feature of the Calcu-flash is that the designers calibrated the digital readout in units that can easily be converted to beam candle power seconds (BCPS) by using a chart included in the instruction manual. All you have to do is take an incident reading exactly 10 ft. from your flash and use the chart to make the conversion. They recommend that you buy an optional flat sensor cover for the most accurate results, but one of the incident domes will work just about as well. You could probably do the same thing with the other meters by doing a little reverse figuring.
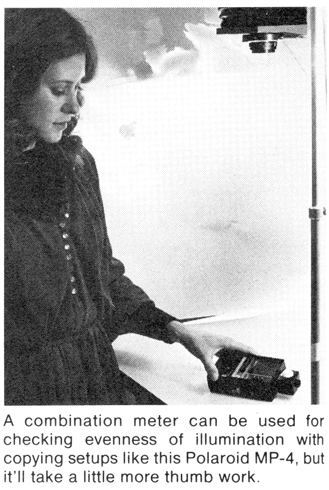
To summarize our findings, all three meters we've discussed will indeed measure both flash and existing light accurately. We proved this to our satisfaction by shooting a series of flash and ambient light pictures based on readings taken with each, using Kodachrome 25 film a calibrated SLR and 50mm lens. To reiterate, they're not intended for really dim existing light measurements and you will have to do a bit of extra button pushing to do jobs like checking the evenness of the light on a copy board or any other situation where you might have to check for hot spots. However, based on our "mini-test," all will do a creditable job whether used in the flash meter mode or as "regular" exposure meters. They're not cheap, but neither is a first class flash meter nor exposure meter these days!