
Exposure and Film Speed Sense
The following article appeared in the January 1962 (Vol 26 No. 1) issue of the now-defunct Modern Photography Magazine (pp. 58-59). It was written by John Wolbarst
To make beautiful negatives you must expose the film correctly. Here are some principles and practices to help you do just that.
Exposure and development are so interrelated that it is a mistake to try to discuss one without considering the other. For that reason, everything which follows is based on the premise that the film will be developed according to the film maker's recommendations. I know that developers made by independent manufacturers may also produce similar results, but I need some kind of a fixed starting point and that's it.
The film maker's recommendations, in combination with correct exposure, ordinarily are designed to produce the "normal" negative.
To accomplish this, a black-and-white negative film should be exposed just enough so that all important shadow details will be recorded sufficiently to print pleasingly. If this result is achieved, the film should also record satisfactorily all the other tones in the scene, including the highlights.
If you give the film much less exposure than this, important shadow detail will be underexposed or missing. This means poor image quality.
There's no point in giving much more exposure than this optimum minimum, since you already have recorded all the important shadow detail suitably. Heavy overexposure causes increased graininess and loss of sharpness, and kills off many of the tonal gradations.
Although it is possible to get correctly exposed films by guessing, or by following tables or rules of thumb, I believe that in order to make beautiful negatives consistently under a wide range of conditions you ought to use an accurate exposure meter correctly. Your meter measures the brightness of the light reflected from your subject (reflected-light type) or falling on the subject (incident-light type).
However, a mere measurement of the brightness of the light is not enough. In order to translate this measurement into meaningful exposure advice (use this shutter speed and that lens opening) you must first set the meter according to the light sensitivity or speed of the film. You will get this information from the instruction sheet packed with the film.
Know your film speed
As a guide to exposure the film makers have identified the light sensitivity of their products by means of a numerical system. Films with a low speed number (such as 25) are "slow" films that need a great deal of light in order to be used correctly. Those with higher numbers (125. 200. 500. 1600. etc.) are proportionately "faster" and can be used where there is less light.
At the present time the film speeds assigned to American-made films are based on a recently revised standard of the American Standards Association. These are realistic film speeds and should be treated with respect.
I quote the current Kodak film instruction sheet: "Properly used, this new speed number will normally lead to approximately the minimum exposure required to produce negatives of highest quality." The italics are mine.
Note that this is not the minimum exposure required just to produce any old kind of an image. This is approximately the minimum required "to produce negatives of highest quality." Misinterpretation or plain disregard of this simple statement is the key to a great deal of the nonsense about film speeds which appears in photographic magazines from time to time.
Here is a case in point. A photographer is in a dimly lighted place with an excellent 35mm camera loaded with Kodak Tri-X Pan—film speed 400. A careful meter reading indicates that he needs an exposure of 1/4 sec. at f/2 in order to make a portrait of his companion. So, he braces his elbows on the table, exhales, hopes, and shoots.
Distrustful of his nerves, jangled recently by speculation in the Singapore pickle market, our man shoots again, this time upping the shutter speed to 1/8 sec. Question: Is he now using a film speed of 800? He is not. Having read somewhere that all films have reserves of speed he shoots another, but this time at 1/15 sec. He says to his friend: "I am now using ASA 1600." She yawns.
Since he's gone that far he figures he might as well shoot the works, so he ups shutter speed to 1/30. Even he's awed as he informs his companion (who couldn't care less) that he's using Tri-X at 3200 (his meter says so). Wow!
So he develops the film normally. Wonders—his hand didn't shake. The 1/4-sec. exposure is clean and crisp; the negative has a beautiful range of tones from the highlights on his girl's face down to the texture of her mink. It looks as if it was shot in a studio.
The 1/8-sec. exposure isn't bad either. It prints well, but the mink is a bit too dark to see the fur.
The 1/15-sec. exposure also shows his girl's face pretty well. Of course, he used No. 4 paper and her hair is all one big black shadow and you can't see what kind of a place they're in.
He even gets a print out of the 1/30-sec. shot. True, it's No. 5 paper and she looks a bit rugged, and the negative was so thin he had to close the enlarger lens to f/16 and use a 3-sec. exposure. But there she is. more or less. He has proved you can use Tri-X at 3200 if you really know what to do.
What does it mean?
Actually, all our friend has proved is that all films have some reserves of speed; that a negative given one-half "the minimum exposure required to produce negatives of highest quality" is still likely to contain a fairly wide range of tones; that if you are willing to settle for a fairly sketchy, low quality image of the highlight areas of your subject, and know a few print-making techniques, you can underexpose a film tremendously and still come up with some kind of an image. This is particularly true if the subject is fairly light in tone and is flatly lighted without important shadows.
But Tri-X Pan still has a film speed of 400, in spite of all that.
The results would not have been much different if our friend had extended development 50 percent, or even 100 percent beyond the normal time. True, he might have increased the contrast, he might have built up the highlight areas a bit more, but he would not have increased the film speed much, nor would there have been much more detail visible in the deepest shadow areas.
Some meter use principles
Film speed numbers are calculated on the basis that they will be used with ''average" exposure meter readings. That is, measurement will be made of the exposure necessary for the highlights and for the shadows, and actual exposure will be for a middle tone somewhere between the two extremes.
Unfortunately, not all exposure meter readings take this into account. This is not surprising, since for many picture taking situations the "average reading" procedure can be awkward, time-consuming, and subject to error.
 In the following paragraphs I shall refer to the pictures at right.
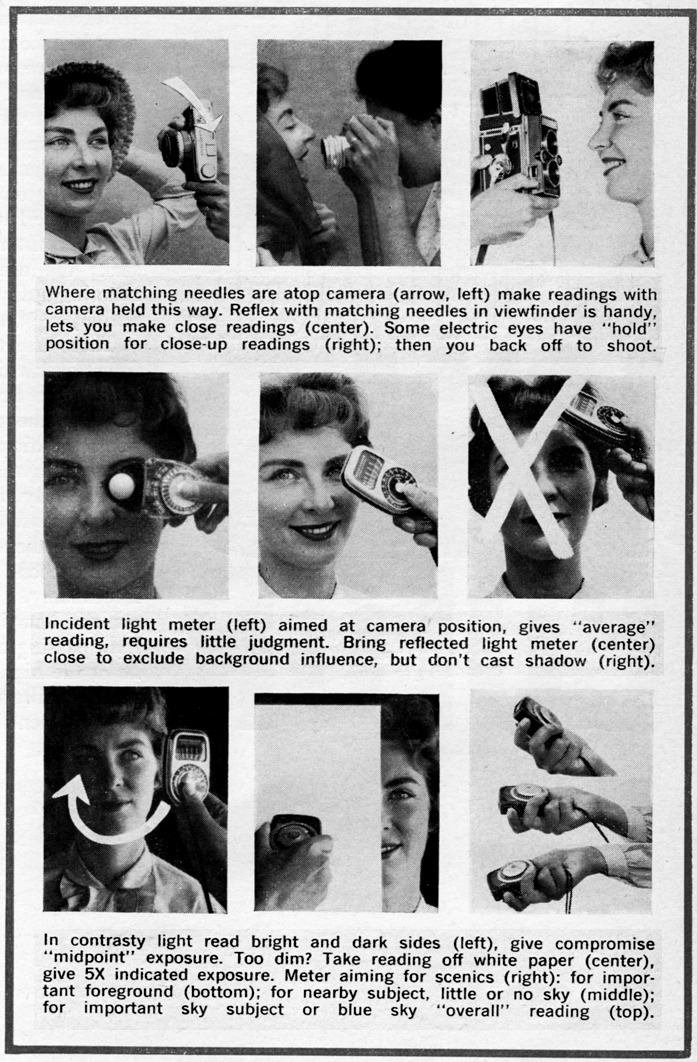
There are two main types of exposure meters: Incident-light meters (middle row, left) measure the brightness of the light falling on the subject. The meter's cell is aimed at the position from which the camera will be used. There are only a few such meters on the market.
Reflected-light meters (middle row, center) measure the brightness of the light reflected from the subject; the meter's cell is aimed at the subject. Virtually all built-in meters and most accessory meters are of the reflected-light type. A few can be converted to incident light use by adding an accessory; some of these are quite useful.
For black-and-white work, particularly for nearby subjects, I consider the incident-light meter to be preferable. Those with a "ping-pong ball" light collector automatically give the "average" readings for which the film speed numbers were intended. Those meters with flat light collectors ignore side light, which may introduce a small overexposure error at times.
With a reflected-light meter the proper way to get a correct average reading would be to aim the cell at a gray card of 18 percent reflectance (intended to represent an average middle tone) which is facing the camera position. Since most of us don't carry gray cards, our reflected light meter readings are likely to be less than ideally accurate. But there are simple substitute techniques.
For portraits in even light, take a reading off the skin (middle row, center) but give 2X the recommended exposure so as to get detail in eyes, hair, and clothing. With very dark-skinned people the 2X exposure increase is unnecessary, if you make the reading off the skin.
If your subject is in both bright light and shade, meter both areas (bottom row, left) and give an exposure halfway between the two extremes indicated.
For a reasonably accurate "average" exposure take your meter reading off a clean matte white paper held vertical and aimed at the camera position (bottom row, center) and give 5X the indicated exposure.
You can get a surprisingly "average" exposure for scenics by aiming the meter cell up at clear blue sky, away from the sun, and using that reading. Clouds will make this technique inaccurate.
The main cause of errors with reflected light meters is the effect on the cell of a very light or very dark background— the meter "sees" this in addition to the subject and the cell is affected by the light or darkness. Therefore, always try to get as close to the subject as possible without casting a shadow.