
you can click most images to see a larger version

BaselineOur patient today is a Soligor Digital Spot Sensor meter. It works but it has a rattle inside—something's loose. I'm told that it's also reading 1-stop off. This is the meter's left side (if you were to hold it up to use it). The label is visible. The other side is plain. There's a lens on the front. The collars are calculator dials for the meter; the lens is fixed and does not actually focus. If you have a needle-nose spanner or maybe a pair of fine tweezers, you can unscrew the front ring just inside the lens barrel and remove the glass for cleaning. The body of the unit is the middle. The eyepiece is in the rear and there's a rubber cup that can be twisted around to fit your eye comfortably, or easily removed. There is one red button on the side (visible, just in front of the label). There's also a large rectangular button on the front, like a trigger. |
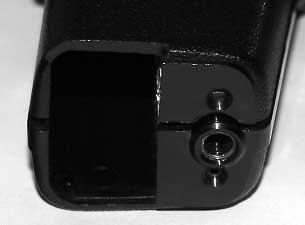
Removing the ScrewsFirst, I took out that big removable screw for the lanyard at the bottom of the handle. This screws into a standard socket so you could put this on a tripod if you're so inclined. There are two small, black phillips head screws at the bottom of the handle. They come out. I also took off the battery cover. On the right side of the meter handle (opposite the label side—not shown here), there's another black screw. I wasn't able to extract this. It goes into a post inside and the post was broken so the screw just turned but couldn't back out of anything. On any other meter, this screw should come out.
|
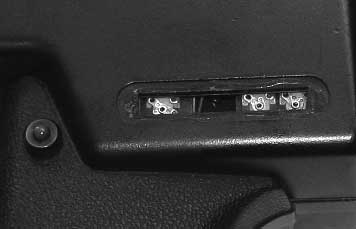
Removing the LabelI thought the label covered up some hidden screws, but no. It exposes three trim pots, which is how you adjust and calibrate this thing. Since I don't have the repair docs, I have no idea how to adjust them and I'm just going to leave them alone.. The label was stuck down with rubber cement, so it was persuaded to come up with some gentle prying with a knife blade. |
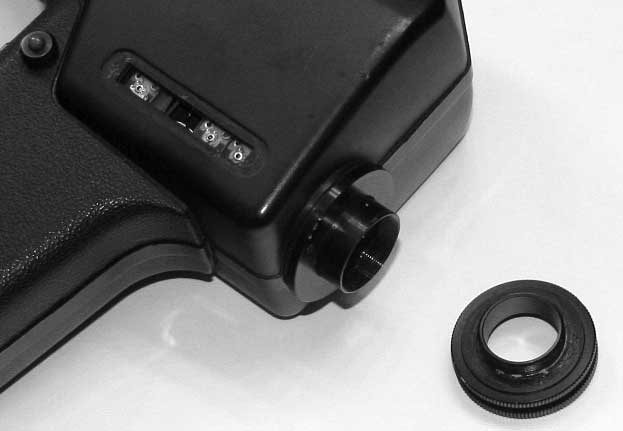
Eyepiece RemovalThis was the killer for me. It took me a while to figure this out. The eyepiece has to be loosened before you can open the clamshell case. There are several pieces to this. I don't have close-up lenses for my digital cameras so this is as close as I can get. But the eyepiece is in four pieces (five if you count the rubber eyecup). There's that big gnurled outer ring. You're supposed to be to turn that with your fingers for focus (mine was glued in place). If yours wasn't glued by a maniac, you should be able to unscrew this from the barrel and set it aside. This makes it easy to get to a disc that acts as a nut. The disc has two tiny holes in it, so if you have a spanner wrench with needle nose tips, or the speciality wrench made for it, you can fit it in the holes and unscrew this thing. Or you can do what I did: wrap a towel around it and undo it with a pair of water-pump pliers. A previous owner had been generous with the glue and everything was locked solid. Regardless, you don't have to fully unscrew it, just loosen it. That'll unpinch the clamshell case and let you open her up. If you do unscrew that nut, that will allow you unscrew the shaft (with the optical element inside) and extract it for cleaning, or to put a little grease on the threads if it's needed. This barrel threads into the final piece which is held captive inside the clamshell case. |
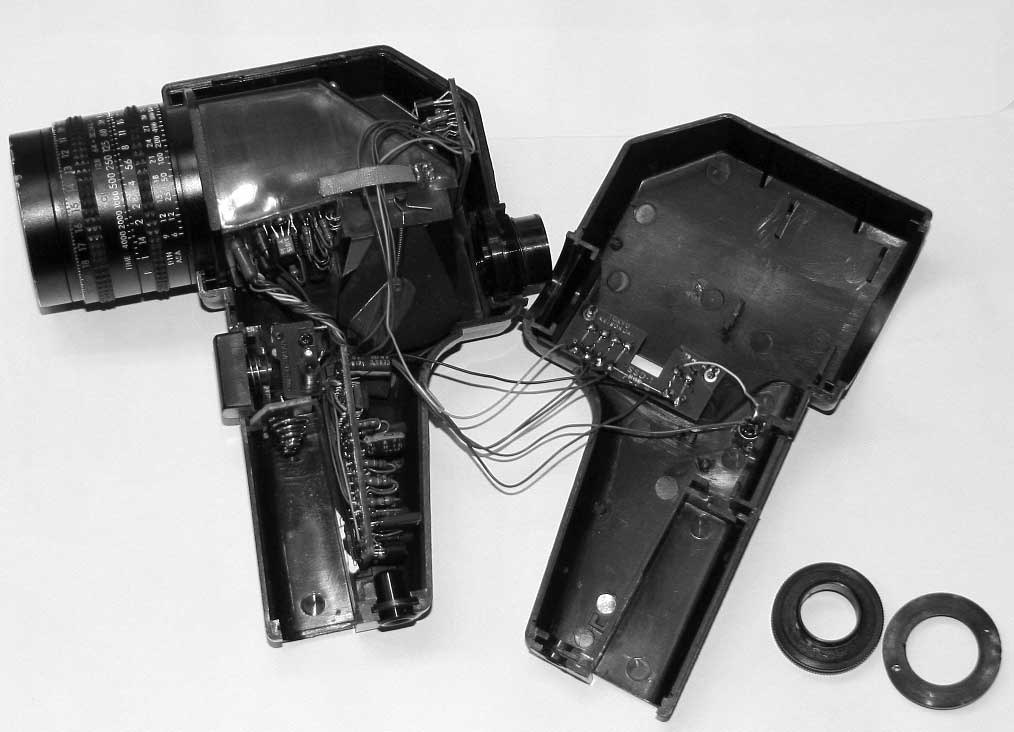
Voila!With the eyepiece slackened (or removed), the clamshell easily opens up to expose the guts. This guy's a lot more complicated than the others I've had open. It's hard to see here (sorry) but there's a PC board in the bottom handle, another PC board up under the mirror assembly, and another one on top of that 45° mirror. Plus bits and pieces elsewhere. So what was the rattle? The front lens is loose. I'll come back later with a photo, but the front lens is a single optical element and it's got a nut in front that's just like in most cameras: it's meant to be difficult to take out. It's got two tiny dimples on the top where you can take it out if you've got the needle-nose wrench. Or you can do what Thomas Toomsey advised in his Camera Repair books: give it a twist with a rubber tip--the removable kind of push-on rubber piece that fits on the ends of canes, walkers, metal chair legs, etc. They come in various sizes and they're good for twisting wide screws, and they won't gouge the metal and scratch paint the way a wrench can. |
| Main |