
This article originally appeared in the magazine Modern Photography, January 1960. It's dated but much of the information is still useful, particularly when evaluating older enlargers.
How to Buy and Test an Enlarger
by the Editors
Few photographers realize the importance of the enlarger in the production of excellent prints. They will discuss cameras, camera lenses, and developers with little thought to that instrument which will really determine whether the image on the paper looks like a smudged mistake or a brilliant creative picture. Contrary to the pap you may have been fed, there is far more to choosing an enlarger than determining the old question of which is better—condenser or diffuser. Accordingly, photographer and technician Edward Meyers here takes the enlarger in hand, as it were, and analyzes all the structural, optical, and mechanical features available on the market today, what each means and whether you need them. In the end, no picture on paper can be better than the man who makes it, the camera that takes it, and the enlarger which produces it. If you find that your old and seemingly faithful enlarger has been cheating you, now's the time to put a stop to it.
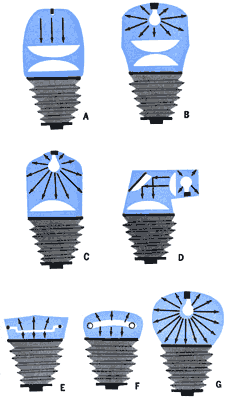
Which Illumination is Best? True condenser enlarger (A) utilizes point source of light and two condensers. It produces prints with maximum sharpness and most graininess. If magnification is altered, lens and condensers must be refocused. Typical condenser enlarger (B) uses frosted bulb. Two condensers focus slightly diffused light through negative. Result is sharp but grainy image. Condensers should be changed or refocused when negative size and lens is changed. Single condenser enlarger (C) uses frosted bulb, produces sharp image with slightly muted grain. Single condenser is often part of negative carrier (see below). Double condenser reflex enlarger (D) produces same quality image as (B); however, by reflecting light to negative with mirror, lamp housing is made more compact. Diffusion enlargers—grid type cathode tube (E), circular fluorescent tube (F), and frosted incandescent bulb (G)—produce visually sharp images with minimum noticeable graininess. These enlargers can take almost any size negative and lens since light is completely diffused and is not focused at any one position as with condenser enlargers. |
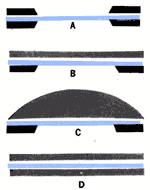
The Truth About Negative Carriers Glassless negative carrier (A) is best suited for negative sizes 2y4 x 2y4 and smaller. Although glassless carriers make cleaning glass plates unnecessary, larger negatives are apt to buckle from heat produced by the enlarger lamp or sag from their own weight. Compromise negative carriers—half glass, half metal (B)—and half glass condenser, half metal (C), hold negatives flatter. Double glass negative carrier (D) holds negatives completely flat regardless of size or heat. However, all four glass surfaces must be cleaned often since they readily collect dust and fingerprints. |
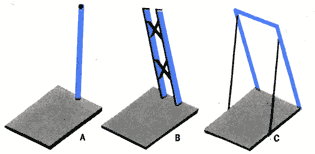
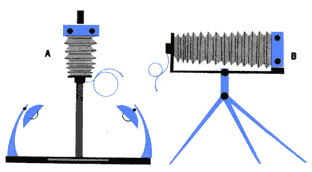
Supports Do Differ The single post (A), if well built, offers a firm support. However, if housing is raised for maximum magnification, vibrations can easily occur. The cantilever type support (B) and the triangular truss (C) offer more vibration-free enlarging. |
Camera or Special Lens? Although camera lenses are designed primarily for photographing objects in a three-dimensional field, they can often be used for enlarging (A). If you want the sharpest prints it's best to use lenses designed especially for enlarging (B). These lenses are built to project a two-dimensional object (the negative) onto another flat plane (the print paper). On some lenses it's difficult to see f-numbers in the dark. A few lens boards (B) have a built-in lucite dowel which projects a small beam of light onto the f-numbers. |
Focusing: Two Manual Systems Helical focusing mount (A) consists of two tubes, one of which screws in and out of the other. This mount is common to enlargers which take smaller size (16mm, 35mm) negatives since its limited focus normally lets you use only one focal length lens. Rack and pinion focusing mount (B) is more versatile. The bellows permits a greater range of focusing and therefore different lenses can be used. However, a bellows requires care since it's apt to wear out faster. |
|
Camera or Special Lens? Although camera lenses are designed primarily for photographing objects in a three-dimensional field, they can often be used for enlarging (A). If you want the sharpest prints it's best to use lenses designed especially for enlarging (B). These lenses are built to project a two-dimensional object (the negative) onto another flat plane (the print paper). On some lenses it's difficult to see f-numbers in the dark. A few lens boards (B) have a built-in lucite dowel which projects a small beam of light onto the f-numbers. |

Distortion Control: Do You Need It? To correct perspective distortions caused by camera position, such as the convergence of parallel lines, you must either tilt the enlarging paper or the negative when making the print. The simplest way is to tilt the negative, using an enlarger with tilting lamp housing (A) or a tilting negative carrier (B). However, with (A) you must use a small lens opening to get adequate sharpness over the entire print area. With (B) you have an alternative method. You can also tilt the easel. In addition, a lens board which tilts at the lens axis (C) provides a method of producing a sharp print when correcting distortions without stopping the lens down. |
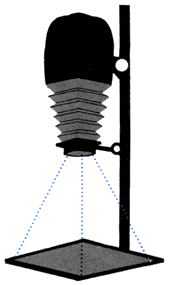
Can Big Blowups Be Made? Single post supported enlarger (A) can be rotated to project image on floor. However, weight must be placed on baseboard to prevent tipping. If enlarger can be turned at 90° angle (B) for wall projection, weight needn't be placed on baseboard. If you can't tip or rotate your enlarger, you can use mirror accessory (C). |
 |
Is Autofocus Precise? Once autofocus system's set, enlarger will focus automatically throughout normal magnification range. Relatively compact parallelogram system (A) is usual on small enlargers with single negative size. Cam track and wheel system (B) on enlargers accepting various negative sizes requires proper cam for each different focal length lens. It's somewhat bulky but usually quite precise. |
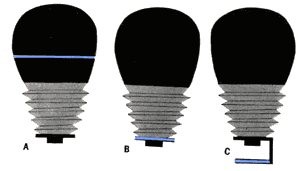
Where Do You Place the Filters? If you intend to print with multiple contrast black-and-white enlarging paper, or do color printing, the enlarger should offer a simple method of using filters. If you're printing color, a large filter drawer above the negative (A) which accepts acetate correction filters is best. However, if you're going to enlarge with black-and-white multiple contrast paper and you'd also like to print color, the filter drawer placed just above the lens (B) which accepts smaller filters is most handy. Filter holder under lens (C) works but reduces image sharpness slightly. |
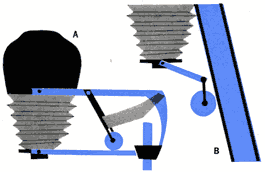
Can You Change Light Housings? Many enlargers can use more than one light source. Often an enlarger with a double condenser illumination system such as (A) can be fitted with diffusion light systems, cold light (B), or frosted incandescent (C). Condenser enlargers produce an image which may appear too grainy and too sharp. By removing the condenser lamp housing and replacing it with a diffusion unit, the same negative will print with less noticeable grain, less contrast, and will appear less harsh. A single diffusion enlarger can use many different focal length lenses, whereas each focal length lens change in a condenser-en-larger necessitates a change in condensers. 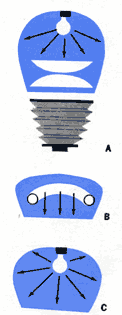
|
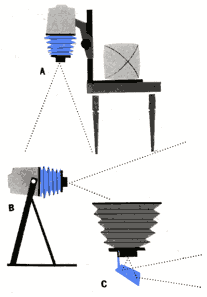
Does It Have Other Bonus Features? Some enlargers can be turned into a camera for close-up copying (A), and general view camera work (B). A sheet film or roll film holder, available as an accessory, replaces lamp housing on top of the bellows. For best results when photographing three-dimensional objects, camera lens with built-in shutter should be used instead of enlarging lens. |
Take Your Enlarger Home and Check These PointsIf you've purchased a new enlarger, perform these tests to make sure it'll produce top quality results. Why not put your old enlarger through the same paces? |
 3. Illumination Test With negative carrier empty, raise enlarger to project an area of about 11 x 14 in. on easel. At full aperture, focus projected carrier edge sharply. Make a test strip as if you were using a negative to determine enlarging time for light gray tone. Then, using this time, make a gray print on 11 x 14 paper. Close lens down three openings. Increase exposure 3½X. Make second print. Compare two prints. First should be darker in center than at edges. Second should have even gray tone. Here's why: Although most enlargers project more light through negative center than through edges at widest aperture, light fall-off should not be apparent when the lens is closed to opening you would normally use for printing. |
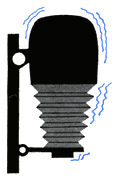 1. Vibration Test With your enlarger on a level floor, and no one in the room who might cause vibrations in the floor, raise the enlarger lamp housing to its highest position. Here vibrations will be most noticeable. Then gently push the top of the support post or stand, horizontally. A slight vibration of housing and post is allowable. However, both should stop vibrating in a few seconds. En-largers that vibrate when heavy traffic passes your house are to be avoided. |
|
|
Cap the enlarger lens. Turn on enlarger light. Extend the bellows slowly. Look for tiny traces of light (pinholes or cracks in the bellows). Focusing should be smooth. If it's not, search for missing gear teeth or for uneven friction wheels in focusing mechanism. To check lens alignment, place a carpenter's level on or against lens board. If all tilts are in zero position and baseboard is level, then lens and negative carrier should check out level with baseboard and with each other—if floor is level. |
 2. Alignment Test