This article originally appeared in the magazine Modern Photography, February 1954. It's dated but much of the information is still useful, particularly when evaluating older enlargers.
How to Buy an Enlarger
by Charles Coles, A.P.S.A
Buying an enlarger is like buying a camera—you have to know what you want. But, how many photographers really know what they want in an enlarger?
The purpose of this article is to point out the features, both desirable and undesirable, to look for in an en-larger, to explain how these features affect your print making, to list the conditions under which you may need or never need them. With this information in mind, buying an enlarger will become less of a hit or miss proposition than it might be.
What size negative should it handle?
This is a primary consideration and it's not as simple as it sounds. If you have only one camera and intend to work in that film size indefinitely, get an enlarger that will take that negative size and utilize most of its area. If you have several cameras, with different film sizes, or expect to enlarge other peoples' negatives, choose an enlarger that will take the largest size you are likely to work with frequently. This same enlarger will probably be able to handle the smaller sizes too. although there are exceptions to this.
The bigger the negative that an enlarger can handle, the bulkier and more expensive the equipment becomes, so don't choose a 4 x 5 enlarger just because you may someday have to enlarge a 4 x 5 negative. In a permanent darkroom a big, heavy enlarger is no problem, but it certainly is a nuisance to set up in a bathroom or kitchen for occasional print making.
No part of an enlarger is more important than its light source and there are several different kinds. They can be classified in two ways: whether lighted by an incandescent lamp or one of the so-called "cold lights," and whether the optical system is of the diffusion or condenser type. Advantages and disadvantages of all types are discussed on these pages. As will become evident, no single type of light source is able to supply all the characteristics desirable for all sizes of negatives. You must take careful inventory of your own needs, then match them against what each type can do.
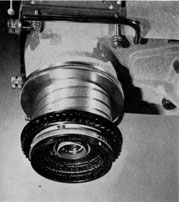
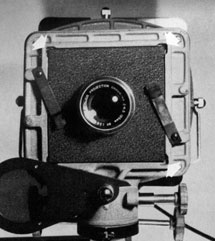
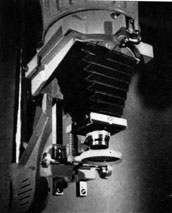
Condenser Type : Light source is an incandescent bulb. Its rays are gathered by pair of condensing lenses, concentrated,
and sent to negative in highly directional manner. Although early condenser enlargers had powerful pinpoint light source, such illumination
is undesirable for general photography. So, present day condenser enlargers use opal glass bulb which diffuses light somewhat. Such enlargers
have advantage of high visual brightness; image is easily seen on easel for focusing and composing. They enhance contrast of negatives. Both
characteristics are valuable with 35mm negatives; they usually are developed to low contrast, and to make big prints enlarger must be raised
 high. Unfortunately, graininess, scratches, dust, are also enhanced, more so than with diffusion enlargers, so extra processing care is
important. For negatives larger than 2¼x3¼ in., condenser enlargers become massive. Bigger ones, Omega D2 (right) for example, can be
adapted to smaller negative sizes by fitting appropriate lenses, negative carriers. For maximum efficiency and even light distribution,
matching condensing lenses should be used with various projection lenses. Check that they can be interchanged quickly and without major
surgery.
high. Unfortunately, graininess, scratches, dust, are also enhanced, more so than with diffusion enlargers, so extra processing care is
important. For negatives larger than 2¼x3¼ in., condenser enlargers become massive. Bigger ones, Omega D2 (right) for example, can be
adapted to smaller negative sizes by fitting appropriate lenses, negative carriers. For maximum efficiency and even light distribution,
matching condensing lenses should be used with various projection lenses. Check that they can be interchanged quickly and without major
surgery.
|
 |
 |
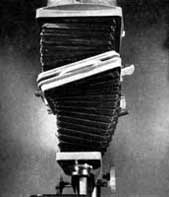
Diffusion Type: There are probably more diffusion enlargers in use than any other kind.
In contrast to highly directional rays which condenser enlargers send to negative, light in diffusion enlarger
approaches negative from all directions. Light source is incandescent bulb. Below it is piece of opal glass
which diffuses light rays to insure even light distribution. Hence, "diffusion" type. To get bright focusing
and exposing image, powerful bulb is needed; to protect negative, heat-absorbing glass is mounted in light path.
Due to light waste in this system, exposures have to be longer, for comparable enlargements, than in condenser
 enlarger. Lamphouse gets quite hot with continued use, which may cause negative to buckle out of focus.
They are not good for 35mm negatives: there is no condensing system to concen- trate light on small film area,
so bigi enlargements take overlong exposures; diffused light decreases generally low contrast of 35mm images.
Despite all this, diffusion enlargers have advantages. They are inexpensive; they suppress grain, dust,
scratches; they are satisfactory for negatives 2¼x3¼ in. and larger, which are generally developed to
considerably higher degree of contrast than are 35mm negatives. enlarger. Lamphouse gets quite hot with continued use, which may cause negative to buckle out of focus.
They are not good for 35mm negatives: there is no condensing system to concen- trate light on small film area,
so bigi enlargements take overlong exposures; diffused light decreases generally low contrast of 35mm images.
Despite all this, diffusion enlargers have advantages. They are inexpensive; they suppress grain, dust,
scratches; they are satisfactory for negatives 2¼x3¼ in. and larger, which are generally developed to
considerably higher degree of contrast than are 35mm negatives.
|
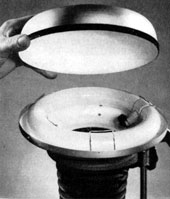
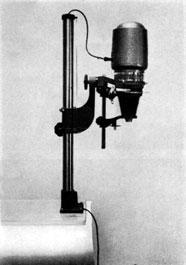
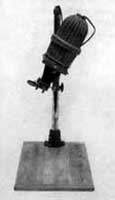
| Cold Light Sources: Two compact new light sources are replacing incandescent bulbs in diffusion enlargers. Circular fluorescent tube (far right) sends all its light into flat white dome, which reflects it evenly to negative. Aristo grid is cold-cathode tube bent back and forth; opal glass diffuses its light. Both types suppress effects of grain, dust, scratches, give excellent highlight detail. Print contrast is less than condenser type, by one half to one full paper contrast grade. This is unimportant with negatives of moderate to high contrast; may be problem with small, very low contrast negatives. Focusing is less easy than with condenser type as light is bluish, appears dim; but it's extra efficient photo-graphically, so exposure times are reasonable. Cold lights need few seconds to warm to full efficiency; best way is to keep them on. cutting off light with red filter or lens cap device. Cold lights are good for larger negatives, difficult to use with 35mm. Since high contrast makes a print appear sharper than lower contrast print of same subject, arguments have raged that condenser type makes sharper prints than cold lights. Tests have shown that for general photographic purposes all three types (condenser, incandescent diffusion, cold light) can give satisfactorily sharp images. However, where it is important to secure maximum contrast, cold light and other diffusion sources are not best choices. | 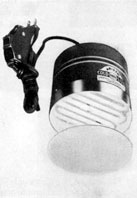  |
  |
Focusing: Manual or Automatic?
To give satisfactory service a focusing adjustment must be smooth in operation, must stay put where set. should not have any backlash or sloppiness in the controls. Two things have to be done to focus an enlarger: the entire head must be moved up or down to get the desired image size; the lens must be moved in or out to get it in sharp focus. Many a back has been strained hoisting the head of an enlarger. Check that it has adequate counterbalance, either in the form of weights or some spring, and that it moves with a light touch. You'll raise and lower it plenty!
The lens should always be focused wide open, to get maximum light, minimum depth of field (maximum aperture of f/4.5 is a great asset I. Then stop it down to about f/11 for sharpness, even illumination. Click stops on the diaphragm control are worth the money, save lots of fumbling in the dark. Automatic or semi-automatic focusing is an appealing feature, especially for people with tired eyes, lots of prints to make. It's particularly good with cold light sources which appear dim, bluish. Warning—unless the autofocus device is accurate to begin with, and stays accurate, it's just an expensive nuisance. Autofocus enlargers have a limited operating range—for ultra large or very small prints it's usually necessary to focus manually. Glass negative carriers are a "must". Check the system for wobble, see if the precise focus adjustments have lock screws to hold them where set, try to push the lens back and forth in its mount to test if it is seated firmly.
Three entirely different automatic focusing designs are discussed on these pages. Also shown are the two most common types of manual focusing mechanism.
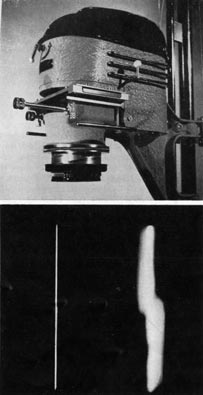 |
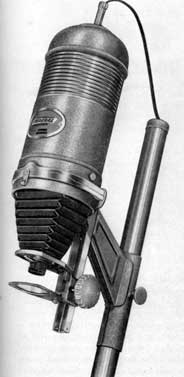
Illuminated Rangefinder: To focus novel Veigel Exact, enlarger head is raised or lowered to desired magnification, knob on front of enlarger is pulled out (as shown) causing picture image to disappear and project through lens onto easel two blurred, broken white lines (above, right). Lens mount is rotated until single, sharp line appears; control knob is pushed in, negative image reappears on easel but in sharp focus. Lenses are interchangeable for 35mm or 2¼x2¼ film and rangefinder is self-adjusting. |
| Pantograph: Leitz Focomat (right, 35mm only) and some other makes, use parallel arms and cam to actuate focusing mechanism. Pantograph is permanently positioned on upright column. Enlarger head, counterbalanced with powerful spring, is raised or lowered to desired magnification (indicated on small dial, far right). As it is moved, arms remain parallel to each other, enlarger head stays vertical, but angle between arms and head changes. As this happens, cam on one arm (far right) changes its position in relation to small follower wheel (directly below cam) on lens mount, causing wheel to move up or down. This raises or lowers lens-bellows assembly, focusing negative sharply on easel. Any looseness in system means end of accuracy. | 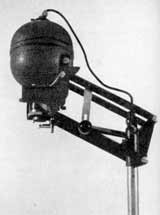 |
 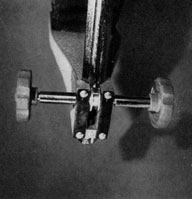 |
Two Manual Controls : Helical lens mount (far left) moves in or out as it's rotated. This is sturdy, trouble-free design. Due to limited travel of mount it's usually found with enlargers for small negatives. If you plan to make reductions, or use enlarger for copying, this is wrong type of mechanism. Friction control is simple, inexpensive, moves lens on end of bellows like folding camera. Dual knobs permit focusing with either hand. Lens must be held rigidly, yet move easily; tension should be adjustable for slippage due to wear. |
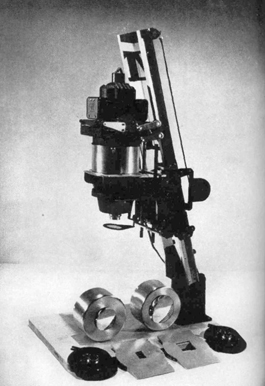
| Cam Track and Wheel: Simmon Automega (right, 35mm to 2¼x3¼ in.) is massive, precise instrument. Automatic focusing mechanism is actuated by follower wheel which runs on long, curved metal cam track mounted in channel beam upright {below, right). Wheel crank on rear of enlarger raises or lowers head to desired magnification by means of rack and pinion gearing. As follower wheel moves along cam track, curve of cam moves it in or out; through system of rigid levers, entire lens mount is moved straight up or down to get sharp focus. For such systems, each cam track must be cut individually to match focusing characteristics of each lens. By mounting two tracks alongside each other and shifting follower wheel to desired track, auto-focus control for lenses of two different focal lengths may be interchanged quickly to match lens in use. | 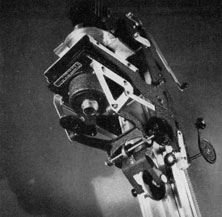
|
 |
 |
Desirable Mechanical Features
On these pages are shown some of the features that make the difference between darkroom struggles and pleasure. Some people may never have any use for an enlarger with all sorts of adjustments, and it would be a waste of money to invest in one. Also, the more tricks an enlarger can do, the bigger it is, usually. Keep these points in mind when the salesman shows you that it will practically recite Lincoln's Gettysburg Address. However, if you want to do more than just blow up snapshots of people and places, some of these features will be invaluable.
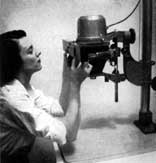
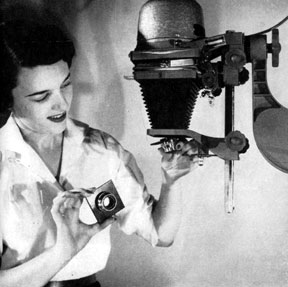
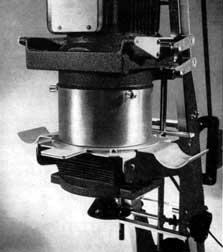
Compare the two pictures of the De Jur enlargers for the differences in height of the lamphouse. The tall chimney is typical of many condenser types while the squat dome contains an Aristo cold light grid. Thus, one enlarger may be equipped for either condenser or diffusion lighting, depending upon need. If you have to handle a wide range of negatives, with no room for different enlargers, such a feature may be quite desirable.
Some enlargers are equipped with press camera type lensboards, which are quick and easy to interchange where a wide variety of lenses is used often. This is not an invitation to use press camera lenses for enlarging. Unless they are of the symmetrical type (Goerz Dagor, Kodak Anastigmat f/7.7, etc.) camera lenses cannot perform as well on enlargers as projection lenses. At the close distances of use, they must be fully stopped down to cover the negative area sharply, and even that may not be enough to make up for other deficiencies.
 |
Vented Bellows: As enlarger is focused, bellows gets longer or shorter, with resulting change in air capacity. Unless it has some means of escape (arrow) air pressure can buckle negatives (in glass-less carriers only), be most annoying. |
| Long Bellows Draw: If bellows is long enough, enlarger may be used for reducing, copying, or making lantern slides, with proper attachments. Inquire about adaptability for such work. Check that bellows extends at least twice focal length of lens to be used. | 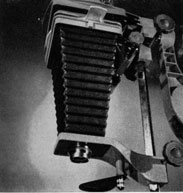 |
 |
Sturdy Upright: Any vibration of enlarger head means unsharp prints. Upright should be rigid, even when enlarger is raised high. Reversible Head: For big enlargements of small portion of negative, upright may not be high enough, or ceiling too low. Ability to rotate enlarger, project onto floor, helps. Baseboard must be securely weighted or fastened. |
Red Filter: This is handy for last minute focusing or composition after enlarging paper has been placed on easel. It's necessity, almost, with cold light sources to get maximum lamp efficiency. It should be mounted sturdily, in unobtrusive location.. |
Interchangable Lenses: If you enlarge from negatives of different sizes, interchangeable lenses are almost necessity to get proper covering power, big enlargements. Check that they are easy to change; also whether or not adjustments have to be made in enlarger's light source.
|
  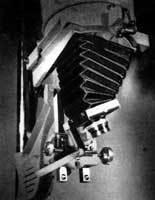 |
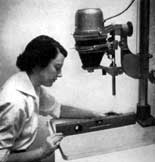
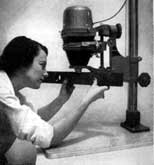
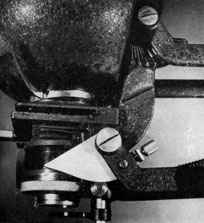
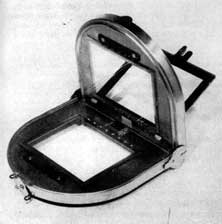
| Tilts and Swings: Most cameras do not have rising fronts or swing backs. One result of this lack is that linear perspective is distorted in many pictures of difficult subjects, such as tall buildings (camera pointed up), commercial pictures of machinery, products (camera pointed down). Much of this distortion can be corrected in enlarging. Simplest method is to tilt easel: this requires extreme stopping down of lens to get depth of field for sharp print; nearer portion of print gets overexposed unless heavily dodged. Tilting entire enlarger (Sun Ray, left) achieves same effect, has same disadvantages as tilting easel. Tilting negative carrier (De Jur, center) is easier to manipulate than easel or enlarger, corrects linear distortion too. If distortion is severe, lens simply may not have enough depth of field, even at small apertures. However, if lens can be tilted on its optical center (Sun Ray, right) useful depth of field will be increased enormously, so distortion correction and sharp print can be had. Tilting negative when easel is tilted also improves depth of field, but this is tricky adjustment. |
Negative Carriers. Illumination, Alignment and Other Problems
Any badly designed equipment is likely to be a nuisance. When it comes to giving headaches, no part of the en-larger can be worse than the negative carrier. Unfortunately, there have not been many improvements in carrier designs in recent years and the print maker is still caught between two fires: if he wants negatives to lie flat, there's the glass plate cleaning job. If he avoids this with a glassless carrier, there are buckling problems. There have been some ingenious compromises. In the Leitz Valoy and Focomat, for example, the negative carrier itself is glassless and the film rests in a shallow channel. However, the bottom of the condensing lens comes down flat on top of the negative, holding it in the carrier with little chance of buckling. There is only one glass surface to clean, but it is not too easy to get at it.
Some negative carriers come equipped with built-in focusing targets. These are a great help with dense or unsharp negatives, but work only with glass carriers. A surprising number of negative carriers are awkward to use, full of sharp edges to scratch negatives, likely to drop the glass out and shatter it, or simply don't hold the negative securely. Be certain you study the negative carrier closely.
 |
Internal Reflection: Surface of negative carrier which faces enlarging lens should be dull black to cut down reflections, stray light inside bellows. Edges may be bright metal. |
Rotating Carrier : When composing picture on easel it is often desirable to turn it one way or another. This may be awkward, particularly if giant print is being made. On many types of enlargers, negative carrier may be rotated instead of turning easel.. |
 |
 |
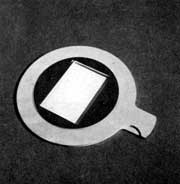
Glassless Carriers : Cleaning problems of glass carriers (opposite) are avoided by glassless type. They are metal plates with shape of negative picture area cut out. In some types, small ridge around negative opening grips film; in others, entire metal plate comes in contact with film. Unless handled carefully, such glassless carriers can cause scratches. Carrier should have guide pins or channel to hold negative in correct alignment, or it will move around. Best of glassless carriers can hold film in only approximate plane of sharp focus. They save time, effort, but are undesirable for autofocusing enlargers or when extremely precise workmanship is needed. |
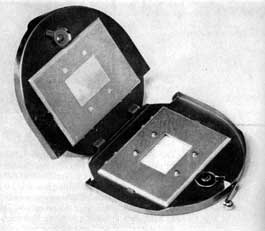
Glass Carriers : For holding film flat, double glass type carriers are best. They are absolutely essential for good results with autofocus enlargers or for any work requiring maximum edge to edge sharpness. They have disadvantages: there are four glass surfaces to keep free of dust, fingermarks. Some enlargers are adaptable to both types of negative holders; others are made for one type only. Carriers left and far left are from Federal. Either metal or glass holders may be inserted as desired. Check that glass is held securely, without danger of being cracked, that it is easily removable for cleaning, as easily replaced. |
 |
 |
Negative Roll Cups: Years ago photographers used to keep 35mm negatives in long, tight rolls, protected by little metal or paper containers. Enlarging one frame from 36 exposure roll meant that film was dangling all over. Accessory roll cups for enlargers were designed to support remainder of roll. This is excellent method of scratching negatives. Unless you are addicted to storing films in long rolls, or are forced to do so, this is unnecessary accessory may be harmful to important films. |
Color Printing: If you've advanced enough in skill to consider making color prints, remember that enlarger must have incandescent light source, which has high red content. Cold lights have discontinuous spectrum and are unsuitable for direct color prints or separation negatives from transparencies. "Color head" is simply place to put gelatin filter used to control color balance of light source. Filter should not be too close to lamp or heat will ruin gelatin sheet. |
 |
 |
Firm Grip: One problem with glassless carriers is that they may not have enough gripping area to hold negatives. This is particularly important with large sizes; about 3/16 in. on all sides of 4 x 5 negative should be gripped firmly by metal. |
Four different types of enlarger light sources were discussed. Here are some additional points to keep in mind.
Whatever the type of light source it should be confined to illuminating the negative and not the rest of the darkroom. Some enlargers leak light in all directions, from the ventilators in the lamphouse and from around the negative carrier. This is undesirable, may cause fog on your prints or ruin a batch of enlarging paper. When examining an enlarger in a well-lighted store this may not be obvious. A piece of dark focusing cloth thrown over the enlarger will give the effect of being in the darkroom.
Incandescent bulbs and circular fluorescent tubes burn out once in a while. Replacement should be simple; check that it can be done quickly.
If the enlarger has an incandescent bulb light source, check the lamphouse for adequate ventilation to be sure negatives won't overheat.
Even illumination is important, otherwise the enlarger will consistently make unsatisfactory prints. There is hardly any way to test this accurately in a store, but there is a simple darkroom test based on exposing a piece of high contrast (No. 4 or 5) enlarging paper.
Place a sheet of clear glass between the plates of the negative carrier. Raise the enlarger until the illuminated carrier opening appears on the easel slightly larger than a sheet of 8 x 10 paper; focus on the dust specks on the glass. Stop the lens down to f/11 and make an exposure sufficiently long so that with full development the sheet of paper becomes a medium gray tone. If the tone is the same from edge to edge, the enlarger has satisfactorily even illumination. If there are big differences in the gray tone, something is wrong. Be sure the lens is well stopped down, or natural vignetting may throw the results off.
In these days of small apartments and houses, there may be no space for a permanent darkroom, nor even enough to store a fully assembled enlarger. Some types are made to come apart and fit into a suitcase-like container. It is important that when assembled the en-larger be just as rigid as if it could not be dismantled.
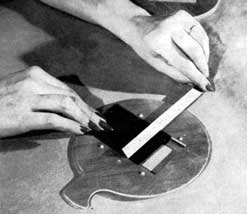
Alignment is important
Sometimes an enlarger turns out prints in which one side is always in sharper focus than the other. This may be due to a defective lens, but more likely is caused by misalignment. A simple test for alignment can be made with a good quality carpenter's level, as shown in the following illustrations.