The Cheap Digital Infrared Camera Project
Background
Infrared (IR) is that part of the electromagnetic spectrum that lies just below visible light, just as ultraviolet (UV) light is out there, just beyond what we can see. Some people may be able to perceive a little more than others, but humans are pretty much blind to it.
But film (and digital sensors) are sensitive to it. Cameras typically have, or you can buy, UV filters that take that little bit of visible UV out of your photos (UV appears as a lightly purplish cast on color images). IR is usually not a problem, but you can buy special film that's sensitive to it. People have been doing it for decades. That crappy old movie Galaxina had portions shot in Infrared to give it an alien look.
I had always wanted to play with IR photography but couldn't afford it. With film cameras you need to buy special film and you need (it's not absolutely necessary but it helps) an IR filter that passes IR but cuts visible light. Exposure is guesswork since you can't see the result until you process your film; you can't measure the IR because nobody (that I know of, anyway) makes an IR light meter, so you can't calibrate your meter and your film. You just have to guess and hope for the best. Making an IR light meter was another pet project, but got lost in the thousand other things I wanted to do instead.
Recently, Make Magazine put a link in their blog to a website by Zach Stern called How to Make a Digital Toy Infrared Camera, and posted his results here.
I had already known that digital cameras were sensitive to IR, and that they put filters in front of the sensor to cut it, so that only visible light hit the sensor. I also knew that most of the filters weren't perfect. If you have a television remote control that uses Infrared, you can actually see the light. Turn on your digital camera, turn on the live LCD monitor, hold the remote in front of the camera and point at the lens, then push a button on the remote. You should be able to see what looks like an LED or two blink on and off. But if you look at the remote without the camera, you can't see it. The camera can see IR—you can't.
I bought an IR-pass filter to play with, a Hoya Wratten #72, which passes IR but cuts most visible light. It passes just enough visible light so you can see to compose your image (but you can get other IR filters that cut all visible light).
Finding a Camera to Modify
Stern's article mentioned that the problem with digital cameras was that even though they're still sensitive to IR, that IR block filter they have makes them poorly sensitive to it; if you add a visible light blocker like a Wratten 72, you'll get Infrared, but the exposure times are miserable. So he bought a cheap (he calls it a toy) digital camera, tore it apart, found the filter and removed it. He replaced it with a visible light blocking filter so he had a dedicated IR camera.
I had not tought of that.
I didn't have a cheap digital. I had two relatively inexpensive ones, a Kodak DC215 and a Canon S100, the latter picked up cheap from a thrift shop because the flash card door was torn off. I repaired it but I haven't been too happy with it, so I was thinking of taking it apart. But the S100 has variable focus and I doubted I could do anything without ruining it, so I thought I'd practice on a camera similar to Stern's.
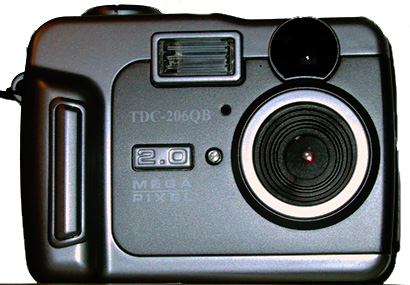
Before I could get to Ritz Camera (where Stern bought his), I was making the rounds of thrift shops and found a good candidate: it's unbranded but the model is TDC-206QB, a 2.0 Megapixel camera. It's a fixed focus model, very few bells and whistles, but I put two AA batteries and an SD card in it and it fired right up. Didn't take a whole lot of work to figure out how to navigate the menus. It's amazing—a small camera, about the size of a packet of cigarettes and maybe twice as thick, weighs very little, and yet it isn't too bad. It's not as good as my Kodak or Canon, but for the $17 the thrift shop wanted, it was a deal.
Disassembly
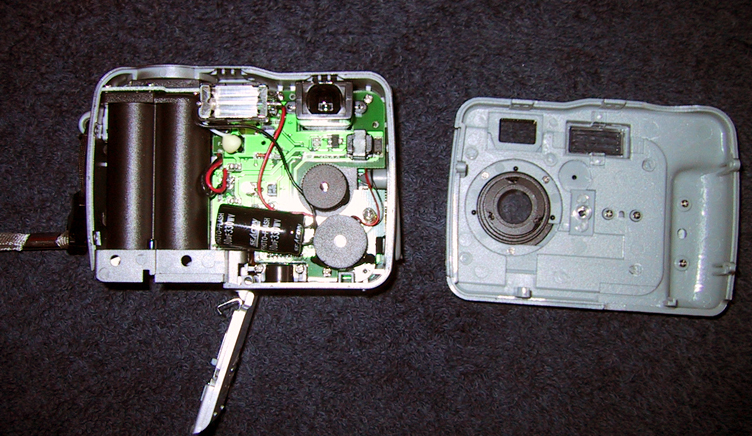
Taking the case apart without breaking it was easy once I figured out where the screws were. There are two on one side, one on the other, one hidden under a "FCC" label on the bottom of the camera, and three inside the battery compartment (though only the one facing the front needed to be removed). Two tabs on the top of the front face hook inside, so you have to persuade it to come out, but it will pop out.
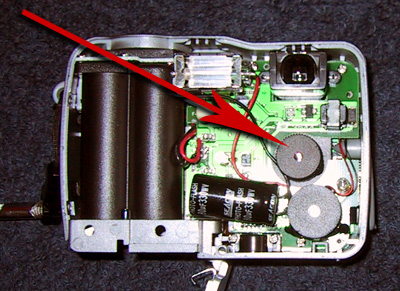
The lens is easy to see here: it's a black cylinder with threads on the side and a knurled edge so that you can adjust the focus by hand (might be useful for closeups). There's a glob of black glue on it (looks like smear of grease in this photo) to keep it from turning on its own, but the lens can be unscrewed and removed without breaking anything.
Surgery
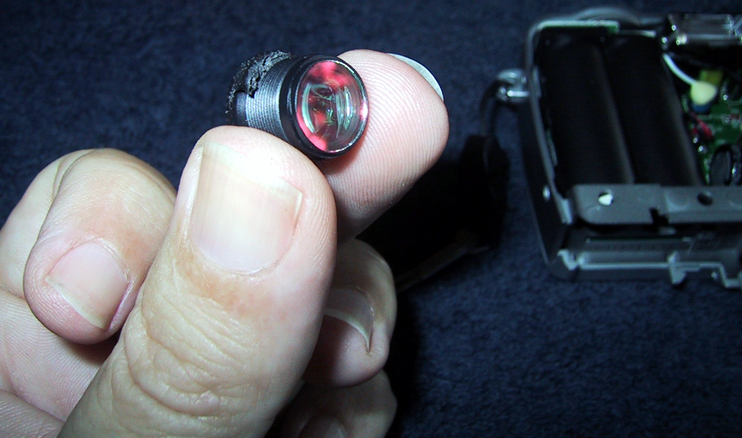
Here's the lens housing, shown in my fingers for scale. It's about the size of a thimble. You can see the small aperture and there's a convex lens behind it.
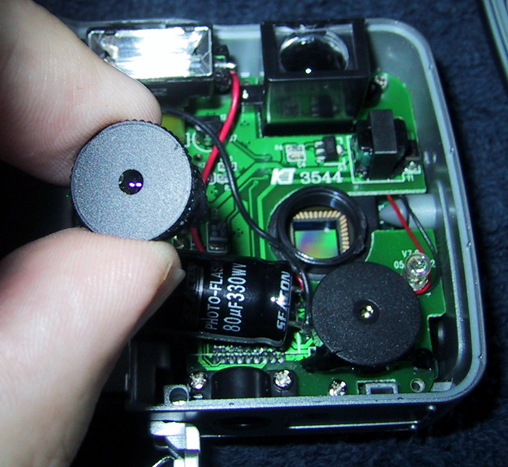
This is the back of it—there appears to be a flat piece of plastic here; you can see here that there's a red cast to this; I wasn't sure but gambled that it was my IR cut filter.
 The filter was mounted flush into the lens housing and there was no easy way to remove it, so I took an X-acto knife and began trying to flick it
off the back. About the fifth or sixth try, the filter popped off. Again, here it is in my hand for scale. The image isn't very sharp but that was
the best I could do.
The filter was mounted flush into the lens housing and there was no easy way to remove it, so I took an X-acto knife and began trying to flick it
off the back. About the fifth or sixth try, the filter popped off. Again, here it is in my hand for scale. The image isn't very sharp but that was
the best I could do.
Results
Reassembly was pretty quick and easy. The lens screwed back into place. I was able to turn the camera on without putting the front cover on it, so by looking at the LCD monitor, I could manually set the focus. I set it as well as I was able, aiming at a target about 20 feet away and also looking behind it, since almost everything I'll do with this camera will be landscapes I popped the case back on, put the screws in, reinserted the SD card and shot a couple tests. Time elapsed was half-an-hour, but that included a lot of time pondering which screws to remove, how to pop the cover, where the IR filter was located and how to remove it without destroying the lens. Now that I've done it, I could do it again in probably 10 minutes.
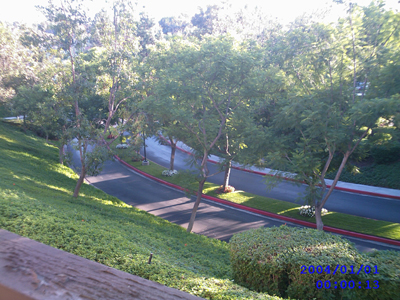 |
This is an image I took from my balcony before I opened the camera. You can see "normal" color. |
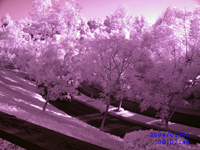 |
This is an image from the same location after I'd reassembled the camera. Note the change in tonality. The "red" was there as well, but I Photoshopped it a bit to make it more dramatic. |
Gallery
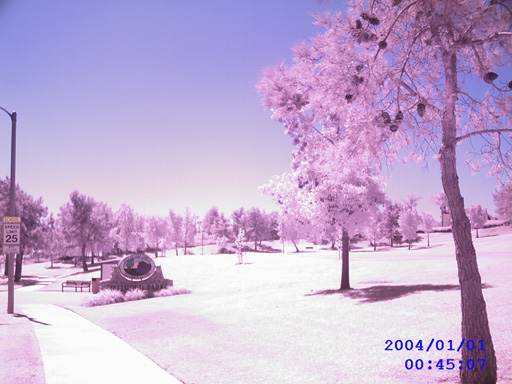
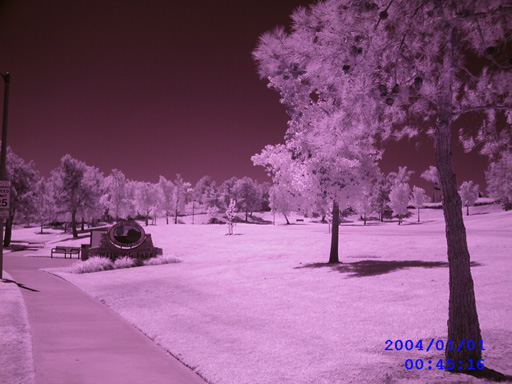
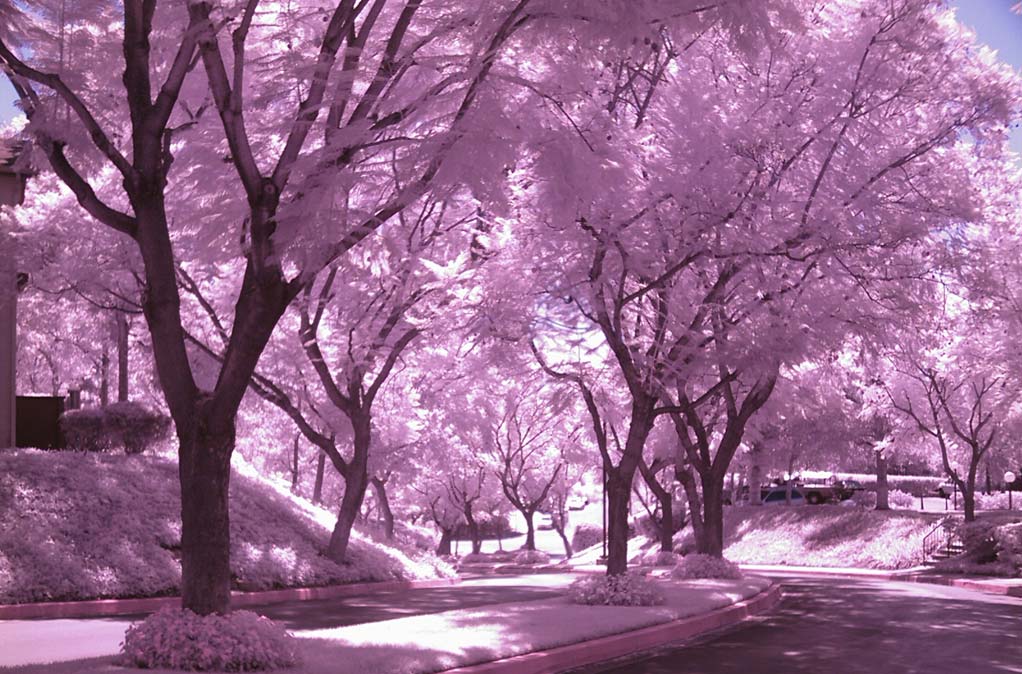
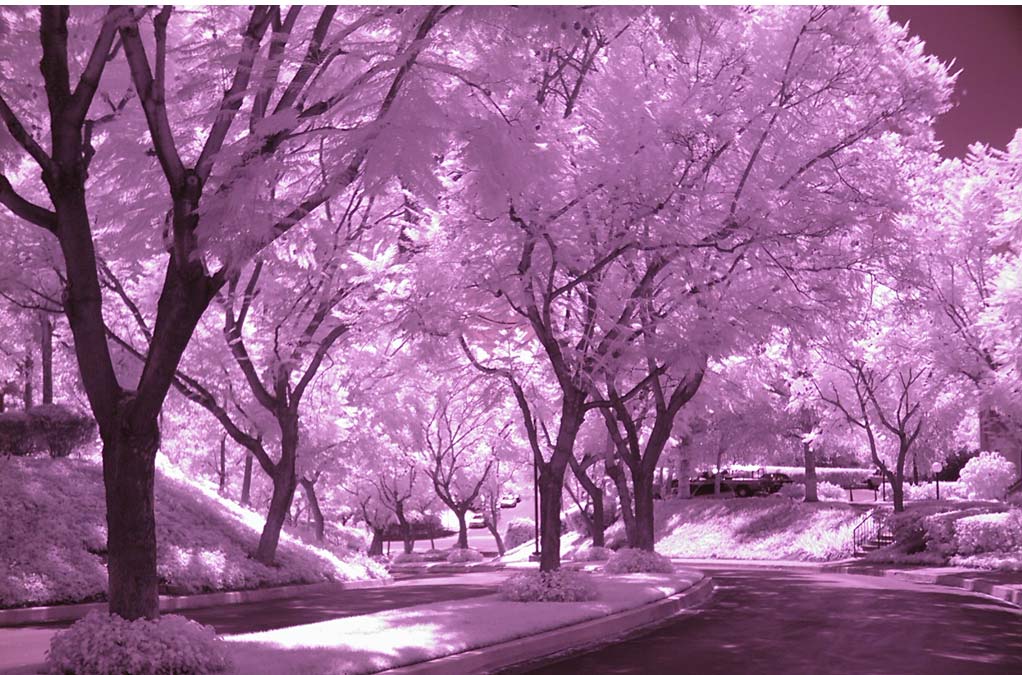
Examples of images I've taken. In each row from left to right, the left one was taken without a filter. The next one was taken using a Hoya R72 filter, and the one on the right is grayscaled and may have been Photoshopped by me to make it more dramatic or a better image. As always, click on the image to see a larger version.
| Without R72 | With R72 | Grayscale |
|---|---|---|
 |
 |
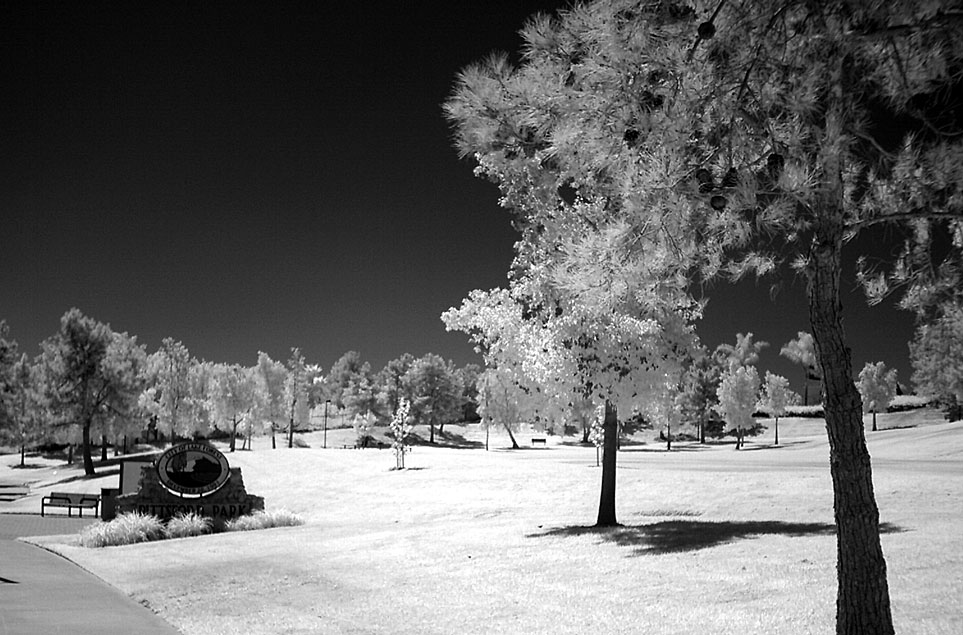 |
A local park. On the far left the camera could see both IR and visible light; note the tinge of blue in the sky, the dark concrete path, the brighter street signs, but the foliage is pretty much the same (foliage reflects a lot of IR). The middle photo is shot through the Hoya IR pass filter, so no visible light got through. Note the darkness of the sky, which doesn't reflect much IR. On the right is a grayscale version, Photoshopped a bit to make it look better. Since most of the color was gone from the R72 version, changing to grayscale really didn't alter the picture a lot; I just changed the curves to separate some of the grays (called mergers).
|
||
 |
 |
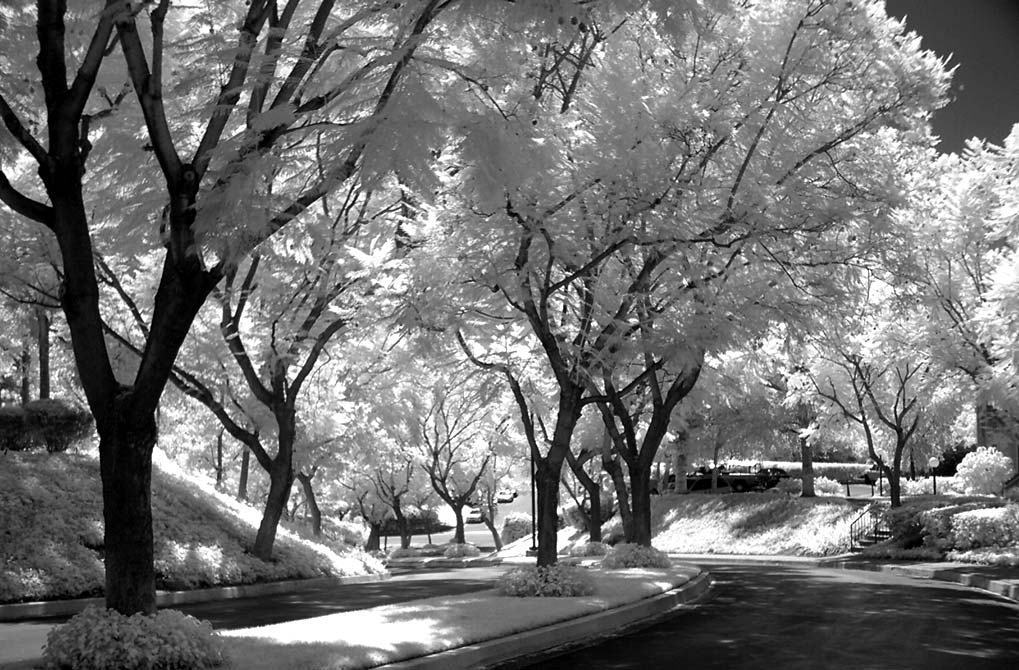 |
| My apartment complex's driveway. The left image was shot with no filter; note the bluish sky. The center image was shot through an R72 IR pass filter; note the sky is a little darker and most of the color is gone, but the images aren't very different. The right image is the center image after I changed it grayscale and played with the curves in Photoshop to increase the contrast and separate the mergers. | ||
Observations
- There is a little difference between shooting without a filter and shooting through an IR filter. When shooting foliage the changes aren't so pronounced, but the sky darkens dramatically when shot through a filter.
- I think the IR images are improved by going grayscale, particularly when making them contrastier. I haven't tried much with false color.
- I think the sensor is overloaded in bright sun without the filter. The IR filter cuts a lot of light, but a neutral density filter may also help. I'm not sure how my ND filters behave in the IR range, but it would be interesting to see.
Return to the main menu